

One reason many indoor gardeners decide to grow with hydroponics is to relieve themselves of the time consuming manual chores associated with watering plants. Automated irrigation has a strong attraction, but not many beginners realize that tradeoffs are involved and often find themselves swapping one maintenance chore for another unanticipated chore. Being freed from the chores of checking plants to see when they need to be watered, and from the actual watering when that time comes, is indeed a welcome time savings anyone can appreciate. However, aside from the time saved performing those chores, does your new schedule really give you any free time you can spend doing other things besides tending to your garden? Not surprisingly, for many people the answer is.... no!
The time tradeoffs for eliminating the need to check and water plants manually is the maintenance involved in seeing that the hydroponic nutrient solution remains fit for the plants to use. Many find soon enough that the fitness of their nutrient solution isn't a static unchanging entity, but rather a moving target that constantly changes positions throughout the entire day-to-day life cycle of the crop. The pH and TDS maintenance of the nutrient solution often unnecessarily keeps hydroponic gardeners captive to their systems. For those who had expectations of freeing up their time, this maintenance often becomes an unanticipated ball & chain. A ball & chain for one gardener can be a welcome opportunity for another to tinker with some new toys, however, in the end, the difference is only one of endurance. Sooner or later the joys of tinkering with meters and solutions wears off and evolves into the humdrum routines we call work. This article is meant for those who can admit they have a ball & chain, and for those who want to put some direction behind their tinkering so they have a handle on reservoir maintenance when the ball & chain are eventually noticed.
Having the ability to predict pH/TDS changes in your nutrient solution is a means of extending your free time away from the garden by reducing those uncertainties that keep you tied to it. To say the least, pH is the most elusive item we need to test for in hydro systems, with TDS being next in line. Through tracking pH/TDS changes, one is able to effectively predict where the pH/TDS will be at any point in the life of a nutrient solution. It should go without saying that anyone reading this article has a unique situation on his hands. Every indoor garden has things about it that make it different from other indoor gardens, this is especially true of hydroponic gardens. Your environment, your choice of nutrients, and your source water all come together to serve you with your own custom brand of required nutrient solution maintenance. This article will show you how to use your environment, your nutrients, and especially your source water, to your advantage. Instead of allowing those variables to control you and put you at a disadvantage, you will learn how to control them by anticipating their next move and be better able to predict where those moving targets known as pH and TDS will be at any given time.
Before one can predict, one must first track a solution to record its habits. This is the control track by which future solutions will be compared, predicted, or formulated.
First I should mention a few things that contribute to the accuracy of the control track when it's applied to the nutrient solution it will be predicting:
Predictability is based on using the control track for the same nutrient formula mix, and for a given stage of growth. The stage of growth is the prime moving target, for it drives the changes taking place in the nutrient solution. For example, the formula mix used in one of the examples below was mixed from General Hydroponics Flora Series components using 6.0 Micro/10.0 Bloom/2.0 Grow (ml/US gallon). The stage of growth is the 4th thru 7th week of induction (days 47 thru 68), and with a full canopy. If the same formula is used on successive crops at that stage of growth the control track will be the same, with all other things mentioned above being equal. It it were used starting on day 7 the control track would be completely different.
This method of using a control track is best suited for those who endeavor to grow with the same system (lights, nutrients, canopy size, etc.) over an extended period of time, and find predictability a definite advantage to have from crop to crop. Highly evolving gardens undergoing constant major changes from one crop to the next will need new controls when changes occur. Having said that, it should be apparent that this method would appeal to the more experienced hydroponic gardener who, through trial and error, has finally arrived at the garden configuration and hardware that best meets his needs.
The only difference between a control track and what you probably do now is that it entails recording daily pH/TDS tests. The end result is to be able to go for long periods of time without taking solution tests because you'll know what pH/TDS will be from the control track. I'm in the habit of taking daily pH/TDS tests of the solution mainly because I'm often experimenting with different mixes to find ways to manipulate pH to my advantage (more on that later). But when I plan to be elsewhere for an extended period of time (vacations, long weekends, etc) I use a mix I can predict from a control track, and it works very well.
I was convinced of the efficacy of control tracks when I went on a 10 day vacation during the time when a crop's peak water uptake was approaching. Knowing from previous crops that approximately 1.25 gallons per day would be used while I was away, I asked a friend to stop by only once during my absence, on the fifth day, with instructions to simply fill the reservoir up to the full line with plain tap water. To make things easy, I had 7 sealed gallon jugs prepared for her to use. When I returned on the 11th day, the reservoir needed 6 gallons (only 1/4 gallon from predicted), pH was just -0.02 from predicted, and TDS was +35 ppm from predicted. At one time, I never would have dreamed that a non-technical friend would be able to maintain my reservoir without knowing how to use a pH meter or make pH adjustments. Predictability paid off very well.
Control tracks can also provide other benefits. They allow you to actually see how the pH/TDS is affected by the addition or deletion of certain nutrients, not just at the time they're mixed into the solution, but over the next few days. This is apparent with the General Hydroponics Flora Series three part formula because it allows one the flexibility to manipulate the nutrient configuration and pH behavior in delicate ways. A benefit is that the nutrients can be used to control or adjust pH as well as to add back depleted nutrients, as is the case in one of the below examples. Also, when your growing environment does change substantially, rerunning a control track taken while the old environment was in place will give you a clue to the subtle differences occurring in the new environment because of that change.
Starting the Control Track |
A control track is simply a list of the pH/TDS measurements taken from your reservoir each day for the life of a nutrient solution. For consistency, the measurements should be taken at the same time each day, and when you perform your reservoir maintenance. After the lights first come on, and before the first irrigation takes place, is a good time to take measurements, and it ensures that all solution has had ample time to drain from the beds back into the reservoir.
There can be up to three pH/TDS measurements taken from the reservoir depending on the maintenance performed that day.
                  pH/TDS
Day Initial    Post-Add Back  Post-Adjustment
47  6.36/830                  6.22/1090
The above represents the day the solution was mixed, the first day of the control track. It's different from the rest of the control track because it deals with the old solution mix as well as the new one, and for those using tap or well water it deals with the stronger pH rebound effect commonly found in freshly mixed solutions. The Initial data is the way the previous solution mix was found before it was replaced. The Post-Add Back data is absent because this is the day the new solution was mixed. The Post-Adjustment data can be either the measurement taken immediately after the adjustment is made, or one taken just prior to the first irrigation after the solution had some time to sit for the pH to rebound, whichever is most convenient. In the above case, it's the reading taken just prior to the first irrigation.
You should preface your control track with details about the reservoir, the mix, your source water, and any comments of special interest to you, as in the below example. To keep this article to the point, it is assumed that elsewhere you would have recorded details about the garden configuration for this particular crop (eg-day of induction, lighting, canopy area, etc.).
Crop 20 3/28/97
SOL#3-(M6.0-B10.0-G2.0 ml/gal) General Hydroponics Flora
23.5 Gallon reservoir
no pH adjustment 6.03/1090
rebound 6.22 in 4 hrs (6.22pH/1090tds 74.6Deg)
Tap water 7.53/180
When tracked data is kept as part of an ongoing record keeping system the Post-Adjustment data for the last day of the previous solution will be available. If doing only an occasional track, that data will need to be added so the first day of the new solution will have a basis for tracking the changes.
46 6.27/800 6.27/800 6.27/800
Adding Data to the Control Track |
Adding new records to the control track is pretty straight forward. From here on, each of the three columns of pH/TDS readings will contain data, even if you didn't add back water or make any adjustments. It works like this..... When there is no water added back, the Initial data is copied to the Post-Add Back slot. When no adjustments have been made, the Post-Add Back data is copied to the Post-Adjustment slot. For example, on the second day of this solution the pH/TDS was initially found at 6.24/1110, no water was added back, and no adjustments were made. Nor were any add backs or adjustments made on the third day. The control track would now look like this:
Crop 20 3/28/97
SOL#3-(M6.0-B10.0-G2.0 ml/gal) General Hydroponics Flora
23.5 Gallon reservoir
no pH adjustment 6.03/1090
rebound 6.22 in 4 hrs (6.22pH/1090tds 74.6Deg)
Tap water 7.53/180
46  6.27/800     6.27/800     6.27/800
                  pH/TDS
Day Initial    Post-Add Back  Post-Adjustment  Note
47  6.36/830                  6.22/1090        S3 (Solution#3)
48  6.24/1110    6.24/1110    6.24/1110
49  6.16/1130    6.16/1130    6.16/1130
50  6.03/1160    6.14/1020    6.07/1040        0.79Bloom
On the fourth day, Day 50, there was water added back and an adjustment was made, so those columns contain measurements taken after each was performed. Whether you want to notate your adjustments as ml/gallon, ml/liter, or as the total quantity of ml's or grams of the product you used, is up to you. I favor ml/gal, which is what's displayed above.
It's not necessary to note the days when water was added back, it will become self evident when the track is finished. However, the volume of water added back should be recorded elsewhere, as you most likely already do that, or it could be kept with the control track data if that's more convenient for you. But it's not needed for the control track per se.
Each day the process is repeated until the solution is eventually replaced.
Finishing the Control Track |
To put the control track into a form that more readily interprets the changes that took place, some simple subtraction is applied to the data collected over the life of the nutrient solution.
46  6.27/800     6.27/800     6.27/800
                  pH/TDS                                   Changes
Day Initial    Post-Add Back  Post-Adjustment  Note       pH    TDS
47  6.36/830                  6.22/1090        S3         0.09
48  6.24/1110    6.24/1110    6.24/1110                   0.02   20
49  6.16/1130    6.16/1130   -6.16/-1130                 -0.08   20
50 +6.03/1160    6.14/+1020   6.07/1040        0.79Bloom -0.13 -110
Notice the two new columns added above under the label Changes. These are the results
of the following calculations:
pH - The Post-Adjustment pH for the previous day subtracted from the Initial pH for the day at
hand.
TDS - The Post-Adjustment TDS for the previous day subtracted from the Post-Add Back TDS for
the day at hand.
Color was added to the meter readings, as well as + and - signs, to demonstrate what's needed to
calculate the changes for Day 50.
The complete control track for this solution is shown below.
Crop 20 3/28/97
SOL#3-(M6.0-B10.0-G2.0 ml/gal) General Hydroponics Flora
23.5 Gallon reservoir
no pH adjustment 6.03/1090
rebound 6.22 in 4 hrs (6.22pH/1090tds 74.6Deg)
Tap water 7.53/180
46  6.27/800     6.27/800     6.27/800
                  pH/TDS                                   Changes
Day Initial    Post-Add Back  Post-Adjustment  Note       pH    TDS
47  6.36/830                  6.22/1090        S3         0.09
48  6.24/1110    6.24/1110    6.24/1110                   0.02   20
49  6.16/1130    6.16/1130    6.16/1130                  -0.08   20
50  6.03/1160    6.14/1020    6.07/1040        0.79Bloom -0.13 -110
51  5.95/1070    5.95/1070    5.95/1070                  -0.12   30
52  5.76/1090    5.76/1090    6.06/1110        0.64pHup  -0.19   20
53  5.88/1130    6.00/1000    6.00/1000                  -0.18 -110
54  5.88/1030    5.88/1030    5.88/1030                  -0.12   30
55  5.82/1060    5.82/1060    5.82/1060                  -0.06   30
56  5.82/1080    5.95/940     5.95/940                    0.00 -120
57  5.97/970     5.97/970     5.97/970                    0.02   30
58  5.98/1010    5.98/1010    5.98/1010                   0.01   40
59  5.98/1030    6.06/880     6.06/880                    0.00 -130
60  6.11/960     6.11/960     6.11/960         TDS batts  0.05   80
61  6.12/990     6.12/990     6.12/990                    0.01   30
62  6.13/1010    6.20/890     6.20/930         1.00Grow   0.01 -100
63  6.15/960     6.15/960     6.15/960                   -0.05   30
64  6.02/980     6.02/980     6.02/980                   -0.13   20
65  5.98/1010    6.06/890     6.06/890                   -0.04  -90
66  6.11/920     6.11/920     6.11/920                    0.05   30
67  6.09/950     6.09/950     6.09/950                   -0.02   30
68  6.13/980                                   S4(Sol4)   0.04
You can get a pretty good idea of the changes taking place, and the pattern pH often takes with source water of the type used for this track. It's signature is the effect that pH rebounding has on the first few days of the solution's life, followed by a period of strong steadily falling pH, followed by a tapering off period, and ultimately ending with a rising pH. The negative TDS values are the days when water was added back, approximately every third day.
Technique |
This particular nutrient solution wasn't chosen because it was a simple one, or a normal one, but rather because it shows the effects of two nutrient additions and one pH adjustment. It's more experimental in nature than it's meant to be put into practical everyday use because of the three adjustments used to maintain it during its life span. However, these adjustments can often be incorporated into the solution when it's originally mixed, so that no additional maintenance would be required during its life aside from plain water add backs. When you track the incorporated solution, and find the pH remains within the hi/lo range you've set for yourself, you will then have a maintenance free solution that only requires plain water additions.
To further appreciate the data, it should be seen visually, in a graph, with both the Changes and the Actual Readings displayed separately. IMHO This enhances ones perception far beyond mere numbers. If you record your pH/TDS readings in a spreadsheet each day, instead of on paper, you can have the calculations and graphs done automatically as you record them. Such a utility is available for download, this Excel workbook is filled with the same data used for the above control track, it should look familiar, you can clear the data then use it for your own control tracks. It will log up to 40 days of reservoir life, and you won't have to repeatedly enter your Initial daily readings if you didn't add back water or make any adjustments that day. It will also produce graphs almost identical to those shown below. It contains one macro, so you might get a virus alert from Excel if you have Excel configured to detect macros. There is no virus, but check it with your virus software first if you're worried. Download the Control Track software.
About The Graphs |
There are two sets of graphs below. The first, labeled SOL3, is for the above control track. As mentioned, it's more of an experimental control track than it is a solution mix you might want to use in normal every day practice, because of the adjustments. The control track was prepared in 1997, and partly because of it, a maintenance free solution was found to work with that particular system.
The second set of graphs, labeled SOL2, are for a different crop, nutrient mix, and lighting configuration than the first. This one is actually a better example of what a control track can ultimately produce where it relates to practical everyday use, because it receives no maintenance aside from plain water added back approximately once each week. The nutrient solution was General Hydroponics Flora series mixed at 7M-14B-0G (ml/US gallons).
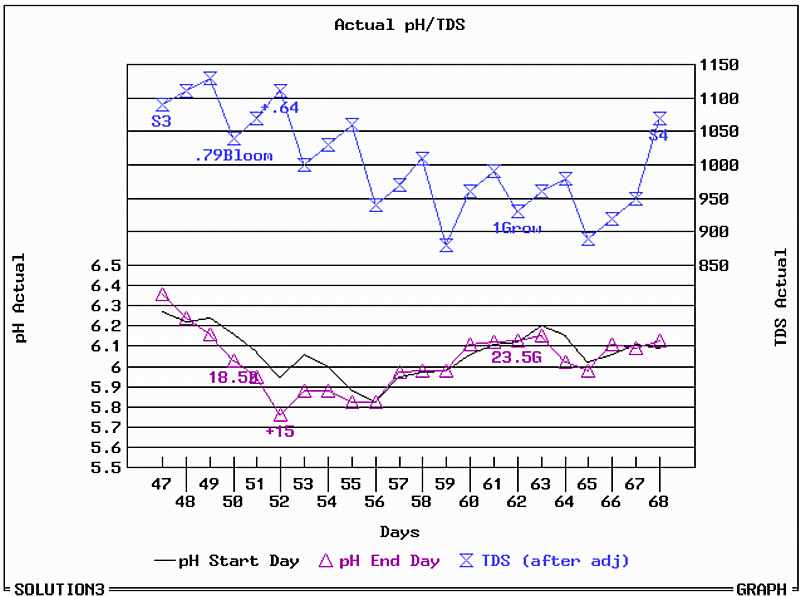
For both sets of graphs, the line graphs on the right hand side of your screen (the "Actual Meter Readings" graphs) have two tracking points where pH is displayed, unlike the bar in the Changes graphs on the left, which only track one pH metric. The black line indicates the Post-Adjustment pH from the day before, and the purple line (with triangle data points) indicates the Initial pH for the day at hand. For any given day, the area between those lines is the actual pH range the plants have seen during the past 24 hours, and are equal to the corresponding changes in pH shown in the bar graph on the left for that day. The TDS for the line graphs is the Post-Adjustment TDS for the day at hand. Also, the numbers shown in blue (.79Bloom) are for ml/gal, and the corresponding purple numbers (18.5B) are for total ml's. A + indicates pH Up, and a - indicates pH Down.
See the text below each graph set for some details about that control track. Click on a graph for larger image.
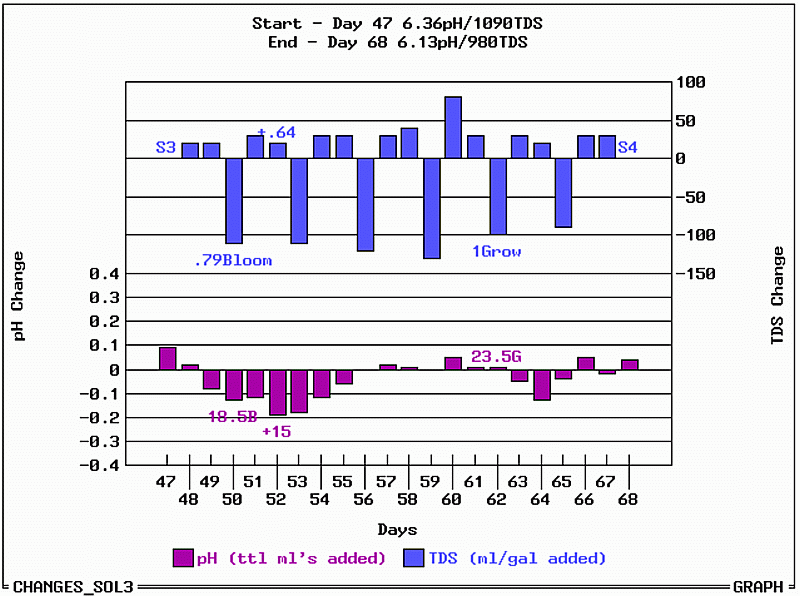
On Day 50 some GH Bloom was added to the reservoir. When the rapid fall in pH was noticed on Day 52, some pH Up was added because at that time I didn't want pH to go below 5.5. Had I anticipated the effect on pH from adding back plain water on the next day I would not have added the pH Up.
On Day 60 the high rise in TDS is mostly due to meter maintenance, the actual TDS rise was 30ppm.
On Day 62 some GH Grow was added to the reservoir at a point in this solution's life where the pH trend had tapered off and begun to rise. Notice its effect on pH over the next 5 days. Also notice how the add back on Day 65 briefly interrupted the descent in pH that would have occurred because of the addition of the Grow. pH rebound can have a profound influence on pH for days to come, often it manifests itself not as a direct rise in pH, but rather as a reduction in the degree to which pH would drop. For example, on Day 54 the pH drop would have been more severe had it not been for the add back that took place on the day before.
On Day 68 the solution was replaced, that was the 100% add back point for this reservoir mix.
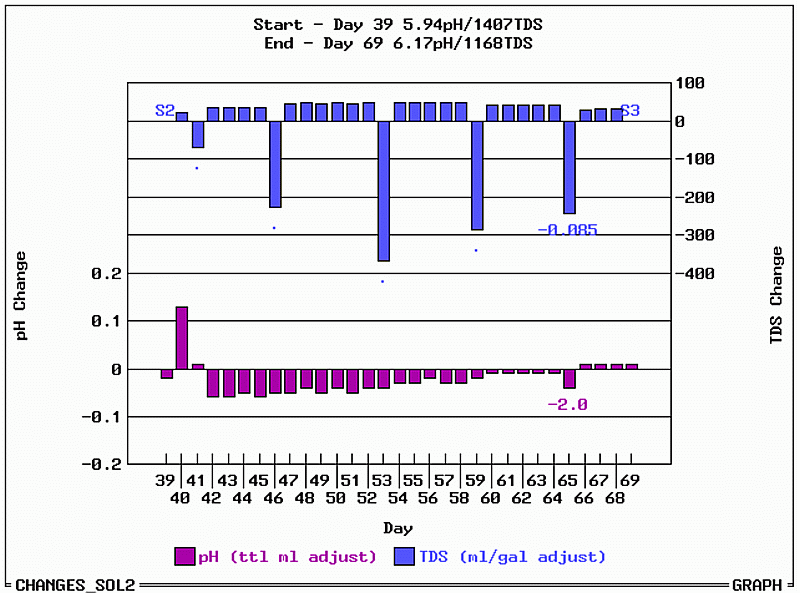
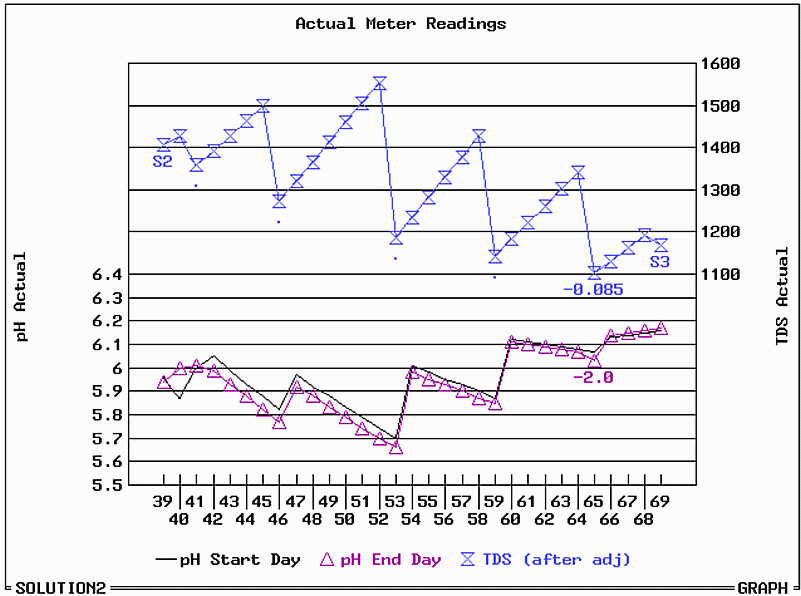
This better illustrates the behavior of a normal solution (not an experimental one) when it's allowed to run its course with only plain water add backs. Day 65 signaled the point at which add back water volume equaled that of the reservoir capacity, often called the 100% add back point. This solution finished at 125% on Day 69.
In the graph on the right notice that as the TDS rises the pH descends, until the reservoir has reached the end of its useful life.
In this graph, on the days between add backs, the pH/TDS data were not actual pH/TDS readings. They were calculated based on the measurements taken during the current add back visit and the previous add back visit, then averaged over the number of days in between visits.
In closing, I have to mention the difference between the changes you see above and controls taken from Hydro Farm powered Bloom nutrients to make a point about the types of Nitrogen found in hydroponic nutrient solutions. The Hydro Farm Bloom nutrients have a very high ammonium:nitrate ratio of 1:0.6, that's 60% of N in ammonium form. Compare that to the 1:16 (6% ammonium) found in General Hydroponics Flora Micro, and the 1:7 (14% ammonium) found in the Grow. This can have a drastic affect on pH control. With the Hydro Farm Bloom, the pH drops lasted longer and were prohibitively severe IMO. The "average" daily pH drop was -0.30 to -0.40, finally maxing out at -0.70 each day. Needless to say the reservoir required constant supervision and adjustments to keep pH from dropping out of range. A small change in these N type ratios can have a large impact on pH stability. Don't take types of N found in your nutrients for granted, and always read your labels carefully.
![]()
Copyright © 1997-2004 pH
