

There are many methods for asexual propagation, or cloning. Described here is one of those methods. It has proven itself with more than a 99.9% success rate.
The Cube |
Cuttings are rooted in rockwool cutting cubes. Cutting cubes can be distinguished from germination cubes by their larger square size (1.5x1.5x1.5 inches), a plastic wrap covering the sides, and a deep narrow hole approximately 1/8 inch in diameter in the center for inserting the stem of the cutting. Germination cubes generally have no plastic wrap, are slightly narrower at the base, and have a broad dimple on top that's usually only about 1/4 inch deep and around 3/8 inch in diameter.
The hole in cutting cubes usually extends about half way through the cube, or around 3/4 of an inch. I usually poke a 1/8 inch diameter pointed stick in the hole to deepen it to a point about 1/4 inch from the bottom of the cube (don't go through the cube). That allows for approximately 1-1/4 inch of stem to be contained in the cube. The more stem surface that comes in contact with the cube the better the chances are for more roots to form along the stem.
Pre-treating Cubes |
Treat the rockwool by soaking it overnight in a 5.2 pH half-strength nutrient solution (if you're using General Hydroponics nutrients, that would be 2.5ml of each component per gallon of water), one drop of Superthrive can also be added to the soaking solution. Then before using, squeeze out excess solution, and rehydrate with a 6.5pH solution of the same strength. In other words, you can mix a gallon of 6.5pH solution, then use some of it to adjust to 5.2pH for the soak. Use the remaining 6.5 pH solution until the clones root.
Rooting Products |
There are various products on the market used to promote rooting. They can be found in powder, liquid, and gel forms. Hormex, Clonex, Rootone, are just a few common brand names you might see. Many people claim the powders don't work as well a liquids or gels, I have to agree, probably because coverage and penetration of the stem isn't as complete as with a liquid or gel. A good product will produce roots quickly while preserving the health of leaves on the cutting. I've used HydroFarm liquid cutting concentrate and have seen much quicker rooting times than with powders, 7-14 days compared to 3 weeks or more using powders. Mix 1 part concentrate to 2 parts distilled water (I've seen labels printed incorrectly, so if you see a label telling you to mix at a 1:20 ratio, it is wrong and should be 1:2). The only problem I've encountered with this concentrate is that by the time rooting has taken place the health of leaves often suffer, many of them yellow and die off. Clonex Purple Gel, while rather pricey, has given me the best performance from a rooting product. Roots have appeared through the bottoms of cubes in as little as 6 days (8-11 days is about average), and leaves are as green and healthy as they were on the day the cuttings were taken.
When using a product like Clonex Gel it's best to pour off a small amount into a shallow test tube or other similar small narrow container suitable for dipping stems into, then discard what's left over after use. A narrow shallow container, just a little deeper than the length of stem you'll be dipping into it, will ensure that you won't be using more product than you need to, because of its cost. Dipping stems directly into the product container can contaminate the entire contents.
Taking Cuttings |
My cuttings are about 2.5 to 3.5 inches tall, plus another 1 inch or so below the surface of the cube. The stem width of my cuttings, at the cut, average 3/32 to 1/8+ inch. If the node spacing on your cutting is such that there isn't about 1-1/4 inches between nodes, trim off the lower nodes (leaf & shoot) with a razor blade so that there is enough stem to go into the 1-1/4 inch deep hole in the cube. You can do this before you remove the cutting from the mother plant.
To remove the cutting from the mother plants, use a new razor blade and hold a small piece of wood behind the stem to serve as an anvil for making a clean cut. Make a diagonal cut on the stem about 1/4 inch below the lowest node site, if you needed to remove nodes. If you didn't need to remove any nodes, and have about 1-1/4 inch of stem to work with, make the cut about 1-1/4 inch below the first node, this will put the first node just about even with the surface of the cube. After making the cut, dip the 1-1/4 inch stem in the rooting product for about 15 to 30 seconds, tweaking it to dislodge any air bubbles that may be present. Then gently push it into the hole.
You want the rockwool to hug the stem and actually come into contact with it, but quite often the diameter of the hole in the cube will be larger than the diameter of the stem. In such cases I use large tweezers. Spread them open, place one pincer on one side of the stem and the other pincer on the other side of the stem, then poke both pincers into the rockwool about 1/2 inch from each side of the stem, then squeeze them together, thus bringing the rockwool closer to the stem and closing up the gap in the large hole. Before moving the cube and cutting to the rooting chamber I label it, then rehydrate the cube by pouring some of the 6.5pH solution over the top of the cube and allow it to drain.
The first night the cuttings may droop, but the second day they will start to lift their heads. I've routinely encountered this wilt-like problem when using the HydroFarm cutting concentrate, but not with Clonex Purple Gel.
The Rooting Environment |
Leave the cube in a suitable propagation container at around 80 to 85 degrees F, with about 30 to 40 Watts/sq ft of fluorescent
lighting on for 24 hours a day. The cube should not sit in standing water. The environment should be humid & warm.
The container can be anything that lets light in, but in order to retain humid conditions inside the container it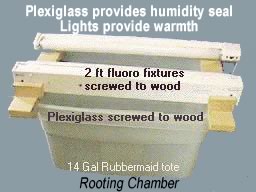 should be relatively sealed from the outside environment to prevent humid air from escaping and drier air
from entering. One can gauge humidity inside the container by how much condensation he can see on the leaves, or the walls
and ceiling of the container. When condensation has noticeably diminished you can spray the cuttings and the container
surfaces with some of the 6.5pH solution. You don't need to spray the cubes, as long as the container is kept humid no
water will be lost from the cubes, you don't want them to sit in standing water. A self-contained portable rooting chamber
is shown in the illustration. The flat plexiglass makes a good seal against the lip of the Rubbermaid container, the externally
attached fluorescent lights provide for both light and warmth, the container is plenty deep for even the tallest of cuttings,
and a lift of the lid provides easy access.
should be relatively sealed from the outside environment to prevent humid air from escaping and drier air
from entering. One can gauge humidity inside the container by how much condensation he can see on the leaves, or the walls
and ceiling of the container. When condensation has noticeably diminished you can spray the cuttings and the container
surfaces with some of the 6.5pH solution. You don't need to spray the cubes, as long as the container is kept humid no
water will be lost from the cubes, you don't want them to sit in standing water. A self-contained portable rooting chamber
is shown in the illustration. The flat plexiglass makes a good seal against the lip of the Rubbermaid container, the externally
attached fluorescent lights provide for both light and warmth, the container is plenty deep for even the tallest of cuttings,
and a lift of the lid provides easy access.
It is strongly suggested that you don't move the cuttings to check for roots until the eighth day, roots hairs can be extremely thin and are torn easily if the stem is twisted in the hole. Also, keep in mind that the longer you have humid conditions the more likely it is to develop mold or fungus, rooting quickly is the best way to avoid lengthy humid conditions, and you will root quickly if you don't disturb the cuttings prematurely.
Acclimatizing Freshly Rooted Clones |
When you first see the cutting is rooted through the cube bottom you can stop spraying and start watering the cube, let the solution drain from the cube. This is a critical time, and the first sign of roots doesn't mean they can be introduced to a new drier environment. I suggest you wait until the day after you've first seen roots before you attempt acclimatizing the clones. Open the tent a little to allow humidity to escape, and check the clones every 20 minutes for the first hour or so. If you notice any wilting, immediately spray the leaves and container interior and close it to return the cuttings to a humid environment, then try again the next day. If, after the 1st hour you have no wilting, open the tent a little more, and check every hour. After about 4 to 6 hours with no wilting you're ready to rock 'n roll.
If you have some rooted and some not, you can keep them all in humid conditions for a couple more days. In some cases I've used a large drinking glass or clear plastic cup to cover only the cuttings that still need humidity while leaving the lid of the rooting chamber ajar for the cuttings that can handle the drier air. The point of this is that you want to get away from the high humidity as soon as you can to avoid any threat of mold or fungus.
Tips |
Use a fresh mix of nutrients, and keep the bottle sealed. pH can shift radically but usually wont do so for the first 10 days if the bottle's kept sealed, out of light, and at room temperature. After about a week it's wise to start checking the pH of the solution each day so it won't shift too much before you catch it.
Don't forget HUMIDITY, HUMIDITY, HUMIDITY. But don't overdo it for too long or you risk mold and damping off.
Once clones have rooted and are growing without the humid conditions, you may need to store them for a while before transplanting them to their new home. I usually put the newly rooted cube in a very shallow round container about a 1/16 of an inch deep. Cutting off about 1/16 inch from the bottom of a plastic drinking cup works great. I water the tops of cubes and allow the shallow container to fill with solution. This holds some solution and keeps the roots from air pruning so they can still develop further while waiting to be transplanted, it also buys you some time so you won't need to check the cuttings as often. The solution will be used fairly quickly in the drier air so there's no danger of drowning roots. Just make sure the container is very shallow. It also serves to contain the roots, and they will grow in a circular direction inside the container. When time comes to transplant you'll have nice long roots with no air pruning having taken place.
Clones rooted in rockwool cubes can be transplanted into any media. I've taken clones rooted in rockwool and transplanted them directly into a pot of soil with no problems at all. As long as roots can be seen coming from the rockwool cube it can be transplanted to soil as if it were a ball of soil. You can remove the plastic wrap, but don't remove the rockwool, because the joy of rockwool is that there is virtually no transplant shock from disturbed roots.
![]()
Copyright © 1997-2004 pH
