
Filtering, Tapping, and Dispensing
-This section will discuss how to filter your beer. Home-brewing supply stores will often sell expensive filtration systems that you can buy at a hardware store for much less.
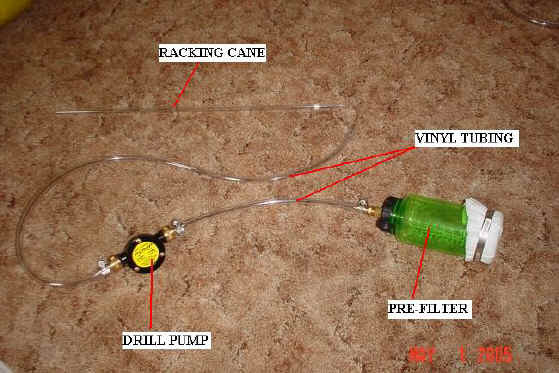
-To filter the beer you simply hook up Vinyl tubing to a racking cane, then to a drill pump, then from the drill pump to your filter, then from your filter to your mini keg. 3/8" ID tubing works great, any larger and the beverage does not flow as well.
-The pump hooks up to a drill to power it. These are found at most hardware stores for 5-20 dollars. Make sure to get appropriate fittings to hook this up to your tubing.
-The filter housing is a 10" whole house water filter housing. I recommend buying a clear one so you can see what is going on in the filter. Make sure to get appropriate fittings to hook this up to your tubing.
-The filter inside of the filter housing is a standard 10" sediment filter. Make sure not to buy a filter that has carbon in it, that will ruin the beer. I recommend using a filter that is rated from 5 to 1 microns, this will filter out any residual yeast.
-BEFORE EVERY USE, THIS EQUIPMENT MUST BE SANITIZED. To do this I usually pump a solution of One Step Sanitizer through the system, then pump just water through it to rinse out the sanitizer. Then drain any leftover water out of the filter housing prior to pumping the beer.
-Once you are ready to keg your beer, simply insert the racking cane into the carboy as you would normally do, then pump the beer through the filter into your sanitized keg.

-If your beer has a lot of sediment in it (because you did not use a grain bag etc...) you might want to run the beer through a pre-filter, into a bottling bucket, prior to pumping it through the filter. This will help prevent clogging the whole house filter. If you use a nylon grain bag during the brewing process, this step is probably unnecessary.
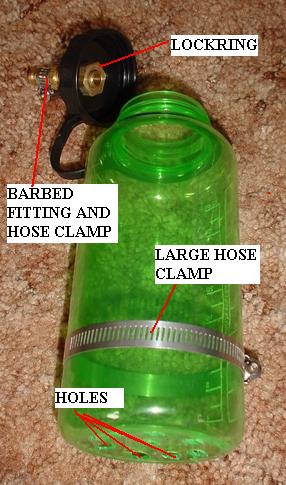
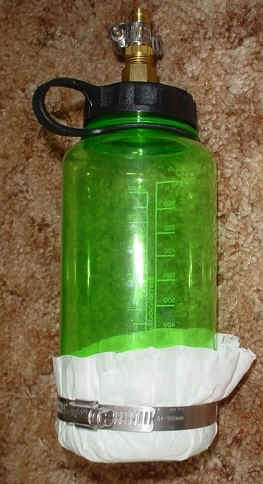
-To make this pre-filter, simply take a "Nalgene" type water bottle, drill several holes in the bottom, attach a barbed inlet to the top of it, attach 2 coffee filters to the bottom of it, then hook it up to the drill pump.
-Prior to using the pre-filter (if you actually need to use it), the system must be sanitized and rinsed the same way the whole house filter was.
-Note: If you use the pre-filter, you will pump the beer from the carboy, through the pre-filter, then into a bottling bucket. From the bottling bucket you will pump the beer through the whole house filter, into the keg. It is a good idea to pump some Co2 into the bottling bucket (if using the pre-filter) and the keg to purge the oxygen out of it. This will help prevent the beer from going stale.
Building The Keg Tap
I have completely redesigned this tap, see my other website for details.
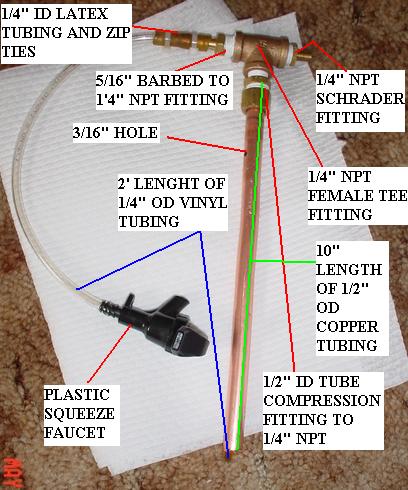
-The parts to build this tap can be found at a hardware store except for the plastic squeeze faucet. The plastic squeeze faucet can be ordered from Leeners online store.
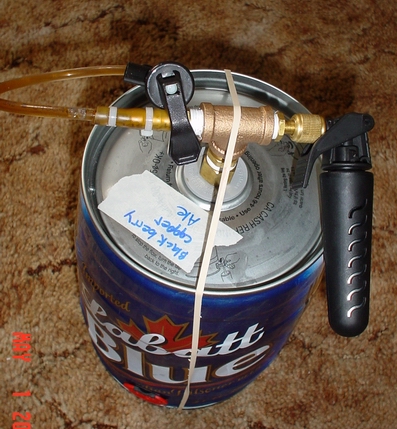
-On the picture to the right, there is a Co2 tire inflator hooked up to it, to dispense the beer. Instead of using the Co2 tire inflator, you can simply hook your Co2 pump up to it (7 psi is good for dispensing). If you are done drinking the beer for a sitting, and there is still beer left, pump the keg to 10psi of Co2 pressure, so the beer does not go flat.
-The 1/4" OD tubing is one length that runs through the body of the tap. To fit this through the 5/16" barbed fitting, you must enlarge the inner hole to 1/4" by drilling it out.
-Make sure to tighten the zip ties enough to prevent Co2 pressure from escaping, but, do not over tighten so you don't slow down the flow of the beverage.
-Here is another schematic:

-Note: When inserting the tap, cover the hole on the shaft so the beverage does not spill out the hole, then secure the tap to the keg (I used a rubber band).
Building The 2 Liter Tap
-Buying a 2 liter bottle of soda can be very cost effective, if you drink it fast enough. This tap will allow you to drink the soda without it going flat.
-This tap is built almost identical to the mini keg tap, but without the copper tubing and compression fitting.
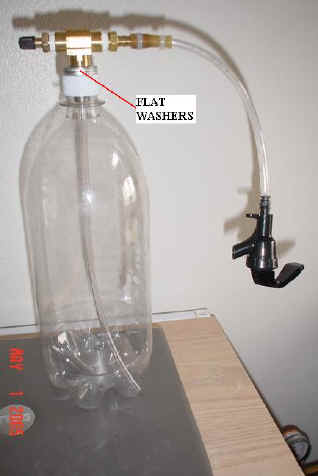

-Drill a 9/16" hole through the center of a 2 liter bottle cap, make sure not to mess up the blue plastic seal on the inside of the cap.
-Cut the top off of a 2 liter bottle, screw the
cap into it, then drill from the inside of the cap/bottle neck: 
-The seal is made by tightening the 1/4" NPT Female Tee. Since the Tee cannot tighten all the way down to the cap, it is necessary to insert washers as shown in the picture. When the Tee is tightened, it puts pressure on the O-ring (inside the cap), between the inside of the bottle cap, and the 1/4" stainless steel hex nipple. (Use a stainless steel hex nipple so that you do not contaminate the soda)
-Do not over-tighten this fitting, or the O-ring will slip off of the hex nipple, breaking the seal.
The Refrigerator
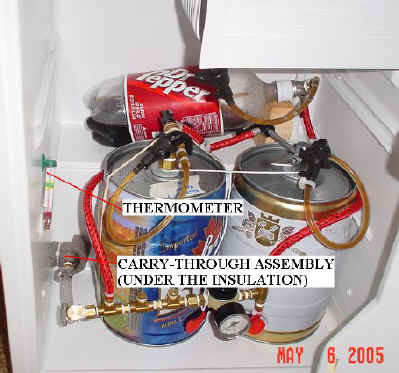
-You can notice the small pressure regulator on the manifold, that is so you can force carbonate and dispense at the same time. The pressure required to force carbonate is usually more than is required to dispense.
-Here is a closer view of the manifold, it is connected to the carry-through assembly with a 3/8" ID reinforced Vinyl hose.
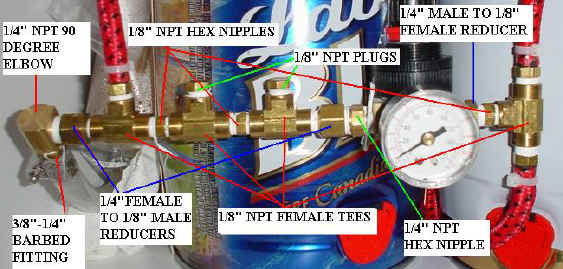
-The 1/8" plugs can be replaced by bicycle hoses as needed and vice versa.
-The bicycle hoses can be ordered online (Pyramid brand bicycle hoses work great). The bicycle hoses need some modification prior to using them. The threaded fittings that come on the hoses are not always 1/8" NPT, if not you must remove the threaded fitting at the bottom (just pull on it really hard until it comes out), then insert a 3/16" barbed to 1/8" NPT fitting. Use a hose clamp or a zip tie to seal the fitting.

-Next, the hose needs a check-valve. This prevents the beverages and pressure from flowing back into the hose and into the manifold. This is very important. Start by taping the hose (electrical tape works great), 3 to 4 wraps is enough. Then cut the hose in the middle of the tape (use a box opener). Insert the 3/16" barbed gas/liquid check valve (make sure the valve is installed to allow gas to flow out the head of the pump). Then zip tie or hose clamp the hose onto the check valve.

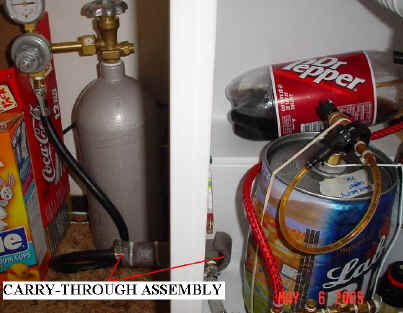
-It is very important to seal the carry-through assembly and the refrigerator so that cold air does not leak. To do this simply apply a liberal coating of silicone around the seams between the 3" long 1/4" brass nipple and the refrigerator. Also make sure to insulate the brass fittings as shown in the above pictures.
-The carry through-assembly requires a 9/16" hole in the refrigerator.
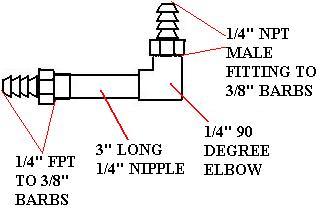
-Here is a schematic of the carry-through assembly:
-If you do not have a Co2 cylinder to pressurize your system, you can hook up a 1/4" NPT Schrader fitting to the outside of the carry-through assembly instead of the barbed fitting. Then you can hook the Co2 pump up to that and simply pump the pressure as needed.
Checking For Leaks
-It is very important to check for leaks. Check for leaks by putting dish soap in a cup, mix in some water until it gets very bubbly. Pressurize the system, then put the soapy water on any place where a leak might form. If the soap bubbles up, that indicates a leak, and it must be fixed.
