
How to Build Your Own Big Loader
Updated: April 10, 2001
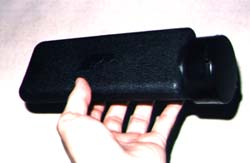 |
The first piece that you will need to purchase is an Allen Paintball Product's Gatorback II pod. This thing can hold 125 rounds. Its triangular shape makes it a good choice from which to attach to the smaller front loaders that come with the gun. |
 |
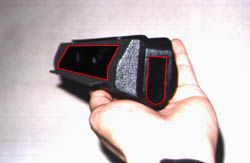
Now, with a Dremmel or a sharp blade, cut a slot (outlined in red for clarity) on the side of the Gatorback pod. It would be a good idea to figure out how much you will have to cut by placing the pod up against the side of the front loader. To help with the cut, draw the outline of the cut first, that way you can place it up against the front loader before you make the final cuts. |
 |
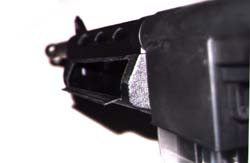
Now, cut the small front loader. What I have done was to cut a slot on one of the facets of the loader. Then, I slit the sides down to the other facet of the loader. What this does is to allow a little shelf to direct the balls from the Gatorback to the loader. This shelf also allows a better connection to the Gatorback. You apply some epoxy to the shelf and along the perimeter of the small loader's opening and attach it to the Gatorback. I used the "Plastic Welder" epoxy made by Devcon. Also, I cut the small opening which directs balls from the loader into the clip. This will allow for a greater flow of balls. |
 |
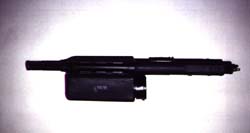
This is how it looks attached to the gun. Notice that there is a little flat spot where the loader attaches to the gun's front shroud. This flat spot is where you will be placing some epoxy to attach the Gatorback to. |
 |
The clip now has to be modified. I have outlined the holes so that they are easier to see. The clip on the left is the regular sized opening. The clip on the right is modified so that it will allow more balls to roll down from the front loader. Remember that you need to make the front loader's hole bigger. To figure out how big the hole should be, just insert the clip into the gun and then (with the front loader off the gun) trace the clip with a marker. Now with your Dremmel or some sort of file, just follow your marker lines. I suggest using a Dremmel with a grinding bit because the file would just take too long to make the hole. |
 |
Top view of the final big loader. Kind of a weird
looking thing, but so long as it does its job of increasing your gun's
capacity it's sure worth it.
This modification will allow you to feed the gun with your standard pods that many of you already have. One note, after you epoxy the two loaders together, you can finish the area where the two loaders mated, with a light coat of flat black spray paint. This will blend the epoxied areas with the color of the loaders. |
 |
Side view with loader mounted. I guess you could
mount the loader on either side depending on whether you are right or left
handed.
Remember to tilt the gun to the right to feed more balls into the front loader. Also, what I have discovered is that you should lightly oil the clip's internal sides and chain. Because there will be more pressure from the balls rolling into the clip, you will have to reduce as much friction from the sides of the clip so that the balls can flow easily and position themselves onto the chain drive. |
![]() .........Return
to the TS-1 Home Page
.........Return
to the TS-1 Home Page
