
Welcome to the LoopMaster building instructions page. You are welcome to build and use the LoopMaster for your personal use. Any commercial/business use of the LoopMaster must obtain my written concent prior to any commercial activity, advertisement, development, or sales.
The LoopMaster is a very helpful training aid for developing loop consistency at home and is very inexpensive to build. These materials are readily available through your local vendors. Below is an exploded view of the basic LoopMaster Components. Note: You may click on any of the diagrams below to view a full printable size document.
Exploded View
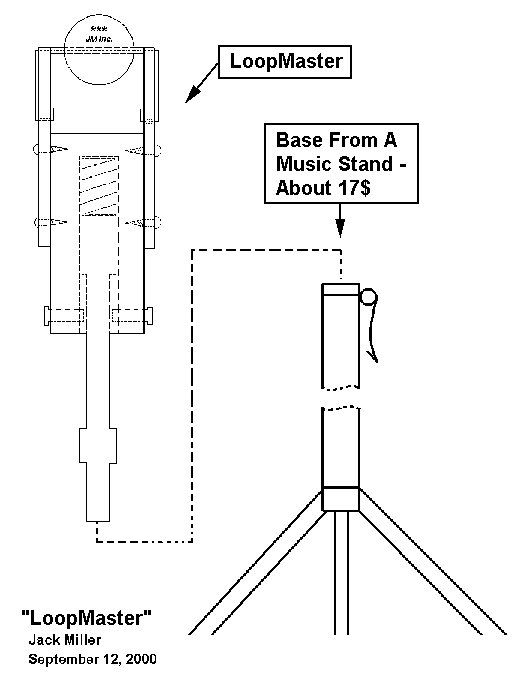
Basic LoopMaster Components
The following is a list of the basic materials needed to build your own LoopMaster.
1 wood piece - 1" thick x 1 7/8" wide x 5" long (Base Assembly)
2 wood pieces - 1/4" thick x 1" wide x 4 1/4" long (Ball Spindle Support)
1 wood dowel - 5/8" outside diameter (OD) x 7 1/4" long (Base Plunger Support)
4 small screws - 1/2" long
1 spring - 5/8" OD x 2 1/2" long and .040" spring wire diameter (Base Plunger Dampening Spring)
2 16d nails cut 3/4" lengths - .150" OD (Base Plunger Limit Pins)
1 large paper clip - .045" OD x 5" long (Ball Spindle)
1 Bic Pen ink cartridge cut to 1 7/8" length (.160" OD)
1 tube of silicon glue
1 table tennis ball (your choice of 38mm or 40mm)
1 cheap, steel, folding type music stand (available at all music stores - about $12 to $18 range.
LoopMaster Diagram (see instructions below diagram)

Note: Refer to the LoopMaster Diagram for detailed specifications. Not all specifications will be listed in the instructions below and is intended for you to refer to the buillding diagram.
Cut all of your building components to size based on the components list above.
Drill the hole for the base plunger bore and sand the bore with fine sand paper. Apply a lite film of lubricant to the bore (any type of paste lubricant will do)
Drill 2 holes for the base plunger limit pins 3/8" up from the bottom of the base unit.
Cut the Base Plunger Support to length. Grind two flat spots as Plunger Base Guides. Then grind with a sander or turn down on a wood lathe the bottom of the dowlel as the Music Stand Coupler shaft. Note: If you wish to install the dowel directly into the ground or grass, then lengthen the Base Plunger Support assembly to the proper length to insert into the ground and ingore the purchase of the music stand. There will also be no need to turn down the base plunger support if you use this method.
Insert the Plunger Dampening Spring into the Base Plunger Bore. Now insert the the Base Support Plunger into the Base Plunger Bore - push down and compress the spring. Now push in the 2 Base Plunger Limit Pins all the way into the drilled holes on the side of the Base Assembly until they fully seat. Now let go of the base Plunger Support. Check that the Base plunger support moves freely in its bore and properly stops against the Base Plunger Limit Pins.
Cut the 2 Ball Spindle Supports to proper sizes. Cut the ball spindle grooves in the supports (a hack saw works great). Drill 2 holes for the Ball Spindle Hold-Down Bores (.050" ID x 1 1/2" down from the top of the supports).
Drill 4 holes in the Ball Spindle Supports for the retaining screws. Attach the 2 to the Base Assembly with the 4 screws (use wood glue for extra support) - 2" of the top spindle supports should be showing above the base assembly.
Drill a hole in through the center of the table tennis ball (The OD is the size of the Bic Pen Cartridge you use. This OD may vary depending of the style of pen you use - ensure that the spindle wire will go through the pen cartridge). You must use a drill press in order to get an accurate drilling that is perfectly centered through the ball.
Insert the Ball hub (ink cartridge cut to length) into the table tennis ball. Put a small amount of siliicone glue/sealer at the sides of the ball where the Ball Hub portrudes out of the ball at. Note: Do not use Super Glue - it will not hold up to impact on the ball. The silicon sealer will flex with impact.
Straighten the paper clip with a pair of pliers. Ben one side of the clip to the shape as shown in the instructions diagram (Do Not bend the locking lips up yet on the inside of the spindle supports). Insert the longest straight end into the ball hub. Put the ball/spindle assembly onto the spindle supports. Now bend the other side of the spindle, using needle nose pliers, down the other side of the spindle support. Now put the last right angle bend of the spindle so it will go into the Ball Spindle Hold-Down Bores. Once you have a good fit, and the ball rotates freely in the support, then bend the locking tabs upward for the spindles on the inside of the spindle supports.
You are now ready for the hard stuff!!! And that is to remember to use the LoopMaster for at least 15 minutes on your loops and alternating your footwork.
Enjoy your new LoopMaster!!!!!!!!!!!!
