THE MAKING OF...
the PURINA CHECKERBOARD guitar
project completed APR 14 2004
The idea for this guitar came from my desire to have an electric guitar with a piezo pickup. To keep things different, I thought it should have three humbuckers, and to be really wild, a Tele Thinline body. Of course, this guitar would have to have a really bizarre paint job - not sure where the idea to do a Purina (yes, as in dog food) checkerboard pattern came from. One this is for sure, when one considers the woods, the hardware, the electronics, and the paint for this guitar, it definitely is the most ambitious project for me ever.
The Work

DEC 29, 2004 ~
Here's the official response from Purina after I e-mailed them pics of the guitar:
"Thank you for sending us the pictures of your Purina guitar! You did an
amazing job designing it, and we appreciate you taking the time to share
your creation with us. Please know that it will
be for our viewing only and can not be considered to be used in any of our
advertisements."

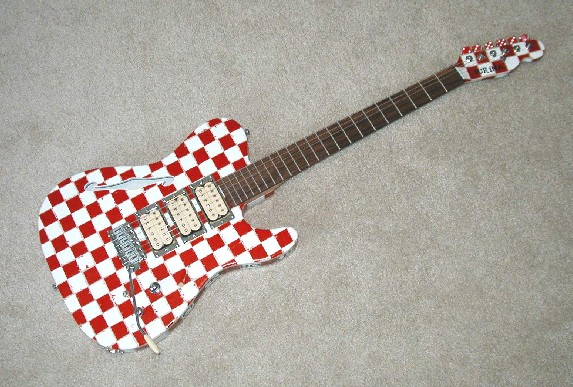
APR 14, 2004 ~ I picked up my Purina Checkerboard guitar from The Guitar Shop yesterday, and it's perfect. They had to replace the white push button for the circuit board on the L.R. Baggs Ctrl-X preamp with a mini on/off toggle, but they were able to use the same hole so it was no big deal. It did cost over $100 for the total installation, but I played it last night and everything works perfectly. The L.R. Baggs X-Bridge piezo adds a lot of tonal colorations to the three-pickup setup already on the guitar. I really love the DiMarzio Bluesbucker in the middle position - great tone.
I guess that's it - this guitar is 100% finished now. What a project! I bought the neck from Warmoth back in September 2002, and it took me 18 more months to assemble all of the hardware, and paint the beast. It cost me over $1200 from start to finish and it definitely was the the most intensive and time-consuming project I'll ever want to tackle. While I'm relieved it's done, I'm amazed how awesome it plays and sounds - I guess it was worth it! My plan is to send a picture of the guitar to the folks at Purina - maybe I can get some free dog food out of this (or maybe they'll sue me).

MAR 26, 2004 ~ I just dropped off the guitar at The Guitar Shop in DC, a few blocks from my work, and the guys who work there, as well as some customers, all said it looked way cool! I'm keeping my fingers crossed that there won't be any problems wiring it up, and that I'll have it back in early April.


MAR 8, 2004 ~ OK, I attached the neck to the body and have the humbuckers in place. I found the guitar to be very neck heavy, so I spent some time last week tracking down some lighter tuning knobs. I found a guitar manufacturer in California, MJ Guitar, which makes tuner knobs out of dice. I picked out a set of red and white dice and they fit on the locking Schaller tuners perfectly. They look sick and the headstock isn't so heavy now. Everyone wins! I just have to string it up and line up the humbucker rings and screw them in, then it's off to be wired up - maybe even this week. I'm pretty sure I'm going to take it to The Guitar Shop in DC, a few blocks from my work. They've handled some of my stuff before. Check back soon for the grand finale!

FEB 23, 2004 ~ Well, I finished clear-coating the body and mounted all the hardware. I had a bit of a problem with the L.R. Baggs electronics which go into the cavity, namely the stereo/mono push button. I had to re-drill the hole twice and fill in the old holes with wood patch, which forced me to re-paint a bit of the white square. Otherwise, it was smooth sailing! The next step is to drill the neck-mounting holes and attach the neck. Then I'll string it up and align the humbucker mouting rings. Then it's off to be wired up!

JAN 31, 2004 ~ Over the past several weeks, I've added all of the graphics and I sprayed several layers of Rust-Oleum gloss clear-coat on both the body and neck headstock. I still have to spray the body a few more times and add the hardware, but it's getting close - maybe 4-6 weeks?
On the body, I painted the sides almond and then painted alternating red and white squares. Then, I stenciled 18 of Purina's finest products around the edges: Giraffe, Goose, Squirrel, Bear, Dolphin, Gator, Pig, Otter, Tiger, Iguana, Elephant, Parrot, Zebra, Monkey, Rat, Goat, Dog, and Rooster chows. I also added the large Purina and Checkerboard decals along the edge, as well as another Purina decal on the back with Cat Chow. Chow. Chow. Chow. stenciled below it - remember the TV commercial?
The neck is all set. As with the body, I painted the edges almond (the back, too) and then painted alternating red and white stripes. On the back, I put on a mini red and white checkerboard. I placed the Purina logo decal on the headstock face, and a Warmoth logo on the back, with the serial number (11022001). Along the edges, I stenciled the following 11 chows: Weasel, Pelican, Hippo, Gorilla, Turtle, Bat, Sting Ray, Rhino, Hanster, Cow, and Kangaroo. I then sprayed it 4-5 times with clear-coat and added the chrome locking Schaller tuners. I also oiled the neck with two coats of Tung Oil and super-glued the graphite nut in place.
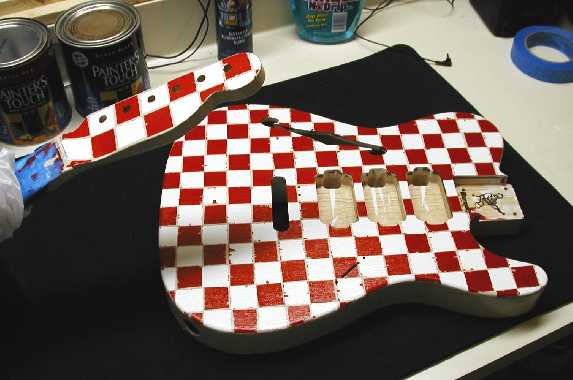

JAN 10-11, 2004 ~ It's almost done! I peeled off all the tape from both the body and the headstock and this is what it looks like (see above). Obviously, the red and almond colors bled through under the tape, but it consistently bled through, so it actually looks pretty cool. I still need to work on the body sides, but pretty soon I'll add the graphics, clear-coat everything, and start putting on the hardware. It's coming along!

JAN 3-4, 2004 ~ What a mess! I taped off the remaining squares (which will be red) and painted both sides of the body and the headstock with an almond-colored paint. I'm going to give it a day or two to dry, and then when I peel off all the tape squares, there should be a red and white checkerboard pattern with an almond border. We'll see what it looks like... (gulp)

DEC 20-21, 2003 ~ I finished giving both sides of the body, as well as the neck headstock, about two coats of red which seems to have covered it up pretty well. I can see that some of the red paint has seeped under the masking tape, so I'll probably have to touch up some of the white squares. I want to let both pieces dry really good before I tape the remaining squares and paint it almond - probably after Christmas. I was never quite sure what I was going to do with the body sides, but I think I'm going to rough them in with almond when it's just about done. I want to stencil in a bunch of Purina products around the body, like "Monkey Chow" and "Parrot Chow"...


DEC 15, 2003 ~ I taped off every other square to make the white squares of the checkerboard theme. I started with the back of the body and the headstock face. After this, comes a few coats of red paint, which I hope to have done in another week. Then I'll put on the remaining masking tape squares and paint everything an almond color. When I peel off all of the tape, it should be a red and white checkerboard with the almond trim - at least that's the plan...

DEC 5-6, 2003 ~ After a major delay due to my move, I was able to set up shop and get going again with this project. I added another two coats of white paint to the headstock face and body top, and one coat to the backs of the headstock and body. So after roughly four coats of white, I'm ready to tape on half of the checkerboard squares and paint everything red. Check back next weekend...
SEP 2-3, 2003 ~ I gave the entire body and neck headstock a second coat of white paint. The mahogany top on the body may require another two coats, but the rest should be fine with three total coats.
AUG 22-24, 2003 ~ Finally getting started! I gave both the neck headstock and the body (both sides) the first coat of white paint (see Paint section below). The wood grains, especially the maghogany on the body, will need at least three coats. Then I'll tape off one set of squares to make up the checkerboard pattern and then comes the red!
The Parts

WOOD ~ Instead of buying a Fender Telecaster, or some other off-the-shelf model, I decided to go with Warmoth. They have already provided me with some great necks and bodies, and I've never had a problem with any of their gear. I purchased the Tele neck in September 2002 straight from their Thrift Shop and it's killer - pau ferro fretboard (no inlays) on birdseye maple with SRV (Stevie Ray Vaughan) custom back shape, 6230 fret wire, and 1 5/8" at the nut.
I had Warmoth build me the custom Tele Thinline body with the f hole in July 2003 - rear routed with vintage trem and three humbuckers. The ash body is semi-hollow and features a mahogany top (Warmoth thought my wood combination was a bit odd). Even though mahogany and ash are relatively heavy woods, the body is very light due to the hollowed chambers.

BRIDGE/ACTIVE ELECTRONICS ~ Needless to say that the key to this guitar is the chrome L.R. Baggs X-Bridge piezo pickup and the Ctrl-X preamp that I purchased from Stew-Mac in late 2002. The Ctrl-X blends the passive guitar pickups with a active piezo pickup so I can dial in some pretty cool electric/acoustic combinations. A 9-volt battery powers everything.

PICKUPS/HARDWARE ~ To go with the red/white/cream theme, I decided to buy cream-colored DiMarzio pickups and went with some odd combinations: Air Zone (neck), Bluesbucker-F (middle), and Air Norton-F (bridge). The Air Norton is typically used as a neck position pickup and both the Bluesbucker and Air Zone are usually placed in the bridge position. Call me a radical. I'm using chrome locking Schaller tuners and straplocks and chrome humbucker pickup rings, as well as a chrome concentric volume/tone. The chrome triangle string retainer is from one of my first-ever guitars - a black Peavey T-60 from the early 1980s, whose neck also spent a year on my Red Devil II guitar. All of the metal hardware is chrome and the two plastic back plates are black. The 3-way passive switch has a cream knob to match the cream tremolo arm knob on the L.R. Baggs X-Bridge. I'm also using a graphite nut.

DECALS ~ I purchased these vinyl sticker logos from Speedy Signs - the small Purina logo is for the headstock, while the larger Purina and Checkerboard logos will be placed on the body. The serial number sticker (11022001) is Ava's birthday. Speedy Signs has provided me with a bunch of miscellaneous logos and I've always been impressed with the quality of their work.

PAINT ~ The natural woods on the body and neck headstock look stunning, but I'm still going to have to break open the Rust-Oleum paint. I used Rust-Oleum's oil-based enamel on the ESP Tel Aviv, but I decided to go with water-based latex for this one, since those types of paint are easier to work with. I picked out a gloss white, apple red, and almond. The plan is to paint the first coat white (it will take a few coats!), tape off every other checkerbaord square and then paint it red. Then I'll tape off the remaining squares and paint it almond. Peel of the tape squares and add a clear coat and that'll pretty much be it!
back to the BEHIND THE GUITARS - YEARLY PROJECTS page
back to the BEHIND THE GUITARS - WEIRD ONES page