

STEPS TO CONSTRUCTION
These instructions are not to scale and are only to be used as a reference to the construction process.
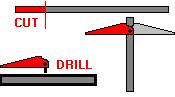
| 1 | Take long section of plumbing tube (041193033147 S-Tailpiece) and cut off flanged end. Be careful only to remove the flange and keeping the cutting to a minimum. This keeps the Saber the proper length. | 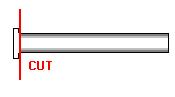 |
| 2 | Draw the correct shaped cutout on the other end of the saber. (The "C" shaped swoop at the beam emitter end.) Then cut it out with the dremmel. | 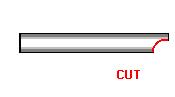 |
| 3 | Draw a circle and drill out a hole for the recharging socket. |  |
| 4 | Take the two sleeve connectors. (041193005212 SLDR Tube) Mark off 1 inch on the sleeved end. Cut these ends off each tube. You now have two (2) 1 inch sleeve sections that will slide over the main tube body. these will be placed next to one another and will be the clamp section. | 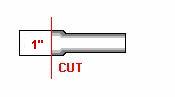 |
| 5 | Next mark a rectangle about 3/4" in length on the beam emitter end of the tube. This is where the two (2) shelf support will protrude through and look like the reflector clamp. | 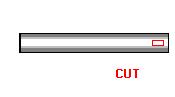 |
| 6 | Next, take the 2-inch "Steel Key" or "Axle Key". Then dissassemble the toggle bolt (52735 Swivel Ceiling Hook) and take the larger half and attach it to the 2 inch block by drilling a hole in the block and fastening the bolt half with a screw. (I used a mini allen head bolt. this looked the most appropriate.) |  |
| * | ALTERNATE: If you can not find a "steel key" in
the hardware store
Next cut a two inch section from the steel bar (26169 Steel square bar) You must buff this with the dremmel. Then dissassemble the toggle bolt (52735 Swivel Ceiling Hook) and take the larger half and attach it to the 2 inch block by drilling a hole in the block and fastening the bolt half with a screw. (I used a mini allen head bolt. this looked the most appropriate.) |
 |
| 7 | Epoxy the sleeves (2) to the main tube body by sliding them on the tube and placing them up the tube so that the lowest end is 3 3/4inches from the bottom. | 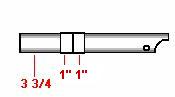 |
| 8 | Expoxy the steel bar assembly to the clamp section 90 degrees off to the right of center. | 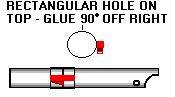 |
| 9 | Place the shelf supports in a vice and bend with a pair of plier until the support dowels break their weld. | 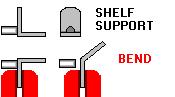 |
| 10 | Then take the two pieces and place them in the rectangular hole at the emitter end of the tube through the rectangular hole you cut earlier. | 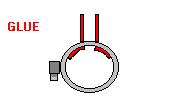 |
| 11 | Epoxy a sink cap on the end of the tube. (attache the D-ring assembly to the cap prior to gluing it on the tube. |  |
| 12 | Glue a the shower rod end cap in the emitter end. | 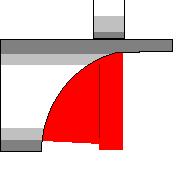 |
| 13 | Affix the grips on the lower end of the tube. | 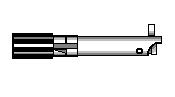 |
| 14 | Glue the clamp detail onto the bar assembly. | 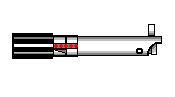 |
| 15 | Glue buttons in respective places on the top and botom of the tube in the appropriate places. | 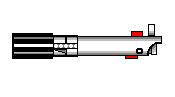 |
