
My daughters Emily & Beth : Parallel view , Cross view. Taken with SR225 camera, handheld.January 2007 Update: I've been using the SR225 (as I like to call it) for over 6 years now without any further failures. The shutter has been totally reliable. I have learned that at small apertures (below f22) the apertures on the two sides don't always track well. So sometimes I get one side darker than the other. I guess that's what happens when you use them outside their design range. The linked focus and film advance have also been trouble-free. Overall I'm very happy with it and haven't felt the urge to use my Sputnik much since getting the SR225 operational.
I have a wide neck strap on it and can get good results shooting hand-held (more like body-held) with it hung around my neck and held with both hands. I have shot Jazz and Fringe festival photos at 1/125 using this method and got very sharp photos (though not always as much depth of field as I'd like).
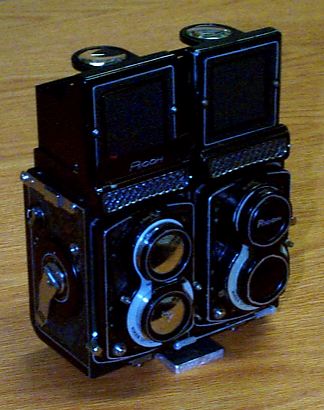
I never did complete any of the cosmetic finishing of the camera like glueing the front leatherette back on. I guess once it was working I put my effort into taking good photos with it, rather than making the camera good looking.

SR225 with Rollei Bay 1 lens shades and my boxes of MF stereo slides in the background.
Recent progress (Feb. 16, 2000): After the October update I loaded up the camera with film and started shooting. After 5 shots the shutter blades jammed open and wouldn't close. I did a partial disassembly and got the shutter blades closed but the shutter no longer worked properly. So I cranked the film through and got it developed. I was very excited by the quality of the five shots (one of them is in my photo gallery). And very sad that my camera wasn't working.
Sam had another go at cleaning and re-aligning the shutters but it still wouldn't work properly. So for a while I owned a nice 2 kg boat anchor. But a friend, who used to have a camera repair business (thanks Gary), offered to try to fix the shutter problem. And he did! Cleaned the shutter again, replaced some parts and relubed the shutter. I got it back on February 10th and today got around to measuring the shutter speeds one more time. I now have a new cheat-sheet to tape to the back of the camera and I'm ready to shoot some photos again. Happy day!
Recent progress (Oct. 18, 1999): I had some problems with erratic timing in the (master) shutter so I sent the shutters back to Sam for a cleaning. I got them back about a week ago and re-installed them in the camera. I then measured the (much improved) shutter speeds and made up a cheat sheet to stick on the back of the camera (mechanical shutters are seldom right on at all speeds). I loaded up two rolls of Velvia and started taking some photos. I'll let you know how they turn out.
There are still some cosmetic things to do on the camera (re-attach leatherette) but for now I plan to use my camera rather than work on it. Probably the most urgent thing is a guard for the shutter linkage, since if you bump it you can open the aperture blades and fog your film.
Recent progress (July 30, 1999): The camera is back from Sam and the shutters are now linked. Yippie! Still to do is measure the shutter speeds to see how much the extra mass has slowed the various speeds. And to link the apertures together since Sam didn't have time to do that. I'll probably shoot some test rolls before trying to link the aperture though.


Recent progress (May 12, 1999): I glued the thin black leather over the top and front seams. No light leaks are visible using the lightbulb test. So now the camera's off to Sam to have the shutters and apertures linked up.
Recent progress (April 25, 1999): Analyzed second test rolls and found that right image is now <0.13% smaller than left on infinity shot. So moving the 4 thou shim improved things as expected.
Focus at infinity is good. I took a couple of shots of Venus (the planet) at f3.5 and f5.6. The dot size is exactly the same on L & R indicating focus match and the same for f3.5 and f5.6 indicating that the focus is at infinity. I'm very pleased.
My newspaper on the floor shot (with camera on tripod at normal height and focus on center of newspaper at 2m focus distance) shows the near focus to differ by about 3" between L & R. A second shot at f8 looks very good, mostly hiding the slight focus mismatch. I don't forsee shooting wide open much or ever so I'm happy with the optics and focus as they now are.
The above 3" difference was determined using a 10x loupe (actually a 28mm camera lens from a dead P&S). I mounted both shots in 80x132mm MF stereo slide mounts then viewed them with my viewer (40x84mm lenses) and found the focus difference to be very hard to see even on the f3.5 shot.
My second light leak test showed no improvement. Actually it looked worse thanks to faster film and longer exposure of the camera seams to the sun. Again the top coupler hole was leaking light to the right film only. About 1/2" high and across most of the film width. Bad.
After some head scratching I stuck a red button type halogen bulb into the coupler hole, stuck the AA battery holder in the taking lens body cavity and closed up the back (mostly). Then I could see light shining out the top, and lots out the front seam, but none out the back.
Sticking the bulb in the bottom coupler hole showed a similar situation. Pure luck and the shiny bearing on the couplers make it so only the top right fogs! I stuffed some black felt into the gap between the two bodies through the coupler holes and there was some improvement, but the light wasn't entirely blocked.
So I've decided to get some black leather and cover the seam between the two bodies in the front and top. Then I shouldn't have any problems. Even if I ever shoot 400 speed film.
Overall I'm very pleased with how things are looking.
Recent progress (April 1999): Analyzed test rolls and found that right image is 0.34% smaller than left on infinity shot and 0.37% smaller on close focus shot.
Consulted with Sam and then decided to shim out the right lens a bit to increase image size. The right lens originally had a 12 thou thick spacer between the shutter and camera body, the left had a 22 thou spacer made up of four thinner ones.
Moved a 4 thou spacer from left to right side (R now 16 and L now 18 thou). I expect this to reduce the image size difference by about 0.25%, so the missmatch should drop to less than 0.1%. The depth of field at normal shooting apertures should hide any missmatch in the focusing distance between left and right lenses.
Bought some cheap film (Agfa Portrait) for testing. Repeated infinity focus test and light leak test. I also plan to do some near focus tests on these rolls also.
Recent progress (March 1999): Shot two test rolls. The photos show that infinity focus and close focus (~2.5m) are pretty well matched. Left and right image sizes aren't exactly the same, but less than 1% different (as expected from the lens matching results).
The light leak test on the test rolls showed a minor leak at the top back where the two cameras are joined. Light is leaking through the holes where the film spool coupler goes. Fixed problem by filling gap between the two back doors with black heat shrink tubing (friction fit). Also painted the top seam between the cameras with black paint. If that doesn't work then a little strip of electrical tape should solve the problem.
Recent progress (Nov 27/98): I chose the best matched Rikenon lenses and installed them in the camera. I still need to adjust the infinity focus of the viewing lenses and check that the taking lenses' focus is okay.
I drilled a small hole in the slave side front to allow me to cock the shutter on that camera. This will be used for the taking lens focus check and when I run the test rolls of film through (for lens match check and light leaks).
Recent progress (Nov 10/98): I tested the 5 Rikenon lenses that I have to find the best FL match. Three of the lenses are in essentially perfect condition and the other two have flaws (rear element separation, front coating scratches).
The good news is that the three best ones all matched to 0.5%. So I have a perfect pair for the Stereo 225 and a third one for my separate Ricohmatic 225. Thus I can use it to take hyper stereos (using it and the Stereo 225 with film loaded only in the master side).
The non-perfect lenses measured about 1% different (the oldest serial numbered one) and about 0.5% also.
Follow this link for the raw test data.
Recent progress (Oct 18/98): I build up two jigs for lens testing (to find the pair that match in focal length out of the five Rikenon lenses I have).
The first jig held the stereo 225 upside down on my tripod. The glass block has a test slide in it (corner and center points marked). Several layers of glass hold the test slide parallel to the film plain but lifted off it so that the image will come into focus nearer than infinity. Basically the camera and lens is used as a projector with a Maglight (focusing flashlight) used as the light source. As shown the image is projected in focus on the wall at a distance of about 0.8 metres (with the camera focused at infinity). 
This jig had several problems: I don't have a spot in my house where I can leave it set up for several days. And I didn't think I could reproduce the setup (distance from wall) to within a mm which is required to have good accuracy in the focal length comparisons. Also, I don't have a good spanner wrench to remove and replace the rear element group while in the camera. Thus I would be forced to remove the shutter assembly, change lenses and reinstall it. All without moving the tripod. Good luck!
So I came up with the second jig. The front plate holds the lens parallel to the glass block held on the rear plate. There is access from the side so I should be able to remove the rear lens group by hand and install the next one to test. If I have all my 5 Rikenon lenses at hand before starting I should be able to test them all quickly and without having to move my setup.
If a focal length match to less than 1% isn't possible then I may try mixing and matching the various front and rear elements. A quick test using the first jig showed a 1% change in FL when I replaced the front lens group only (distance from the two marks on the wall went from 422 mm to 418 mm). 
I also attached my laser pointer onto jig 2. It is perpendicular to the lens board. So I can hold a pocket mirror flat on the wall and aim the laser pointer at it. When the laser spot reflects back and hits the laser pointer then I am exactly perpendicular to the wall, and the lens board is parallal to it.
Recent progress (Sept 98): Added black flocked paper in the area between the two camera bodies. The goal is to prevent light leaks through the holes that I made to couple the film spools together.
Recent progress (Aug 26/98): Beautifying the camera.
Recent progress (Aug 21/98): Extending aperture range (to f32). 
By swapping parts from among my three 225's I have made the Stereo 225 nicer looking. It now has the nameplate/range switch on both sides. The lens panel front on the slave camera that was yellowed has been replaced with a nicer one.

I also have two nice backs on the camera. They don't exactly match because one is from an older camera that only has the Depth of Field chart in feet. The viewfinder cover on the slave camera has been replaced with a better (less dinged) one.
The Ricohmatic 225 goes from f3.5 to f22 in 1/3 stop steps (clicks). Actually both of mine go to one click past f22 (~f25).
The Seikosha SLV shutters assemblies, when removed from the camera, will stop down to about f45. The stop in the camera that prevents this is just the slot that the aperture control lever moves in. It hits the end of the slot at f22+1/3. So by lengthening the slot I should be able to get f32 and perhaps more.
One limitation is that the aperture lever turns a geared ring that meshes with a 2nd geared ring that surrounds the viewfinder lens. It is used to display the aperture setting through a window at the top of the viewfinder lens bulge. Both geared rings only have teeth part ways around. At f22 the last 3 teeth are in contact. So I can't enlarge the slot so much that the teeth completely disengage.
So I gradually enlarged the slot (Dremel cutting disk) and checked that I still had enough mesh on the gear teeth. After a few cut and check steps I had f32. I kept going and got f32+1/3 but had to stop before f32+2/3 (the last tooth was un-meshing). So I quit at f32+1/2 stop.
I was a bit worried that the last bit of the aperture control arc wouldn't be "linear". But the 3 clicks past f22 (which I call f32) measure out to be half the diameter of f16 (measuring curved sided pentagon with calipers ain't easy :) .
Needless to say, I'm a happy camper. I always wanted a MF stereo camera with f32 and now I'll have that and more (f38).
Recent progress (Aug 19/98):
The mounting plate (1/4" thick aluminum) helps hold the two cameras together as well as providing a centered tripod mounting hole (drilled and then tapped with 1/4-20 tap). The two corners at the front of the plate (top on photo) had to be removed to give access to the locking latches for the backs. I want to be able to change film without removing the plate.
The center section was left to help protect the focusing linkage (from bumps etc.) and to reduce the chance of the camera tipping over forward.
The holes for the camera screws were countersunk and brass countersink screws were used to have a flat bottom on the plate.
In this photo you can see the anti-tipping benefit of the mounting plate. The focusing linkage is visible below the lenses (cameras are focused at infinity). Click here to see another photo with the viewfinder covers up.
This photo shows the cameras focused midway between the minimum distance and infinity. You can see that I made the hexagonal brass tubing (press fit over the distance pointer) longer so that the nylon socket part of the linkage doesn't bump into the black lens plate cover. The camera needs to be focused to infinity or minimum distance to avoid interference with the back latches when you open them up. When closed the tubing goes right above the latch without touching it.
After adjusting the linkage length and adjusting the position of the brass tubing so that both cameras hit their infinity and min distance stops simultaneously I soldered the tubing in place. I had previously filed the nickel finish off the back of the pointers to reveal the brass beneath. The tubing was quite tight on the pointers so I just used regular 60/40 electronics solder. If more strength were necessary silver solder could be used.
Click here for past project updates.
Back to my

Email: greg.erker_at_shaw.ca


