
I recently replaced the timing belt on my '88 325is M20 b25 (made in 3/88). It's a fairly straightforward job, although you can expect it to take you a while, especially if you haven't done anything like it before. The reason it takes so long is that you have to take apart the whole front of the engine to get to the timing belt. Since you're doing so much work to get to it, it makes good sense to replace a few other things while you've got the engine apart.
First is the water pump. Water pumps are a weak point of E30s, and although they're not terribly expensive, they are very difficult to replace. The water pump is right there with the timing belt. In fact, you have to at least relieve tension on, if not remove, the timing belt to replace it. If you don't do these two at the same time, you're doubling the work for yourself. Make sure you also have a new gasket for the water pump.
Next, replace the timing belt tensioner pulley. It's a $20 part, and, like the water pump, you have to loosen the timing belt if you're going to replace it.
Also, replace your coolant, as you have to drain it anyway, and your radiator hoses, as you will have them off. Get a new engine block coolant drain plug gasket, as it's cheap, and may need to be replaced. You will also have the remove your accessory drive belts (there are three: alternator, power steering pump, and A/C compressor), so it's a good idea to replace them too. The distributor rotor and cap will be off, so it's a good time to replace them if they need it. I went ahead and replaced my thermostat, too.
All E30s should have their timing belt replaced every 50,000 miles. BMW says 60,000, but there have been stories of belts breaking shy of 60k. If you don't know when the last time it was replaced, replace it. The timing belt is not something to mess around with, because if it breaks, severe engine damage could result. M20 engines (as are most modern engines) are valve interference engines, meaning that the path of the valves as they are opening overlaps the path of the piston. Normally this is not a problem as engine timing prevents then both from being in the same place at the same time, but if the timing belt snaps, you're pistons are going to collide with you valves, at the very least bending a couple of them. If you timing belt breaks at higher revs, you could lose your head, and in extreme cases, crack your block. Bad. So replace you timing belt!
This guide is written based on my experience with my car, which has a one-piece crankshaft hub. If you have a two-piece crankshaft hub, there will be some differences, which Bentley covers. This guide will still get you through 98% of the process, including the removal of the crankshaft bolt.
A final word of caution: do not reuse a timing belt after you've loosened it. According to Bentley, it causes belt stretching and premature belt failure. And besides it's just dumb. If you've loosened the belt, say, to replace the water pump, you done 99.9% of the work toward replacing the timing belt. It's a $12 part; it doesn't make sense to take chances. That being said, let's replace a timing belt!
Tools you will need:
I recommend a pair of jackstands for this job. Ramps will work, but jackstands have the added advantage of letting you a) adjust the height, and b) raise and lower the car without cranking the engine, which will be rather difficult once it's taken apart. They're cheap, too. I got a a pair of 2 ton stands at Pep Boys for $10.99.

Also, you'll probably want to take off the hood. I did, and it made the job infinitely easier. Before you do, mark around the brackets onto the hood with a sharpie. The brackets are made with oversize holes so that the hood can be fine tuned to line up perfectly with the body panels, and if you don't mark the hood, you'll have fun adjusting it when it's time to put it back on. Once you've marked it, remove the 4 outside bolts and loosed the 2 inner bolts. At this point the hood can be lifted off its brackets and set aside.

I removed the air filter housing before starting. This is definitely not necessary, but it emptied up a lot of space in the engine compartment, and it was easy to do. Remove the two mount nuts for the filter housing, disconnect the connector from the AFM, and loosen the hose clamp clamping the AFM to the rubber ductwork leading to the throttle body. Then unclip all of the clips on the filter housing as if you were replacing the filter (be careful the don't fall!), and remove the rubber duct from the intake of the filter housing by pulling it out. Lift out the top part of the filterhousing along with the AFM, and then remove the lower part with the filter.
First, remove the splash guard from under the car. This is a black shield of sorts that keeps water from splashing up into the engine compartment. Mine has three square holes in it. Remove this by taking off 4 7mm or 8mm screws holding the splash guard to the brake intakes, and then the 4 10mm plastic nuts holding it to the frame (2 on each side). The splash guard will now come right out.
The first thing to do in the engine compartment is remove the radiator. I'm told that it is not absolutely necessary in order to replace the timing belt, but I can't imagine doing the job with it in. First you have to remove the fan and fan clutch. For this you'll need a 32mm combination wrench. Chances are that you, like me, don't (or didn't) have a 32mm combination wrench, so you'll need to get one. I tried using a really big adjustable wrench, but it was too wide and wouldn't fit on the nut (the mounting screws for the water pump pulley were in the way). So I had to go drop $25 for a the combination wrench. The fan clutch nut is reverse threaded, so, looking at the engine, you will have to turn it clockwise to loosen it. To do this, get under the car and fit the wrench on the nut and move the wrench toward the passenger side of the car. Since you won't be able to hold the fan in place, the only way to loosen the nut is with sharp impacts to the wrench with a hammer. Once you've loosened the bolt, spin the fan to remove it and set it aside. Keed it upright, however. Storing the fan clutch on its side will let the fluid drain from the fan clutch. XXXXX

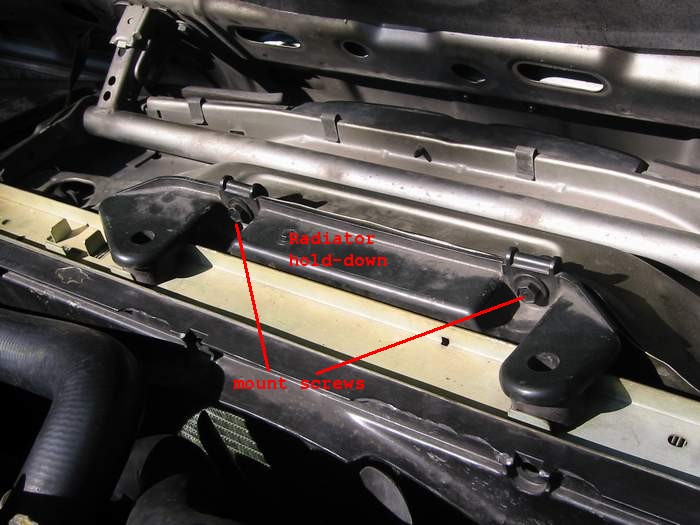
Next, you'll need to drain the coolant, which can be easily accomplished my removing the lower radiator hose and putting a pan under the opening. There's also a drain plug, but since you're taking out the radiator anyway, it's easier to just remove the hose. Once the coolant is drained, disconnect the upper and lower radiator hoses. Then take out the two screws in the black plastic bracked holding down the radiator from the top. Remove the bracket and lift out the radiator. Drain the rest of the coolant from it by seesawing it back and forth over a pan.
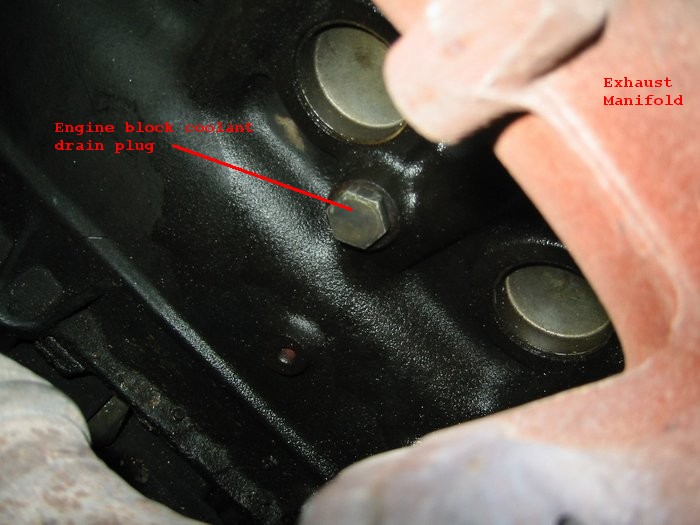
If you're going to go ahead and replace the coolant (good idea), then remove the 19mm engine block coolant drain plug from the passenger side of the block under the exhaust manifold. Use a big pan to catch to coolant, it goes all over the place.
Now remove the distributor cap and rotor. The cap is secured by 3 bolts. Remove these and set the cap aside in the engine compartment; there is no need to remove the wires from it. Now remove the three allen bolts from the distributor rotor and remove the rotor. Now remove the plastic dust shield from behind the rotor.
You can now see your timing belt. The camshaft sprocket is partially exposed. Before you remove the cover, however, you'll need to remove your three drive belts. This is not fun. BMW seems to have designed the accessories as an afterthought, and the belts are incredible difficult to replace. The A/C compressor belt is the worst; I'll cover its replacement later on. For now it may be easiest to just cut the belts off (I used a hacksaw). The belts are not under extreme tension, and will not snap at you when they are cut. If you can loosen the pulleys enough to take them off the Kosher way, skip down to here, where I cover how to loosen the pulleys and install the belts. Once the belts are off, remove 4 bolts securing the water pump pulley and remove the pulley (The water pump pulley is the third pulley that the alternator drive belt runs on).
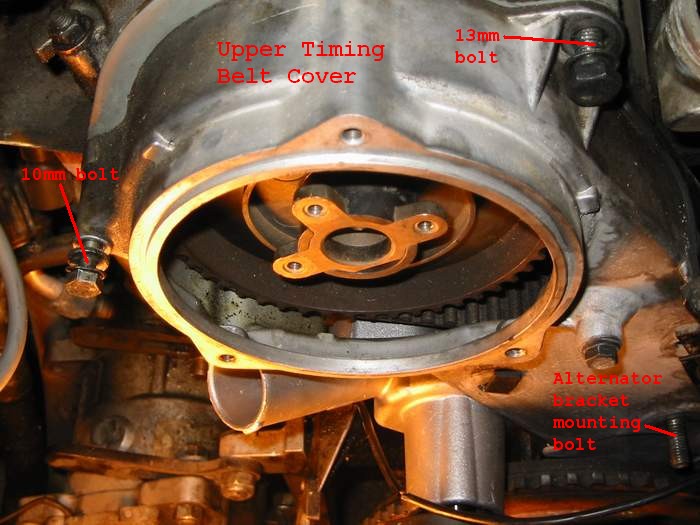
Now it's time to get to the timing belt. You'll want to first remove the upper timing belt cover. To do this, remove one 13mm and one 10mm bolt from the cover, and remove the alternator bracket by removing the nut. You then have to remove the reference sensor mounting bolt (which is an allen bolt) and unclip its wires from the upper timing belt cover. The reference sensor is located on the lower passenger side of the engine, pointing at the big toothed pulley on the crankshaft. Note: Only "i" engines have a reference sensor. Lay the reference sensor aside in the engine compartment, and remove the upper timing belt cover.
Put a 22mm combination wrench (box end), or a 22mm socket on the vibration damper bolt. Use it to rotate the engine clockwise until the TDC (top dead center) marks on both the camshaft and crankshaft pulleys line up with the TDC marks on the head and lower timing belt cover.

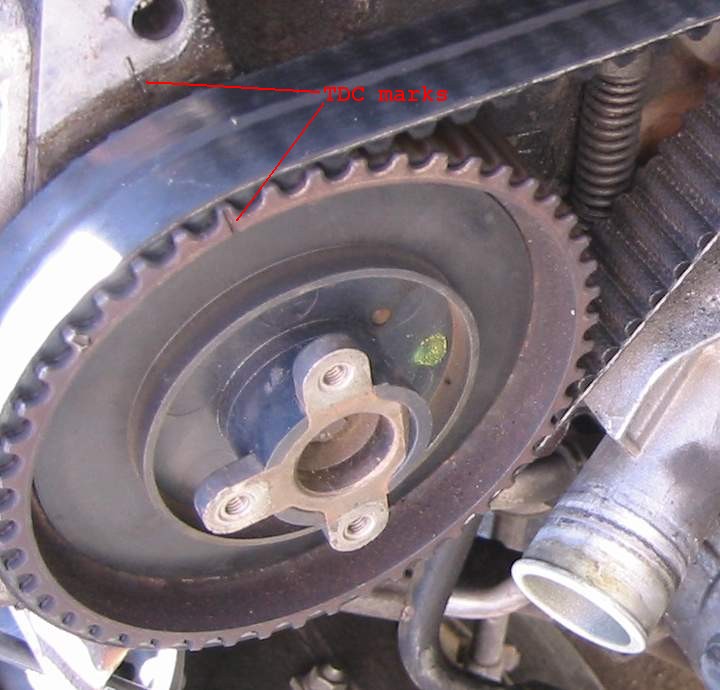
The TDC mark on the lower timing belt cover is the ridge between the two depressions in the metal, right below the BMW emblem. The TDC mark on the crankshaft is the line between the "O" and the "T". Remember that the crankshaft revolves twice for every revolution of the camshaft, so you may have to rotate the crankshaft around twice for both marks to line up.
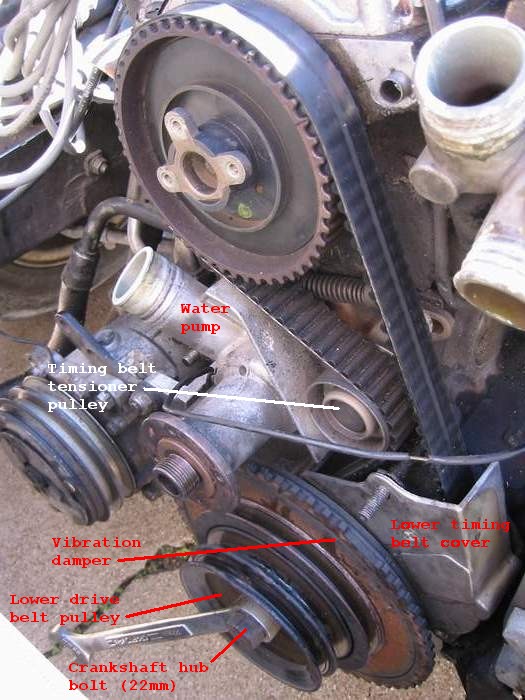
Once you have the engine at TDC, you need to remove the lower timing belt cover so that you can access the timing belt. To do this, you will have to remove the lower drive belt pulley and vibration damper. Remove the six bolts holding on the lower drive belt pulley and the vibration damper. Both the pulley and vibration damper can now be removed. The vibration damper will require a little coaxing with a screwdriver. If even this won't budge it, you will have to resort to a puller. Once the hub is clear, remove the lower timing belt cover.
The way the engine is designed, you have to have both the vibration damper and lower timing belt cover installed in order to see if the crankshaft is at TDC. I made marks of the back of the vibration damper and on the engine block so I could check TDC without reinstalling the lower timing belt cover every time.
If your car is like mine (which I beleive is what Bentley calls having a "one-piece crankshaft hub," then proceed to the next paragraph and remove the timing belt. If you have to remove the crankshaft hub bolt because you have a two-piece crankshaft hub, read here my section on removing and reinstalling the crankshaft hub bolt.
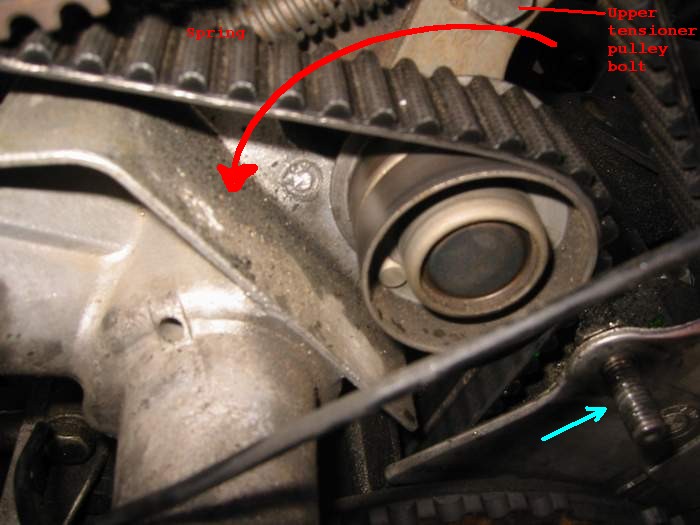
Before loosening the timing belt, double check that your engine is still exactly at top dead center at both the crankshaft and the camshaft. Once you have confirmed this, you're ready to remove your timing belt. Loosen the upper timing belt tensioner pulley bolt, push on the tensioner spring with a screwdriver until the spring's travel is maxed out, and then retighten the bolt. The arrow on the picture represents the direction in which the tensioner pulley should be rotated in order to relieve tension on the timing belt.
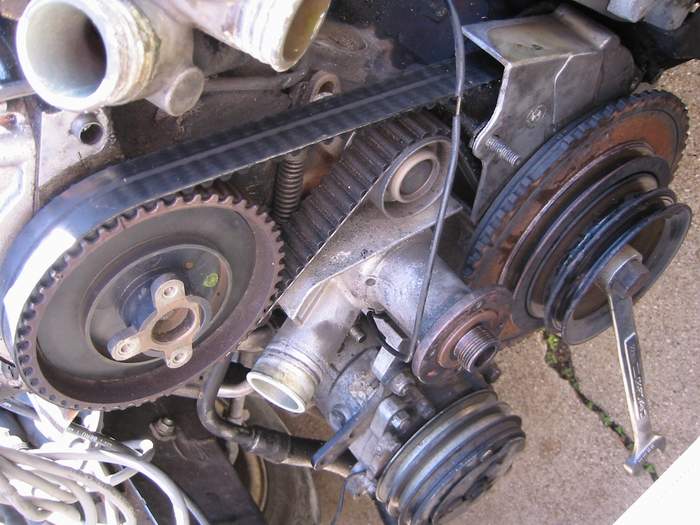
Once the belt is loose, remove it (without using tools) from the different sprockets in this order: camshaft, intermediate shaft, crankshaft, and tensioner pulley. Be careful! Do not move the crankshaft or camshaft sprockets once the timing belt is removed. You need the sprockets to be in the same place when you put the new belt on so that the timing will be correct.
Now remove the upper tensioner pulley bolt as well as the long stud that secures the base of the tensioner pulley, as well as the lower timing belt cover and alternator bracket. This stud/lug/bolt is marked by the light blue arrow in the picture of the tensioner pulley. Remove the tensioner pulley, taking care to keep the tensioner pulley spring from flying away. Remove the 3 mounting bolts for the water pump (one of then is hidden under the little shield) and remove the water pump.
Install your new water pump with a new gasket, torquing the bolts to 16 � 1 ft-lbs (22 � 2 Nm). Install a new tensioner pulley in place of the old one. Note: The new tensioner pulley will not spin as freely as the old one did. This is normal. Use the screwdriver to max out the tensioner spring while tightening down the upper bolt so that a new timing belt can be installed.
Before installing a new timing belt, make sure that the TDC marks on the camshaft still line up. To check the marks on the crankshaft, you'll have to replace the vibration damper and the lower timing belt cover. Or, if you marked the back of the vibration damper, then that's all you will need to check. Now, install the new timing belt starting and the crankshaft sprocket, followed by the intermediate shaft, camshaft, and tensioner pulley. Don't use tools for this step either. Loosen the upper bolt on the tensioner pulley. The spring will snap the pulley into place, automatically getting the timing belt to the right tension. Retighten bolt tensioner bolts to 16 � 1 ft-lbs (22 � 2 Nm). (The lower tensioner pulley bolt can be hard to get a torque wrench on. If you can't, don't sweat it. Neither of these bolts matters that much)
Now, using your combination wrench on the crankshaft hub sprocket, rotate the crankshaft through 4 complete revolutions and check to verify that the TDC marks on both the crankshaft and camshaft still line up together. If you can't get them both to line up at the same time, you screwed up somewhere. Follow the procedure for removing and reinstalling the timing belt, but rotate the camshaft a little bit to the right or left to get the timing right. Do not proceed past this point until your work passes the "four revolution test".
Now start putting your engine back together just as you took it apart. If you removed the crankshaft hub bolt, retighten it as described here. The following torque specs are from the Bentley book:
Hold off on reinstalling the water pump pulley until you get to installing the accessory drive belts.
Before putting back the engine block coolant drain plug, make sure the gasket is in good shape. If it's crushed or damaged it will need to be replaced.
The distributor rotor is held on by 3 allen bolts with lock washers. Chances are, the lock washers are smashed down. This defeats the purpose of lock washers, so if they are, go to the hardware store and get some M5 lock washers to replace the original ones. Also, if you don't have a way to turn allen bolts with a torque wrench, the correct torque of 3 Nm is acheived by tightening the bolts just until the lock washers are fully compressed. Stop tightening as soon as you encounter substantial resistance; you don't want to crush the plastic distributor rotor.
Once you've put all of this stuff back on, you need to reinstall the accessory drive belts (v-belts). This is fun!
First try fitting them on normally. If you can't get them to go on, you'll have to resort to other measures. For the alternator belt, fit the belt around the alternator and crankshaft pulleys. Make sure the water pump pulley is not installed. Fit the belt around the loose water pump pulley, and then bolt it onto the water pump flange. This was the only way I could get that belt on. Next is the power steering belt. Mine fit on normally without any problems, but if yours doesn't, you might try what I did with my A/C belt.
The old A/C belt was on so tight that I had to cut if off, as I couldn't fit it over the pulley to remove it. The problem was that I couldn't releive tension on the pulley, because the adjustment mechanism was maxed out in the "loose" position when the belt was fully tensioned! I read about "rolling on" the belt, which is where you put the car in gear and have someone push it so that the pulley turns, making it easier to slip the belt on. I tried this, but my new OE belt was so hopelessly short that even this didn't work. I finally got fed up and went to the auto parts store and bought a Gates 1/2 in. (12.5mm-13mm) width belt that was 2 inches longer than the OE belt. This one slipped right on. I tensioned it and it's worked beautifully ever since. Go figure.
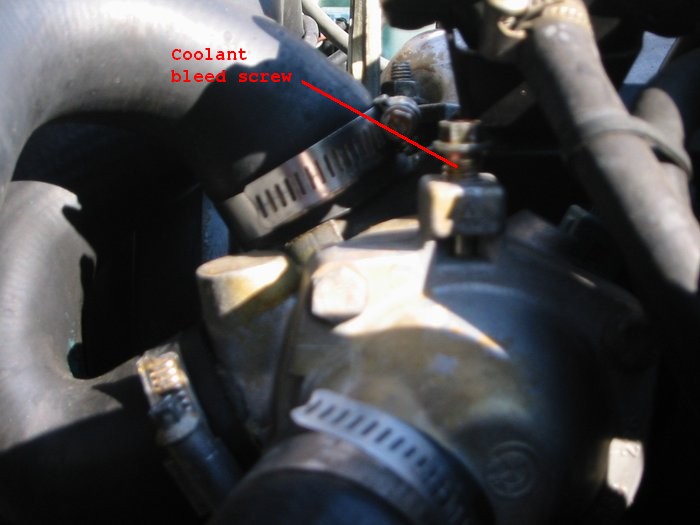
Once you get the radiator and engine block coolant drain plugback in, and the hoses all tight (with new hose clamps), you'll need to refill your coolant. Mix 50/50 water/coolant with phosphate free, aluminum safe coolant. Do not use red coolant! (I used regular Prestone, many store brand coolants contain phosphates.) You can either premix it, or pour in equal amounts of each, but if you premix it, make sure you keep all dirt out of the coolant so it doesn't get in your cooling system. Loosen the coolant bleed screw (8mm) on the top of the thermostat housing. Mine was hopelessly stuck, so I had to spray WD-40 on it, and break it free with visegrips. Hopefully this won't be a problem, but if it is, get a new screw. If you go ahead with the old one, you'll have to bleed the system again when you replace the screw. Now, pour the coolant in the expansion tank slowly. If you pour it too fast, you'll make it worse come time to bleed the cooling system. Fill the cooling system until coolant starts to come out the bleeder valve. Start the engine, and once it warms up, a mixture of coolant and air bubbles should start flowing from the valve. Allow the engine to run, while keeping the expansion tank filled, until air bubbles stop coming out with the coolant, and only coolant flows from the bleeder valve. Then retighten the bleeder screw before shutting off the engine. If you shut off the engine before tightening the screw, you'll have to bleed again. Be careful while running the engine with an unbled cooling system. Keep a close eye on the temperature gauge, and if it gets even close to the red, close the valve, shut off the engine, and start again when the engine cools down. When you start again, crank the engine before opening the valve.
Now get out and drive your car! You'll swear it drives better than before :-)
Although this guide is written as a complete walkthrough of how to replace your timing belt, and I know that you could complete the job using only this guide, I recommend you cross-reference with some other sources. A few good ones are:
Home | My Car | Gallery | Maintenance | E30 Links
