Orb Button
(Intermediate)Looks Cool Huh?
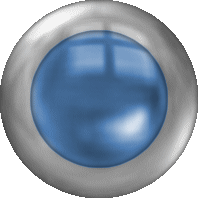
Looks Cool Huh?
2. On top click (Selections>>Select All) then on top again click (Selections>>Float). Now your ball should have running ants around it.
3. On top again click (Selections>>Modify>>Select Selection Borders)
Settings should be:
inside-checked
anti-alias-checked
border width-30
Press ok
4. On top again click (Selections>>Modify>>Feather>>Change the number to 25)
5. On top click (Adjust>>Brightness and Contrast>>Brightness/Contrast)
Settings should be:
Brightness-95
Contrast-0
6. On top click (Selections>>Select none)
7. On top click (Selections>>Select All) then on top again click (Selections>>Float). Now your ball should have running ants around it.
8. On top again click (Selections>>Modify>>Contract>>Change the number to 30)
9. Lets change the middle color of the ball. On top click (Adjust>>Hue and Satuation>>Colorize). You can make it into any color you want! I choose a blue (HUE-150, SATURATION-100). When you finish press ok.
10. On top click (Layers>>New Raster Layer>>You dont need to change any settings so press ok).
11. On top click (Effects>>3D Effects>>Cutout)
Settings Should be:
Vertical and Horizontal-0
Opacity-100
Blur-10
Shadow color-black
Fill interior with color-unchecked.
Press ok
12. On top click (Selections>>Select none) then on top again click (Layers>>Merge>>Merge Visible)
SAVE IT!
YOU ARE DONE!
Tutorial by Tina