FIDE Master Ralph Dubisch
|
|
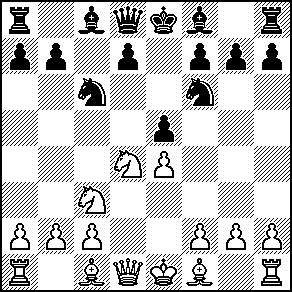
Game annotations are both the best and the worst part of my business as a personal chess trainer and teacher. It is great fun to play over and comment upon other players’ chess games, and the games submitted often give me insights into individual strengths and weaknesses. Almost every time I analyze games I learn something myself, and I can work at my own pace. That’s the best part. The worst part is that annotating a game, much like playing a game, is a task that simply doesn’t allow a perfect finished product. In practice, I am paid a finite sum to provide this service, and I have to limit the time I spend on the game. When done I am always sad, because inevitably there is one or more area of the game that could be further investigated, some line or other that I could clarify, some unnoticed error in my own work that I must permit to go uncorrected. I have to learn to live with this. Annotations must be targeted for a specific audience; variations turned into suggested and interesting lines rather than definitive conclusions; notes confined to a small number of critical positions rather than commenting virtually every move and idea. The following game was sent to me by Paul Goodspeed in Colorado. Paul has generously allowed me to publish both his game and his annotations, which are clearly marked, bracketed, in italics, with his initials preceding. When I was �done,� I had to admit I had spent far more time on the game than I had budgeted, and the finished product was eleven pages long, including cover letter, the four pages of notes that you see here, and six pages of supplemental games to support a specific opening suggestion. The section involving the opening suggestion has been modified for publication, since 43 supplementary games take too much space for our purposes. The rest is pretty much the same as when I shipped it off. No doubt there are errors. I think of this as a work in progress, never really finished, only put to one side while other projects beckon. Game 1.3 Goodspeed, Paul (1645) - Scott, Sean (2019) Denver Chess Club Monthly Swiss, Game/90 Denver, Colorado November 17, 1998 1.e4 c5 2.Nf3 Nc6 3.d4 cxd4 4.Nxd4 Nf6 5.Nc3 e5 
6.Nxc6? (PG - I think this was an error. The Knight has to give way, but Nb3 may be better. This just strengthens Black’s center and opens a useful file for him.) Yes, 6.Nxc6 is an error. 6.Ndb5 is the main line of the Schveshnikov Sicilian, though 6.Nb3, 6.Nf3, and 6.Nf5 all have theoretical lines that are supposed to be equal. Actual practice with these alternatives shows Black scoring very well. However, it is probably suicidal to enter into the main lines of the Schveshnikov (also known as the Lasker/Pelikan) against a well-prepared expert unless you, too, know what you are doing. There is simply too much going on to fake your way through the opening, and the wild, tactical complications typical of this variation make it hard to go by any simple positional rules. A standard main line: 6.Ndb5 d6 (to stop Nd6+) 7.Bg5 a6 8.Na3 b5 9.Bxf6 gxf6 10.Nd5 f5 11.Bd3 Be6. White may play Qh5, c3, Nc2, Nce3, and attack a castled Kingside, or Black may avoid castling and attack a White Kingside on the g-file. White may decide to wait to exchange on f6 to avoid giving Black the extra f-pawn that may be used to undermine e4 or even to advance further, and Black may end up recapturing with the Bishop (Bf8-e7xf6) and later play ...Bg5 to get rid of the "bad" Bishop. Major articles and book chapters have been written on the benefits of playing the Black Bishop to g7 instead of e7, and there are similar chapters proving White sacrifices on b5 are sound and/or refuted. Many players avoid open Sicilians altogether with 2.c3 (the Alapin), the Closed, or an early gambit. My own advice, assuming you are comfortable with other open Sicilian positions, is to try a rare forcing alternative at move seven. It goes 6.Ndb5 d6 7.Nd5!? Nxd5 (forced, to avoid Nc7+) 8.exd5. White chooses to give up the struggle over a possible d5-outpost, and instead creates a mobile Queenside pawn mass. Black must generally try to prove that the advance of the f- and e-pawns in the center has more significance. But first, there is the problem of where to retreat the Knight. It can go to either b8 or e7, with interesting complications developing right away in either case. For awhile it was thought that 8...Ne7 was wrong, with White proving this with the finesse 9.c3 Ng6 10.Qa4 Bd7 11.Qb4 Bf5 12.Qc4 Rc8 13.Qa4 Bd7 14.Qxa7. Black can improve with 9...Nf5, which protects d6, and White doesn’t get to use the c4-square for his Queen with quite the same effect. So now White can play 9.c4 against either Knight retreat, and choose whether or not to play Qa4 depending on Black’s choices, or can pick 9.c3 against 8...Ne7, perhaps planning to play a2-a4 against 9...Nf5 (this, intending ...g6 and ...Bg7 may be Black’s best). White often gets in an early c4-c5, and play is sharp, but on White’s terms, not Black’s. See the supplementary games for some amusing examples. [6.Ndb5 d6 7.Nd5 Nxd5 8.exd5 Nb8 (8...Ne7 9.c4 (9.c3! Ng6? 10.Qa4 Bd7 11.Qb4 Bf5 12.Qc4 Rc8 13.Qa4 Bd7 14.Qxa7) 9...g6?? (9...Nf5 10.Bd3; 9...f5!? 10.Qa4!? Kf7) 10.Qa4 Bd7 11.Nxd6#) 9.c4 Be7 10.c5!?] 6...bxc6 7.f3 The position is quite interesting, with White maintaining the very slight development advantage conferred by the first move, but with Black now holding the significant advantage of having more center pawns. This could be useful both in terms of central influence, and in the long term, due to the ability to play on the half-open b-file and the possibility of weakening White’s Queenside pawns with a minority attack using the a-pawn. White now has a choice, either to wage an all-out battle to prevent the advance of Black’s d-pawn to d5, or to allow that advance, and either strong-point e4 in a defensive action, or to exchange in the center and attempt to prove the mobile Black center pawns are a liability. The most natural choice would appear to be the battle for d5, with White playing Bg5, Bc4, and perhaps Qf3 and Rd1, while Black would likely pin with ...Bb4, and possibly try to distract some of White’s attention to the weakened Queenside while developing with an eye to the ...d5 break. It isn’t clear that Black can force ...d5 against this kind of White set-up, but it should also be noted that this battle is essentially a defensive one for White, and that Black has other targets, such as c3, b2, and the other Queenside dark squares. With ...Rb8, ...Bb4, ...Qa5 (or b6), and so on, White would be forced to adopt a different defense and ...d5 may again become possible. In general, this kind of position must favor Black. Offering up the Bishop-pair with Bg5xf6 almost certainly leaves fatal dark-square weaknesses in the White camp. Another White plan is to strong-point e4, probably with Bd3, f3 (or f4, trying to find play on the f-file), Qe2, and perhaps Re1 after castling. This kind of solid defense offers some hope of survival, and may even allow active play depending on Black’s central choices, but clearly it cedes the initiative. Again Black must stand well. Finally, allowing ...d5 and exchanging the e-pawn for the c-pawn gives Black a strong, mobile center formation, but White isn’t without chances to put pressure on it and perhaps effect a blockade. Again Black would gain the initiative, but the battle could be interesting. [7.Bg5 Rb8 8.Rb1 Bb4 9.Qf3 Qa5 10.Bxf6 (10.Bd2 d5 11.exd5 (11.Qg3 0 0) 11...Nxd5 12.Bc4 Bxc3 13.Bxc3 Qxc3+ 14.bxc3 Rxb1+ 15.Kd2 Rxh1 16.Bxd5 cxd5 17.Qxd5 0 0 18.Qxe5 Rd8+ 19.Ke2 Ba6+ 20.Kf3 Rhd1) 10...Bxc3+; 7.Bc4 Bb4! (7...Nxe4?! 8.Bxf7+? (a) 8.Nxe4! d5 9.Bd3 (9.Bb3! dxe4 10.Qxd8+ (10.Bxf7+ Kxf7 11.Qxd8 Bb4+ 12.Qd2 Bxd2+ 13.Bxd2 Ba6) 10...Kxd8 11.Bxf7 Bc5) 9...dxe4 10.Bxe4 Qxd1+ 11.Kxd1 Bb7 12.c3 0 0 0+ 13.Kc2 Bc5; b) 8.Qh5!? Nd6 9.Qxe5+ Qe7 10.Qxe7+ Bxe7 11.Bd3 Nb7!?) 8...Kxf7 9.Nxe4 d5 10.Ng5+ Kg8 11.Qf3 Qf6)] 7...Bc5 The straightforward 7...d5 looks more natural. White would have to choose between holding e4 and the battle against the pawn center. [7...d5 8.Bd3 (8.exd5!? cxd5 9.Bb5+ Bd7 10.Qe2 Bd6 11.Bg5 d4 12.Ne4 Be7) 8...Bb4 9.Bd2 Qb6 10.Qe2 d4 (10...0 0) 11.Na4 Bxd2+ (11...Qa5 12.b3) 12.Qxd2 Qc7 13.Nc5] 8.Bc4 Nh5? (PG - This move does not seem very useful for Black. It turned out simply to be a waste of two tempi.) Black seems interested in making two-move threats, and doesn’t seem to be willing to find a real plan based on the features of the actual position. White will not allow the tactic ...Qh4+ and ...Ng3, and the Knight won’t find a home on f4, so this move only makes sense in the long-term if it is a preparation for ...O-O, ...Kh8, and ...f5, which may lead to some Kingside play. Not only does this not turn out to be possible, it is also not indicated by the position, which cries out for central play and b-file action. This error is about as serious in terms of loss of time as was White’s error on move 6 in terms of structure. Black should castle now, and start making a plan involving ...Rb8, ...Qa5, and so on. 9.g3 O-O 10.Qe2 [10.f4? Nxf4 11.gxf4 Qh4+ 12.Kd2 Qxf4+ 13.Kd3 Qf2] 10...Qb6 
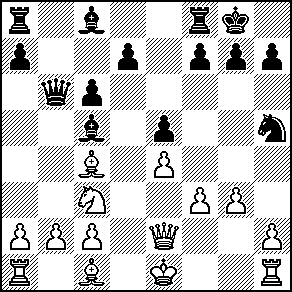
11.Bb3?! White need not give up the a6-f1 diagonal so easily. In fact, White may be able to take back the a7-g1 diagonal through tactical means, and can threaten the f4 break (hitting the loose h5-Knight) as well. I like 11.a3! here, though an argument could be made for playing 11.f4 right away. I think the exchange of early blunders (6.Nxc6? and 8...Nh5?) leaves this position slightly in White’s favor. This inaccuracy on move 11 gives Black a slight initiative. [11.a3! a5?! (a) 11...d6? 12.Na4! Qa5+ 13.Bd2! Qxa4 14.b3!; b) 11...Bd4 12.Nd1 (12.Na4!? Qa5+ 13.Bd2 Qxa4 14.b3 Qxc4 15.Qxc4 Bxa1 16.c3!) 12...d6 (12...Qb8 13.c3 Bb6) 13.c3 Bc5 14.b4 Bg1 15.Qg2) 12.Na4; 11.f4! Bd4 (11...g6 12.fxe5) 12.Qxh5 Qc5 (12...Qb4 13.Bd3 Bxc3+ 14.Ke2 Bxb2 (14...Ba6 15.Qf3) 15.Rb1) 13.Bd3 Bxc3+ 14.Ke2! Ba5 15.Be3 Qe7 16.fxe5] 11...Ba6 (PG - Now Black’s Bishop-pair and Queen are boring into White’s position like lasers. At this point I was simply hoping to hold on a few more moves to avoid slinking out of the tournament room before anyone else’s game was out of the opening.) Though Black’s control of the key Kingside diagonals does look impressive, it is only useful if entry points can be found. White’s position is sound, and Black must deal with the threat of Na4. Basically, this position is not terrible for White, and offers serious counterplay. If we were to toss in a4(?) for White and ...a5 for Black, the situation would be radically different, since there would be no way for White to challenge the diagonals, and Black could take as much time as necessary to gain entry. 12.Qg2 Bb4 Black settles for this, since he was unable to discover any way to use the diagonals before their control was wrested away. 13.Bd2 Bxc3 14.bxc3 (PG - Accepting doubled and isolated pawns because I really didn’t like the look of 14.Bxc3 Qe3+.) Even this isn’t clear, since White will be able to gain material (preferably the e-pawn) before Black blows open the central files for his Rooks. Black has now added to the problem of the offside Knight by giving up the Bishop-pair. The doubled and isolated pawns are only weak if pieces are needed to defend them. White has some dynamic compensation for this weakness, and the position is still in balance. [14.Bxc3 Qe3+ 15.Kd1 d5 16.Re1 Qb6 17.exd5] 14...Nf6 This is a good idea, bringing the Knight back into the game. However, Black seems to have fixated on the plan of playing it to c4 (positionally laudable, but long-winded) via d5 and b6. Instead, it should remain on f6 and support the advance of the d-pawn. Black should hold a strong pawn-center and play against White’s fixed weaknesses. 15.O-O-O (PG - Finally! Not the best castled position ever, especially with the open b-file and the Black a- and c-pawns which can come dislodge the Bishop. But after all that time in the center, it seemed like hiding in the back of a dark cave.) The castled position appears defensible, so this is a good move, connecting the Rooks. 15...d5! Finally! Black should have had this break in mind for a long time. 16.exd5?! [16.Bg5!? Qc5 17.Bxf6 gxf6 18.Kb2] 
16...Nxd5? 16...cxd5 is much better, both in terms of keeping the pawns connected - notice that Black would have only two pawn islands vs White’s three - and in terms of attacking White’s weaknesses, the doubled pawns on the c-file. Clearly the pawn on d5 would help to restrain the weaklings while Rooks placed on the c-file attack them. Black would, of course, have problems of his own. The center pawns themselves need protection, and White may gain space and open lines on the Kingside. [16...cxd5 17.Rhe1 Qd6 18.f4 e4 19.Be3 Rfc8 20.Bd4 Qa3+ 21.Kb1 Bc4] 17.Rhe1 Qc7 (PG - This move surprised me. I’m not sure what Black had in mind.) Black is clearing the path for the Knight (...Nd5-b6-c4). However, White now has a clear edge, with the Bishop-pair and Kingside possibilities. Black’s e-pawn requires defense by major pieces, and so proves to be a greater weakness than White’s c-pawns, whose weakness is masked on the c-file by the Black c-pawn. 17...Rfe8 seems better, though Black will still have great difficulties. 18.Qf2 [18.c4! Nb6 19.c5 Nc4? 20.Bc3] 18...Nb6 Perhaps 18...Qe7 to keep the White Queen off of the key diagonal. 19.Qc5! Nd7? Black should prepare this with 19...Rfe8, though White now stands very well indeed. 
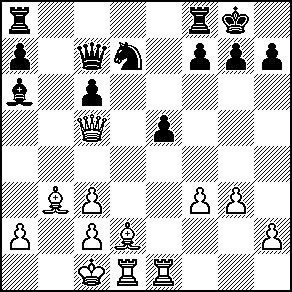
20.Qe3 White missed an opportunity to dominate the central files here, with 20.Qe7! threatening to move the d2-Bishop with discovered attack on d7 (perhaps to h6!?) and when that has been protected (...Rd8 or ...Bc8) White can follow up with f3-f4. [20.Qe7! Rae8? 21.Bxf7+] 20...c5 21.c4 Interesting is 21.Bd5!, intending c4 and Bc3, with attacking chances. 21...Bb7 (PG - This also surprised me. It seemed as if Black had lost the thrust of a wonderful attack.) Black has failed to find a plan consistent with the demands of the position. This move both attacks the slightly weak f-pawn and guards d5 against invasion by a White Rook, which would assist in doubling and attack the Black Pawns on c5 and e5. It also releases the a-pawn for a possible charge up to a4. 22.Bc3 f6 23.Rd2 Logical and strong, doubling Rooks on the center-file. 23...Rfd8 24.Red1 
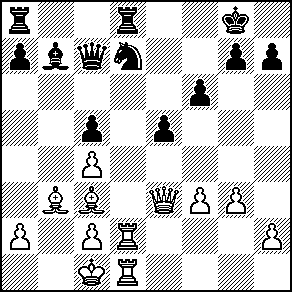
24...Nf8? 24...a5 or 24...Nb6 is called for, though Black will still have serious problems. White’s Bishop-pair and active Rooks are hard to deal with, and Black is hoping to improve the placement of his Knight by getting it to d4, overlooking the fact that White will simplify and win material. [24...a5 25.Ba4 Nb6 26.Rxd8+ Rxd8 27.Rxd8+ Qxd8 28.Bxa5?! (28.Bb5!) 28...Qa8 29.Bxb6 Qxa4 30.Qxc5; 24...Nb6 25.Rxd8+ Rxd8 26.Rxd8+ Qxd8 27.Qxc5 Bxf3 28.Qe3 Bc6 29.c5+ Nd5] 25.Rxd8 Rxd8 26.Rxd8 Qxd8 (PG - In the space of just a few moves, Black’s attack has died completely.) 27.Qxc5 Bxf3 28.Qxa7 Qd7 29.c5+ Kh8 30.Qb8 Qe7 
31.Bb4 (PG - Amazing. Now look whose Queen and Bishop-pair are boring into whose position.) Yes, and with a big difference - White’s are actually doing something. Ironic that the "weak" doubled c-pawn is now a monster passed pawn, no? [31.c6! Bxc6 32.Bb4] 31...Bc6 (PG - At this point I had 30 minutes left, he had about 40. I used up half of my remaining time on move 32.) 32.Ba4 (PG - Presumably he resigned in light of 32...Bxa4 [I don’t think any other Bishop moves are any better, and if he doesn’t move it he just loses it, since the Queen is tied to defense of the Knight]; 33.c6 Qf7 34.c7 Bd7 35.c8/Q Bxc8 36.Qxc8 Kg8 37.a4 and the pawn cannot be stopped.) Black can defend better here, reaching a lost opposite-Bishops ending with 32...Bxa4 33.c6 Qe6! 34.c7 Bd7 35.Qxf8+ Qg8 36.Qd8 Bc8 37.Kd2 h5 38.Kc3 Kh7 39.Qxg8+ Kxg8, when White wins by placing the King on b6, advancing the a-pawn, and restraining Black’s Kingside pawns with the Bishop. 32.Bd5 is a little more accurate than 32.Ba4 (though both win), since it avoids the opposite-color Bishop ending. [32.Ba4 Bxa4 33.c6 Qf7 (33...Qe6 34.c7 Bd7 35.Qxf8+ Qg8 36.Qd8 Bc8 37.Kd2 h5 38.Kc3 Kh7 39.Qxg8+ Kxg8 40.Kc4 Kf7 41.Kc5 Ke6 42.Kb6 f5 43.a4 g5 44.a5 Kd7 45.Be7! (45.a6 Bxa6 46.Kxa6 Kxc7 47.Kb5) 45...g4 (45...Kxe7 46.a6 Bxa6 47.Kxa6 Kd7 48.Kb7) 46.Bf6 e4 47.Bg5 Kd6 48.Be3 Kd7 49.Bf4) 34.c7 Bd7 35.c8=Q Bxc8 36.Qxc8 Kg8 37.a4 e4 38.Qxf8+ Qxf8 39.Bxf8 Kxf8 40.a5; 32.Bd5! Bxd5 33.c6 Qe6 (33...Qf7 34.c7 Be6 35.c8=Q Bxc8 36.Qxc8 Kg8 (36...Qxa2 37.Qxf8+ Qg8 38.Qxg8+ Kxg8 39.c4 Kf7 40.c5 Ke7 41.c6+ Kd8 42.Bd6 e4 43.Kd2 f5 44.Ke3 g6 45.Bf4 g5 (45...Kc8 46.Kd4 Kd8 47.Kd5 Kc8 48.Kd6 Kd8 49.c7+ Kc8 50.h4) 46.Bxg5+ Kc7 47.Kf4 Kxc6 48.Kxf5 Kd6 49.Kxe4 Ke6 50.g4) 37.a4 g5 38.Qxf8+) 34.c7 Bb7 35.Qxb7 Qxa2 36.Bc3 (36.c8=Q Qa1+ 37.Kd2 Qd4+ 38.Ke2) 36...Qa3+ 37.Kb1 (37.Bb2 Qe3+ 38.Kb1 Qe1+ 39.Bc1)] 1-0 Annotations in parenthesized italics (identified with PG) by Paul Goodspeed. All other notes (c) 1999 by FM Ralph Dubisch. Supplementary Games Parashiv - Evulet
Romania, 1980
Mellgren, A - Alekhin, Alexander (RUS)
Oerebro (Sweden), 1935
Gazik, Igor (SVK) - Manik, Mikulas (SVK)
Topolcianky (Slovakia), 1994
Olazarri, Marcelo (URU) - Donatti, Alvaro (URU)
Montevideo (Uruguay), 1994
Gaponenko, Inna (UKR) - Mendeiros, J
Cappelle la Grande (France), 1995
Kolaots, K - Olsson, R
Stockholm (Sweden), 1994
Matulovic, Milan (YUG) - Moutousis, Konstantinos (GRE)
Vrnjacka Banja (Yugoslavia), 1990
Huebner, Robert (GER) - Garcia Palermo, Carlos (ITA)
Germany, 1990
Inkiov, Ventzislav (BUL) - Muse, Mladen (GER)
Berlin (Germany), 1984
Cuijpers, Frans Andre (NED) - Wiersma, Eelke (NED)
Netherlands, 1996
Rantanen, Yrjo A (FIN) - Seidler, O
Buenos Aires (Argentina), 1978
Kholmov, Ratmir D (RUS) - Filipenko, Alexander V (RUS)
Cheliabinsk (Russia), 1991
Popovic, Petar (YUG) - Nikcevic, Nebojsa (YUG)
Yugoslavia, 1994
Rowson, Jonathan (SCO) - Holmsgaard, Henrik (DEN)
Copenhagen (Denmark), 1996
Oll, Lembit (EST) - Herczeg, Tibor (HUN)
Budapest (Hungary), 1989
Bellon Lopez, Juan Manuel (ESP) - Garcia, G
Lanzarote (Spain), 1977
Lein, Anatoly (USA) - Bilek, Istvan (HUN)
Rome (Italy), 1976
Spassky, Boris V (FRA) - Polgar, Zsuzsa (HUN)
Brussels (Belgium), 1986
Porubszky, Maria A (HUN) - Macek, Vlasta (CRO)
Pula (Croatia), 1975
Contact me by e-mail: rdubisch@hotmail.com
|