FIDE Master Ralph Dubisch
|
|
Beneath the theories of candidate move selection proposed by Alexander Kotov, in Think Like a Grandmaster, and Jeremy Silman, in How to Reassess Your Chess, is what I consider the basic method that humans gain expertise in almost any skilled activity, from chess to tennis to driving to solving math problems. The student consciously acquires knowledge, such as positional concepts and tactical skills, and after a surprisingly short time begins to absorb this new knowledge subconsciously. When faced with a chess position, the student�s subconscious will supply candidate moves and plans based on the student�s subconscious database of chess knowledge � if it is allowed by the conscious mind to do so. During the learning process, which means pretty much forever for most of us, the student should gladly accept the offers from the subconscious, but should also consciously consider the reasons behind these moves. If one or more good reasons appear to exist in support of the move or plan, then the move should be gladly accepted, analyzed, and played if appropriate. If the move appears to be incorrect according to all consciously known principles, or is found to be tactically flawed, this should be noted gently, and the subconscious will learn the lesson. Most errors that occur at the class level of play seem to be errors of excess concentration � tunnel vision, if you will � rather than lack thereof. In chess, attentive alertness is almost always more important than deep concentration. Further, in order to perform, the subconscious needs the conscious mind to relax, momentarily disconnect, and stop giving orders. The conscious is very judgmental, and if given the opportunity prefers to stay in control of everything going on. One of the ways it does this is by making value judgments about not only the moves played (bad move), but also the thinking processes behind the moves (you�re not thinking about this right), the mental quality of the individual choosing the moves (don�t be so stupid), the way all of this appears to others (what will they think?), and just about anything else it can (how can I play under these terrible conditions?). Results are important to chessplayers, but concentrating on results being "good" or "bad" is just a trick of the conscious mind to stay on top. As this kind of value judgment is reduced and eliminated, a strange paradox develops: as results become less important, they tend to improve. When results are more important, it is harder to be pleased by the results you obtain. Since we are supposedly playing chess for enjoyment (what, you thought you were going to be a professional?), shouldn�t we enjoy playing chess? Doesn�t this mean enjoying playing every move, as long as it is still possible to set traps, solve problems, and appreciate the interacting lines of force? If we are not playing chess as a profession, why should we ever consider offering (or accepting) a draw on move eight? If there is something better to do with the time than play chess, why are we here in the first place? Our job is to enjoy choosing the best move we can in every position in every game. It does us no good to worry about the possibility of winning or losing; there is no value in realizing during the game that we irretrievably missed an opportunity two moves earlier; it isn�t important that we impress our opponent by snapping out a quick reply to an unexpected move; there is no benefit in beating ourselves up over using too much time. The game we are playing must be chess only, not one of those other games at which we all excel, involving self-doubt or ego-building. The Soviet School worked because it built a powerful subconscious database of chess knowledge in a style that almost forced the students to properly access it. The boring repetition in itself helped students to disconnect the conscious mind from that part of the decision-making. Their conscious mind was free to set long-term goals and generally direct the process, while their subconscious had been trained to do the pattern recognition, databasing, and most of the calculating tasks needed to play well. We�re going to have to make do with assimilating some important strategic and tactical principles. One of the things that I request of all my students right from the beginning is to have good reasons for every move they play, and to try to see the reasons for their opponents� moves, too. These reasons must be based on actual positional and tactical elements currently found on the chessboard, and cannot be emotion-based reasons such as �I wanted to attack,� or �I was afraid of something.� My theory is that improving the reasons for playing moves will lead to improvements in chess skill. To have meaningful reasons for moves, it is necessary to appreciate positional elements. The first and possibly most important element I choose to discuss is the outpost. An outpost is: "a square at the forefront of your position which you can readily support and from where you can control or contest squares in the heart of the enemy camp. To be useful an outpost must be firmly under control and so should ideally be protected by a pawn. Conversely your opponent should not be given the opportunity to deny you access to your outpost, so in particular it must be immune to attack by enemy pawns." (Stean) It believe the outpost is fundamental to almost all other positional concepts: when discussing weak pawns, it is usually the fact that an outpost is available in front of them that is most significant; when discussing open and half-open files, outposts once again appear, seemingly as a side-effect of thematic play. When looking at weak square complexes, you can hardly avoid outposts. Outposts are critical because without them, pieces flounder around with nowhere to go; knowledge of outpost play often offers a guide to choosing plans in positions that otherwise offer few clues. The first game I like to show is a classic use of the d5-square in the Sicilian. The concept of minority attack shows up in this game. A minority attack is a method of weakening an otherwise sound set of pawns by advancing a smaller number of pawns at it. It revolves around a half-open file, and its goal is fairly small, but has a certain inevitable quality to it. It will be mentioned briefly in this game, but a complete discussion will have to wait for another lesson. Game 1.2 Fischer, Robert - Gadia, Oscia Mar del Plata, Argentina 1960 1.e4 White plays to gain space in the center, contest the d5 and f5 squares, and open lines for the Queen (d1-h5) and the Bishop (f1-a6), which will facilitate development and aid in quick castling. 1...c5 Black hits at the d4 square, and plans the exchange of c-pawn for d-pawn if White should choose an early d2-d4. Black’s move suggests a dark square strategy in the center, especially if White avoids this exchange. 2.Nf3 Choosing a natural developing move for the g1-Knight, and preparing the move d2-d4, since this Knight development allows White to avoid a recapture in the center with the Queen (and subsequent loss of time) or an unclear gambit. The f3-Knight attacks the central d4 and e5 squares. 2...d6 A flexible waiting move, continuing the dark-square strategy initiated on move one. The pawn attacks e5, inhibiting White’s central advance e4-e5, and opens a line for the c8-Bishop (c8-h3). Black avoids making a committal decision about the placement of the b8-Knight (c6 or d7?), and delays the decision on which direction the f8-Bishop will go (e7 or g7?), but consequently also begins to fall behind in development. 3.d4 White faced a decision whether to pursue open development or to attempt to keep center pawns abreast on e4 and d4 by playing c2-c3 first, intending a recapture on d4 with the pawn. The c-pawn move would take time, but threatens a fairly large central superiority. 3.c3 would be favorable, except that the White e-pawn lacks support. Black can challenge it immediately with Ng8-f6, forcing White to take more time to look after its defense. Note that c3 is the natural square for the b1-Knight, and that occupying this square with a pawn leads to a real dilemma when faced with the question of how best to defend e4 (Qd1-c2? Bf1-d3?). Incidentally, 3.d4 opened the c1-h6 diagonal as well as attacking the c5 and e5 squares, while possibly threatening to charge ahead with gain of central space with d4-d5. 3...cxd4 Black’s exchange of the c-pawn for the d-pawn in the open lines of the Sicilian means Black gains a numerical central pawn advantage. This does not give Black the right to simply rush up the center of the board, but it does give Black extra pawn influence in the center, thus restraining White’s ambitions there. Also as a consequence of the exchange of pawns, Black has a half-open c-file, and White has a half-open d-file. These features � the extra center pawn, and c- vs. d-file � indicate Black’s strategic play should be a minority attack on the Queenside (much more on minority attacks in a later lesson). A minority attack is more favorable the further away from the center the half-open file is located (or, stated another way, with a smaller number of pawns in the minority), thus Black has chances with the (pawn-based) minority attack, with play on the c-file to create weaknesses on the c3- and c2-squares using the c4- square as a semi-outpost (since White can guard it with b3, but only at the cost of weakening other important c-file squares). White has a less powerful option of minority attack on the Kingside, since his file is too central. However, White has other things going in compensation, including an edge in development, and can make an attempt at Kingside attack intending mate. If Black survives the attack, his Queenside play yields a long-term advantage. 4.Nxd4 Recapturing and centralizing a piece. From d4, the Knight eyes b5, c6, e6, and f5, all important squares. Though this is moving a piece twice in the opening, it replies to a time loss (initiating the exchange) and loses less time than a Queen recapture, since after 4.Qxd4 Nc6 White would need to reply to the attack on her majesty. 4...Nf6 Black’s first developing move, and a very important one, more or less forcing 5.Nc3. Now Nb1-c3 isn’t a bad move for White, but by requiring White to play it early, Black avoids lines where c2-c4 is played first. In light of the discussion about Black’s third move, it should be clear that a pawn on c4, protected by one on b3, is less vulnerable to attack along the c-file than one on c2, and it also serves to shorten the influence of Black major pieces on that line. Further a c4-pawn serves to restrain the b5-square, thus making it hard for Black to successfully expand on the Queenside, and it reinforces White’s control of d5, a key point in the White strategy. 5.Nc3 Developing, defending the e-pawn, and influencing d5. 5...a6 Another flexible choice, and the defining move of the Najdorf variation of the Sicilian. 5...a6 proves useful in most Sicilian positions, making it expensive for White to post a Knight on b5, and announcing a later Queenside expansion with ...b7-b5. Although still delaying the decisions about which square to develop both the b8-Knight and the f8-Bishop, in practice Black is now committed to play ...e7-e6 and develop the Bishop to e7 rather than choosing the Dragon set-up with ...g7-g6 and ...Bf8-g7. 6.Bc4 Influencing the key d5-square and aggressively eyeing f7 and e6, Fischer’s choice is better used in variations where Black has committed the b8-Knight to c6 instead of the flexible Najdorf formation. In 1960, they were still figuring out the fine points of these variations (and still are), but it is now thought that quiet lines with 6.Be2 (Karpov) or challenging the whole system with 6.Bg5 (everyone else) is a better way to go. The c4-Bishop appears to be a target for the Black pawns on the Queenside. 6...e6 Blunting the attacking line of the aggressively posted Bishop, preparing the quiet development of the Bishop to e7, and offering a pawn defense of the d5-square. 7.Bb3 White avoids the fork-trick ...Nf6xe4 and ...d6-d5, which would simplify and reduce White’s central influence (the e4-pawn). This also admits that ...b7-b5 will come soon forcing the Bishop to move anyway. 7...b5 Claiming the Queenside space, attacking c4, and preparing to develop the Bishop to b7. Black also hints at a threat to the e-pawn with ...b5-b4 attacking the defender. 
8.O-O Providing King safety and developing the Rook, which may come to the e-file to defend the pawn or attack on an open line if the pawn is removed. This move offers a gambit. 8...Bb7 Black can attempt to win a pawn with 8...b4, but of course White offered this gambit intentionally. Though 9.Na4 is the most common response to 8...b4, Fischer played 9.Nb1 once, and won nicely. White gets development and play on the opened center files for the small material investment, while Black has some trouble finding a home for his King. Instead Black develops a piece and puts pressure on the White center, especially the e-pawn, while increasing the defense of d5. However, this also weakens the e6-pawn, and White takes aim. 9.f4 Gaining space and attacking e5, while preparing a central break such as e4-e5 or the positional advance f4-f5. 9...Nc6 Once again Black can take the e-pawn, though perhaps it is even more dangerous now that White has f4-f5 in reserve. With 9...Nc6, Black hopes to exchange some of White’s active minor pieces and reduce the pressure on important central squares such as e6. 10.Nxc6 White plans f4-f5, and prefers not to leave the Knight that can move to e5 on the board. Also White wants to avoid trouble on the a7-g1 diagonal such as Black playing ...Qd8-b6 (or even ...Bf8-c5), pinning the Knight. 10...Bxc6 Recapturing the piece. 
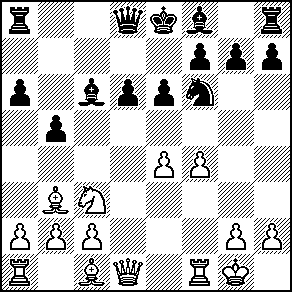
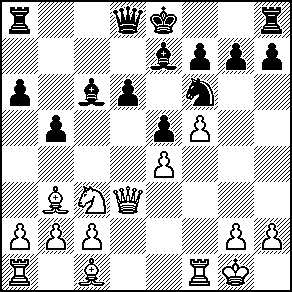
11.f5! Fischer is playing to gain d5 as an outpost for his pieces. He was able to decide on d5 because it is the furthest advanced square on "his" half-open file that is naturally guarded by a pawn, and he sees a clear way to undermine the Black pawn defense of the square. Similarly c4 would be a natural outpost for Black in this position, but because of the White lead in development, it will take longer for Black to get around to outpost play there. d5: protected by a pawn; the opponent can’t guard it with a pawn (after 11...e5). It is on open lines controlled by White pieces (the d-file and the a2-g8 diagonal), making it even more important. If it didn’t offer a way to control significant squares on the Black side of the board, it wouldn’t be worth as much; if Black could contest the d5-square with his pieces, White might not ever get to use the outpost point. This suggests a defense to an enemy outpost, namely to challenge the square by simply guarding it as many times as possible, or by exchange of those pieces (often Knights) that might find it a useful staging ground. 11...e5 Black gives in to the pressure right away. Other moves look dangerous: 11...Qd7 12.fxe6 fxe6 13.Qd4 Be7 14.Bg5 with an active White position; 11...b4 12.Na4? e5 would be good for Black, since the Knight is needed to occupy the d5-outpost, but 12.fxe6! bxc3 13.exf7+ Ke7 (13...Kd7 14.e5) 14.Qe1! Qc7 (14...Qb6+ 15.Be3 Qb7 16.e5 dxe5 17.Qxc3; 14...cxb2 15.Bxb2 Nxe4 16.Rf4 d5 17.Rxe4+ dxe4 18.Ba3+) 15.Qxc3 Nxe4 16.Qh3 offers White strong attacking positions. Analysis by GM Stean, in his excellent book, �Simple Chess,� now out of print. Find it, buy it! 12.Qd3 Key to the control of White’s newly created d5-outpost is the e-pawn, so White now returns to the job of defending it while aiming to connect the Rooks. 12...Be7?! Developing, but Black should preserve the Knight with 12...h6. Also 12...Qb6+ 13.Kh1 13.Qb7 or even 12...b4!? 13.Nd5 (13.Qc4? Qd7 14.Qxb4? d5; 13.Bd5? Nxd5 14.Nxd5 Bb5) Nxd5 14.Bxd5 Qb6+ 15.Be3. 
13.Bg5! White makes use of his dark-squared Bishop, which cannot directly use the outpost, to harass a defending piece. 13...Qb6+ Developing with tempo, intending to connect the Rooks. 14.Kh1 Getting out of check without self-pinning any pieces. 14...O-O Connecting the Rooks, and hoping for King safety. 15.Bxf6! Removing the d5-defender according to plan. 15...Bxf6 Recapturing, avoiding major weaknesses. 
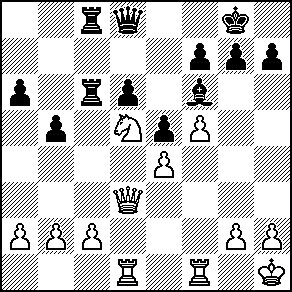
16.Bd5! Eliminating the final defender of the outpost square. 16.Qxd6?? Rad8 isn’t at all what White is looking for, converting the game to a dead loss after 17.Qa3 b4 or 17.Nd5 Rxd6 18.Nxb6 Bxe4. The thematic 16.Bd5! leaves White with a beautiful Knight on a central outpost versus a passive, bad Bishop. Remember the definition of a bad Bishop: one whose own pawns, especially center pawns, are fixed on the same color squares on which the Bishop travels. Now examine the big funny-looking pawn on f6. 16...Rac8 Black unpins and hopes to obtain play on the c-file. 17.Bxc6 Snapping off the d5-defender before a retreat (d7 or e8). 17...Rxc6 Recapturing, and planning to double Rooks on the c-file. 18.Rad1! This prevents ...Qb6-d4 after the Knight jumps into d5. If 18.Nd5?! right away, 18...Qd4, and 19.Nxf6+ gxf6 20.Qg3+ Kh8 21.Qh4 (hoping for 21...Kg7 22.Rf3 or 22.c3 and 23.Rf3, which might work if the Black c6-Rook were still back on a8) 21...d5! and Black stands well. With ...Qb6-d4 Black hopes that White will exchange Queens on d4 and the Knight for the Bishop on f6, ruining Black’s pawn structure, but giving White weak pawns on c2 and e4. 18...Rfc8 Doubling Rooks, hoping to create distracting pressure. 19.Nd5 Finally occupying the outpost with the ideal outpost piece. From here it hits b6, c7, e7, and f6. 19...Qd8 Removing the Queen to a point where it can aid in the defense of all of the attacked squares. If Black now tries 19...Qd4??, then 20.Nxf6+ gxf6 21.Qg3+ Kh8 22.Rxd4. 
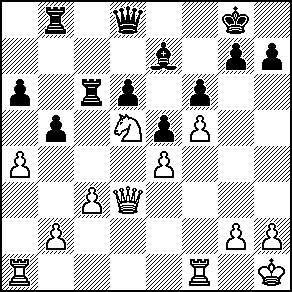
20.c3 White blocks most of Black’s c-file play. Now White has consolidated his outpost, and Black has practically no compensating play. White can choose his winning method. 20...Be7 Trying to get out of the way of a pawn avalanche on the Kingside, defending d6, and possibly intending to retreat to the safety of f8 to try to weather the storm. 21.Ra1! Fischer decides on a simple and safe plan to destroy the Black Queenside, against which Black is powerless. More direct and not much more risky is the exchange sacrifice 21.f6! Bxf6 22.Rxf6! gxf6 23.Rf1 with what must be a winning attack. 21...f6? Attempting to prevent attacks based on f5-f6, but this loses quickly. It is hard to suggest real improvements. 22.a4 Attacks the Black Queenside pawns. Due to the influence of the powerful Knight on d5, Black must give up at least a pawn now. 22...Rb8?? Trying to defend b5, but simultaneously leaving c6 unguarded. 
23.Nxe7+ Winning, since c6 is a Rook. One more White piece will occupy the outpost square with a double attack: 23...Qxe7 24.Qd5+ and 25.Qxc6. 1-0 Contact me by e-mail: rdubisch@hotmail.com
|