FIDE Master Ralph Dubisch
|
|
This example game is one I annotated more for its entertainment value than for any educational aspects it may have, but it should provide an idea of my style, both as player and writer. The target audience for this piece is about low expert (actually a specific expert-rated friend of mine), so there are some analytic questions left deliberately unanswered - the reader is intended to use some independent thinking while playing over the game and notes, and should not assume all answers are simply supplied. However, the game is suitable reading for most players. I hope you find it enjoyable. Game 1.1 Dubisch, Ralph - Roper, David Seattle, Washington 1996 1.e4 d6 2.d4 Nf6 3.Nc3 c6 Although Black’s first two moves would traditionally lead to a Pirc/Modern defensive structure with a Kingside fianchetto, this move announces a different plan involving ...e5 instead. This can lead to positions similar to Philidor’s Defense if White chooses not to challenge the idea with an early f4. 4.f4 Qa5 5.Bd3 Bg4 More usual is 5...e5 first. 6.Nf3 e5 7.dxe5 Possibly more objectively promising is 7.Be3. Ironically, some of Black’s best results in this line have come from playing ...d5 early, either in addition to or instead of the thematic ...e5. 7...dxe5 8.fxe5 Pushing the f-pawn might also promise an advantage, but I had only seen that move played with the Bishop still on c8, when it clearly reduces that piece’s potential. In this position, White would likely gain the Bishop pair, but Black is well placed to complete development and take advantage of the weakened d4 square, or to maneuver a Knight to c5 and take the d3- Bishop. 8...Nfd7 This slight congestion will prove discomfiting, but only after fairly incisive play by White. Black hopes to get this Knight to e5, then support it with natural development of the rest of his pieces: Nbd7, Bd6, etc. 
9.e6!? Already the third e-pawn to appear for the White side, and the first able to choose the square on which it perishes. During the game, the choice seemed clear - to depart by being captured on e5 would aid Black in his effort to blockade that point. A successful blockade on e5 by Black would indicate a complete vindication of his opening strategy. In hindsight, however, 9.Bf4 doesn’t look bad at all. 9...fxe6?! The more natural recapture with the Bishop allows White to gain at least the Bishop pair with Nd4, but Black may be OK here. My philosophy playing White is to try to get something concrete from the opening - a clear advantage, or failing that, some kind of imbalance that may be exploited and controls the direction of play. I’m not as comfortable to just reach a playable, balanced position, then maneuver indefinitely until an error occurs or someone falls asleep. I also try to do the same with Black, but I’m more willing to accept a balanced game if the only available imbalances appear to favor my opponent. In other words, things tend to happen in the openings of my games, and an inattentive opponent may find themselves swimming upstream early. On the other hand, if I force the play too quickly, I sometimes find myself overextended, or playing with an unfavorable imbalance. This happens more often when I play Black, as I choose unusual lines; the idea is to improve on lines that have been unfairly discarded by theory, but sometimes it turns out that the opening is simply poor (or worse), and the situation is out of my control. Either way, my games are rarely boring. [9...Bxe6 10.Nd4 Nc5 11.Nxe6 Nxe6+/=] 10.h3 Bh5 11.g4 Bg6 12.Bd2 Qc7 13.Qe2 Bd6 [13...Qg3+ 14.Qf2 Qxf2+ 15.Kxf2 Bc5+ 16.Ke2 0-0+/=] 
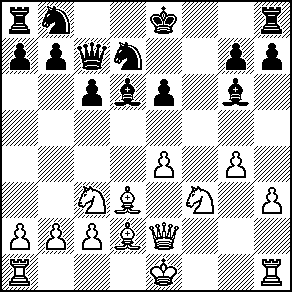
14.e5!! Fulfilling the thematic duty of every e-pawn in this game: to expand, to die; but in dying, to create weaknesses and open lines. This is clearly the only move that prevents Black from establishing a minor piece on e5. 14...Nxe5 [14...Bxd3 15.exd6 Bxe2 16.dxc7 Bxf3 17.c8=Q+] 15.Nxe5 Bxe5 16.Bxg6+ hxg6 17.0-0-0 Nd7 18.Qe4!? This move helps to prevent ...Bf4, as well as directly hitting g6. I felt that immediately playing Bg5 allowed Black to gain more activity. [18.Bg5 Bf4+ 19.Bxf4 Qxf4+ 20.Kb1 0-0-0 21.Qxe6 Qf6] 
18...Nf8?! If this was a meal instead of a chess game, an appropriate remark at this point might be that Black’s eyes were bigger than his stomach. Certainly anyone can see that Black is a pawn ahead, simply by counting. However, he has three pawn islands, and his "extra" pawn is either the isolated pawn on the open e-file or one of the doubled isolated g-pawns. Far more important is the fact that his Rooks are not yet connected, and that all of White’s forces are developed and ready for action on the myriad open lines near Black’s King. This would be a good time for Black to admit that White’s gambit was sound, to castle long, and forget material questions. [18...0-0-0 19.Qxg6+/-] 19.Bg5! Qa5 [19...Bxc3 20.bxc3 Qa5 21.Qf4] 20.Qe3 Analytically tempting was the fancy Rook sacrifice, but Black has an unusual defense with two Rooks along rank and file leading to his King. I spent a fair amount of time finding that during the game, although even without that specific defense I wasn’t certain White's attack was good for more than a draw. [20.Rhf1?! Bxc3 21.Rxf8+? Kxf8 22.Qxg6 Rxh3! 23.Rf1+ Kg8 24.Qxe6+ Kh8] 20...Bxc3 This certainly looks like counterplay, but one Queen on the attack simply isn't enough of a distraction from the real battleground. Since I have no improvements to suggest, it seems safe to say that Black’s game is bankrupt. 21.bxc3 Kf7 Clearly the best chance. If White is allowed to place major pieces on the f-file while the King resides on e8, mate will surely follow. Note that taking the a-pawn simply places Black’s Queen further from the action. 22.Rhf1+ Kg8 23.Be7! With multiple purpose of both attack and defense, this gets the Bishop out of harm’s way along the fifth rank, defends a3, and attacks f8. 23...Kh7 24.Rf7! It would be silly to settle for merely regaining the e-pawn here. 24...Re8 Apparently threatening the trick ...Rxe7 and ...Qa3+, but White has sleeves, too. 
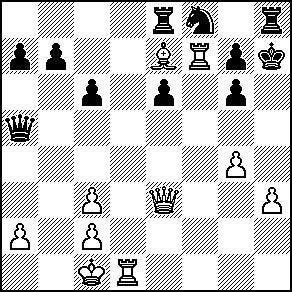
25.Qf2! e5 [25...Rxe7? 26.Qh4+ Kg8 27.Rxf8+ Kxf8 28.Qxh8+ Kf7 29.Rf1+] 26.Qf6 Check and sac lines were far less clear. Rxf8 looked to win material, but I just got that Rook to the seventh rank, and wasn't ready to give it up for mere material gain just yet. This move actually foresaw the game continuation, although I waited two more moves to calculate all the way to mate. [26.Qh4+ Kg8 27.Rxg7+ Kxg7 28.Bf6+ Kf7 29.Qxh8 (29.Bxh8 Re6) 29...Qxc3] 26...Ne6 [26...Rg8 27.Qh4#] 27.Qxe6 Qxc3 
28.Rxg7+! Time ran down while I made certain of the details, but this provided more suspense for the spectators than for the players, since even if the mate in ten didn’t pan out, there are simple retreats that leave White with an extra piece and a simple win. [28.Qb3 Qa1+ 29.Qb1; 28.Kb1] 28...Kxg7 29.Bf6+ Kf8 [29...Kh6 30.g5+ Kh5 (30...Kh7 31.Qf7#) 31.Qg4#; 29...Kh7 30.Rd7+ Kh6 31.g5+ Kh5 32.Qg4#] 30.Bg7+!! The key move, without which White would have only a perpetual check (Be7+), obviously not an acceptable result after being a piece ahead. This move might seem hard to visualize prior to the Rook sacrifice. The whole idea of the maneuver Be7-f6-g7 is to remove the piece from the board with tempo, leaving the exact position from the Rook sacrifice but without the Bishop. This allows the d1-Rook to enter the game with check. 30...Kxg7 31.Rd7+ Kh6 32.g5+! Without this little pawn check, the whole combo would fail, and the Black King could hide behind his g-pawn. This move provides both a drawing out and clearance of g4 for the Queen. 32...Kxg5 33.Qg4+ Kf6 [33...Kh6 34.Qh4#] 34.Rd6+ Ke7 [34...Kf7 35.Qxg6+ Kf8 36.Qf5+ Kg7 37.Rg6+ Kh7 38.Qf7#] 35.Qd7+ [35...Kf8 36.Rf6+ Kg8 37.Qf7#] 1-0 Contact me by e-mail: rdubisch@hotmail.com
|