
True
Colors
The
best
place
to
go
for
information
on
colorguard!
Tips & Tricks
Selecting / Designing / Sewing Flags
Cool Flag Moves
Instructors & Directors
The following is just my opinion, and by no means an absolute standard.
Black has many advantages. It is flattering, dramatic and matches just about anything. It also is easy to keep clean. However, it is difficult to see this uniform from far away. Bright sequines can help, but make the uniform more expensive and harder to clean. I'd stay away from white as a base color. It's shows eveything. I mean, everything! Dirt, that 'couple extra pounds' and even pantylines. One tough question is...skirt or pants? Skirts are elegant, but a pain in the butt to twirl in. Pants are more functional, but the hems get dirty every show. I prefer straight-leg pants. (Baggy) They are elegant, flattering, comfortable and don't limit choreography. If you have a small guard, check the listings on MarchingBandLinks.com. Sometimes they list uniforms and you might just get lucky.
Here are some things to consider when designing a uniform for your group:
-Members with large hips have the opportunity to emphasize a small waist, keeping in mind that gathering over the hips should be minimal.
-Members with large busts should avoid designs that feature the focal point of the design on the bust area of the bodice.
-Diagonal design features are more flattering than horizontal.
V necklines
Slanted hemlines rather than straight across the thighs
V waistlines
-Shiny fabrics will make members look larger......matte finish fabrics make members look smaller.
-Dark colors are slimming....bright neons and pastels make you look bigger.
-It's better to put the emphasize on the neckline and shoulder area rather than at the waist or tummy. Two piece costumes are popular, but don't put your team in a crop top and belly button revealing hip huggers if their tummy's aren't toned. There ís nothing more distracting in a performance than flesh hanging over a belt!
-Wide sequinned belts make members look wide in the waist.
-And remember, always, always design for you largest/hardest to design for performer!!!
Selecting / Designing / Sewing Flags

I've been told, and I agree, that flags that have
a circular pattern or a circle in the center are usually not a good idea.
For some reason, this draws your eyes to the center of the flag, and it's
much easier to tell when someone is off (even if it's only by the slightest
degree). Basically, it is just hard to appear as a "clean" color
guard with these flags.
I always recomend either double-sided or universal
flags. What this means is if you have writing on your flag, it must
be correct on both sides of the flag. Otherwise, when you spin to
the left, your letters will be backwards. If you want a pattern to
look exactly the same on both sides, you better double-side it.
If you want a design on only one side, make sure
you sew it on the right way. About 80% of the the left side shows
when you spin. That means if you lay your flag down on the gound,
when the flag lays to the left of the pole you see the design.
SEWING DIRECTIONS
A good estimate of how much fabric you will need is one yard per flag (assuming the bolt is 60" wide.) If the bolt is 45" you may want to go up to a yard and a half, but you can probably get away with just one yard. Select a fabric that has good flow (miniamal drag). Poly china silk has optimal flow. Tissue lame and nylon fabrics are also great. If you choose to include lame in your design, I recommend picking up a bottle of Fray Check solution. This clear liquid is applied to the edges of fine fabrics and prevents it from unraveling. It really does a nice job...keeps lame designs professional-looking throughout the season. 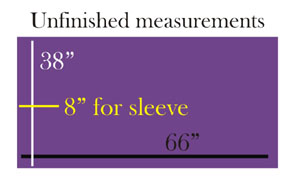 If you choose a fabric that has anything glued on it (i.e. light-weight sequins) you might also want to pick up a bottle of de-gummer since the glue on the fabric will gum up your needle.
BUY CLEAR THREAD. This is the ultimate time saver. Your seams won't show, and you don't have to stop and re-thread your machine everytime you change colors. Plus it's pretty strong, which is great for the amount of stress the flag is going to indure.
Make your flag porportional to your pole. If your flag pole is 5 feet long, a 30"x48" is going to be too big. Here are approx. sizes:
5' Pole 24"x40"
5.5' Pole 30"x48"
6' Pole 37"x58"
6.5' Pole 44"x70"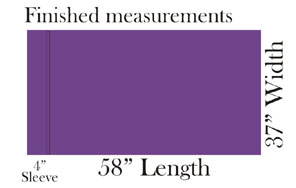
You can choose to cut additional fabric and sew the sleeve for the flag, or you cut your flag 8 inches longer on one side to fold over and create the sleeve. (This is simply a faster method, but you might not have enough continuous fabric to do this.) Cut your fabric 1/2 inch bigger than the finished size to allow for the hems. Turn under the seams 1/4 of an inch, press and stich. Repeat. If you have allowed for the sleeve, simply fold in one of the shorter sides of the fabric 3.5 inches and stich. If you must create the sleeve seperately, cut a piece of fabric 8" by your smaller number. (i.e. a 30"x48" flag has a sleeve 8"x30") Hem all sides, then fold it length sides together. Stich to close, then sew the flag to the sleeve. And you are finished!!
Instructors and Directors This part is under quite a bit of construction, but here a few tidbits of info for now. (Please excuse the randomness) If you are looking for educational videos to help you with fundementals, advanced work or design, check out www.wgi.org and click on the link for "Shopping." There is a category called educational videos that is fabulous. (A price-y investment, but worth it!) Another random tip: purchase wieghtlifter gloves from a sports store. They are identical to the ones sold in catalogues and websites, but you can negotiate the price with the store if you buy all of the gloves at once and you can save lots of money on the cost...and you won't have to pay pricey shipping either.
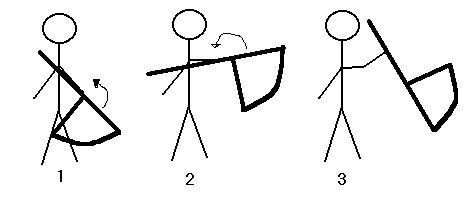
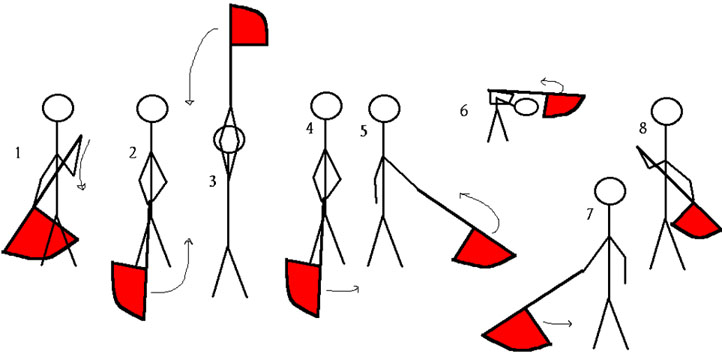
The arms are in a low V and the pole is tucked under
your right arm. Raise your right arm till it is parallel to the ground.
While doing this, flick your wrist, gently releasing the flag. The
flag goes behind your right shoulder. Catch the flag at a 45 degree
angle from the ground, about 1/3 of the way in the pole away from the bottom
stopper. This is a simple move, a slow toss that only rotates 1/2.
It looks a lot more difficult than it is.

Toss a parallel, (this is the one that spins parallel to the floor,
a.k.a. lateral) and catch it in your right elbow pit. Your left arm
goes over the pole. The effect is a "hands free" catch. Watch
your free arms though, making sure you don't have any frightening arm positions.
It is important that you already feel comfortable with a parallel before
you attempt this move. You may develop a small bruise on your right
bicep if you practice this move often, but hey, you're doing it right.
The Cradle Drop
The arms are in a low V and the pole is tucked under
your right arm. Put the flag into cradle. Then, at the same time
bend your arms so that you can set the flag on your shoulder and bend your left
behind your back with your hand open and palm facing up. (So you can catch the
flag.) Drop the flag into your left hand and your right arm goes up into a jazz
hand. You pop your right knee out at the same time you catch. Look up
at your right hand to give a more dramatic effect.
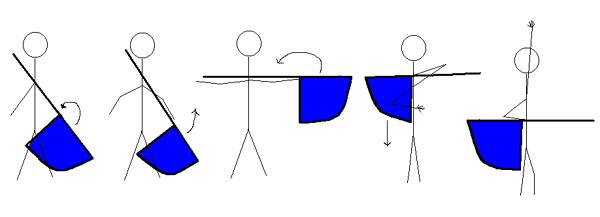
The Headbanger
Start in a R slam. Push the flag out in front of you until both hands
are at the tip of the pole. Continue the direction, completing a 45 degree circle. Make sure
the flag stays in the same plane that you started from the R slam. After you complete the
circle, let go with your right hand and let the flag go behind you. Bend over and let the flag
continue it's path. You need to turn your left wrist so that the silk part of the flag ends up over
your head. Grasp the pole with your right hand, making sure your palm is up. Let go with the
left and then unwind your flag until it comes to a L slam. NOTE: Make sure you bend all the way
over until your back is parallel to the floor or you will have some scary planes!
The Neck Roll
Start with the flag tucked behind your back,
grasping the  pole with your right, palm facing back. Cross your arms in front of your chest
while bending at the waist. The silk should be down and the pole up. Set the pole
on the back of your neck and release with your right. Your left hand should be waiting to
catch the pole on the other side of your neck. Let the flag gently roll into your left hand.
Then just bring the flag down to flat.
pole with your right, palm facing back. Cross your arms in front of your chest
while bending at the waist. The silk should be down and the pole up. Set the pole
on the back of your neck and release with your right. Your left hand should be waiting to
catch the pole on the other side of your neck. Let the flag gently roll into your left hand.
Then just bring the flag down to flat.
