
|
|
||
|
43. Panoramas & Spherical Mapping |
||

CREATING PANORAMAS In this tutorial, I'll be showing how to create a panorama shot that can be used as a spherical map in LightWave. To do this, you'll need a digital camera (or 35 mm with 35 mm digitizer such as a Nikon CoolScan). My favorite is the Nikon CoolPix E4300 digital camera NIKON COOLPIX E4300 
I decided upon the E4300 because of many reasons; first, being the quality of the images. I believe the Nikon gives you nicer saturation than most digital cameras. Many camera companies pander to the 'shoot intense colors' crowd, which generally means less subtlety in the color areas. That doesn't mean that you can't get intense colors with the Nikon, but it does mean that the colors you get tend to be delicately shaded just as you envisioned them. The camera costs around $300. It comes with rechargeable lithium batteries and a charger, so you can shoot about an hour and a half. If you wish to shoot longer than that duration, buy a second rechargeable lithium and keep it charged. The 16 MB Compact Flash card that comes with the camera is way too small for shooting the highest quality images. NIKON COOLPIX E4300, IMAGE QUALITY vs IMAGE SIZE The camera gives you many ways to obtain different-sized images. Even with the teeny 16 MB card they give you, you can shoot enormous numbers of quality images. First, ALL images that come from the camera are 300 dots-per-inch, no matter what size or JPEG compression quality that you choose. You can get a fairly high quality image from a printer even when you use 150 dots-per-inch. If you're saving images to the web, you'll want 72 dots-per-inch images. You can readjust the number of dots-per-inch using photoshop. And, for the very best quality, you can use the 300 dpi. There are four different compression qualities. HI saves out images without compression in the TIF format. The other three qualities pertain to the amount of JPEG compression the camera gives the image. I'll use a program called 'Advanced JPEG Compressor v4.1' to show me the level of JPEG compression for each image. HI - No compression. Only can be used when you choose the largest 2272 x 1704 size. This image type is generally 11,000 KB in size. 640 x 480 FINE - 1 : 7.8 compression (115 KB), PS 9+ 640 x 480 NORMAL - 1 : 11.2 compression (81 KB), PS 8- 640 x 480 BASIC - 1 : 13.5 compression (67 KB), PS 7+ 1280 x 960 FINE - 1 : 8.5 compression (426 KB), PS 10+ 1280 x 960 NORMAL - 1 : 14.1 compression (256 KB), PS 8+ 1280 x 960 BASIC - 1 : 23.7 compression (152 KB), PS 5+ 2272 X 1704 FINE - 1 : 10.5 compression (1083 KB), PS 10+ 2272 X 1704 NORMAL - 1 : 15.5 compression (734 KB), PS 9+ 2272 X 1704 BASIC - 1 : 26.2 compression (434 KB), PS 8+ In that last table, I performed experiments, then returned and documented the equivalent Photoshop JPEG compression values for those same image sizes. The PS stands for Photoshop and the number refers to the number I used when saving out the Photoshop JPEG image. The + means a little bit better quality than that number, a - means a little less than that number. So, after all my experiments, they show that the camera doesn't apply the same amount of compression to a small image as it does to larger images. But, surprisingly, this is also true about Photoshop's JPEG compressor. Both Photoshop, and the camera give more compression for a larger image than they do for a small image. That's surprising. Except for the strange results I got when trying to match the 1280 x 960 BASIC quality of the camera, ALL quality types of the camera seem to be better than a quality level of JPEG 7 if you were to compare the image with Photoshop's JPEG Compressor. NIKON COOLPIX E4300, DOTS-PER-INCH Next, lets see what the size of the images would be if I bring each of these pictures in, readjusting the dots-per-inch of the images. To adjust the dots-per-inch without affecting the image I do an 'Image->Image Size' in Photoshop, uncheck 'Resample' but keep 'Constrain Proportions' checked. As I adjust the number of dots-per-inch, the size will automatically increase or decrease to compensate. 640 x 480 at 300 dpi = 2.133" x 1.6" 640 x 480 at 150 dpi = 4.267" x 3.2" 640 x 480 at 72 dpi = 8.889" x 6.667" So, even with the very smallest size you can still get good quality 6 x 8 inch images for the web. That's pretty amazing. When I go to the larger 1280 x 960 size: 1280 x 960 at 300 dpi = 4.267" x 3.2" 1280 x 960 at 150 dpi = 8.533" x 6.4" 1280 x 960 at 72 dpi = 17.778" x 13.333" This quality could give you good 6" x 8" prints of quite good quality (better than snapshot quality). 2272 x 1704 at 300 dpi = 7.573" x 5.68" 2272 x 1704 at 150 dpi = 15.147" x 11.36" 2272 x 1704 at 72 dpi = 31.556" x 23.667" Thus, at the largest size, the camera can easily give you impecable quality 8 x 10 prints or quite good quality 11 x 14 prints. I won't waste my time showing you image comparison shots at each of those resolutions, as there are many digital camera websites which already do that. NIKON COOLPIX E4300, EXPERIMENTS In case you're interested, here are the particular experiments that I performed, and their results: Since I saw that the camera didn't save out with the same level of compression with both small and large images... As a comparison, I wanted to see if size has anything to do with JPEG quality when I save out images from Photoshop. I take in a 2272 x 1704 image into Photoshop, save it out as a BMP image (just to make sure that all vestigages of the JPEG format are gone), resize that same image like it were shot with the camera, and save it out with different JPEG compression values and see what I get. I, first, try saving out with a JPEG quality of 0 and a size of 2272 x 1704. I'm surprised with a whomping 1 : 96.5 compression ratio. Again, I never knew that a JPEG compression of zero gave such a large compression ratio. Now, let me resize the BMP image to 1280 x 960, save it out with a 0 JPEG quality and see if the compression ratio of the resulting file changes at all. I'm surprised a second time. The answer is YES. Photoshop ALSO saves out with a smaller compression ratio when the image is smaller. It's now a 1 : 60.4 compression ratio for the 1280 x 960 image. And, again, when I resize it to 640 x 480 and save it with a zero JPEG compression ratio, I get a 1 : 29.5 compression ratio on the saved file. So, Photoshop also gives more compression to a larger sized image. NIKON COOLPIX E4300, EQUIVALENT PHOTOSHOP JPEG VALUES Next, lets see if I can find an equivalent amount of compression in Photoshop's JPEG compressor which equals the FINE, NORMAL, and BASIC compression levels of the camera. First, I'll try and equal these three: 2272 X 1704 FINE - 1 : 10.5 compression (1083 KB) 2272 X 1704 NORMAL - 1 : 15.5 compression (734 KB) 2272 X 1704 BASIC - 1 : 26.2 compression (434 KB) PHOTOSHOP'S compression values: 2272 X 1704 - 1 : 9.5 compression (1196 KB) PS quality 11 2272 X 1704 - 1 : 13.2 compression (862 KB) PS quality 10 2272 X 1704 - 1 : 19.7 compression (577 KB) PS quality 9 2272 X 1704 - 1 : 26.0 compression (437 KB) PS quality 8 So, for 2272 x 1704 size: FINE, Photoshop's 10+ Next, I'll try to equal these three: 1280 x 960 FINE - 1 : 8.5 compression (426 KB) 1280 x 960 NORMAL - 1 : 14.1 compression (256 KB) 1280 x 960 BASIC - 1 : 23.7 compression (152 KB) PHOTOSHOP'S compression values: 1280 x 960 - 1 : 9.3 compression (387 KB) PS quality 10 1280 x 960 - 1 : 12.7 compression (283 KB) PS quality 9 1280 x 960 - 1 : 16.4 compression (221 KB) PS quality 8 1280 x 960 - 1 : 21.4 compression (169 KB) PS quality 7 1280 x 960 - 1 : 21.5 compression (168 KB) PS quality 6 1280 x 960 - 1 : 26.3 compression (137 KB) PS quality 5 So, for 1280 x 960 size: FINE, Photoshop's 10+ And, finally, I'll try matching these: 640 x 480 FINE - 1 : 7.8 compression (115 KB) 640 x 480 NORMAL - 1 : 11.2 compression (81 KB) 640 x 480 BASIC - 1 : 13.5 compression (67 KB) PHOTOSHOP'S compression values: 640 x 480 - 1 : 7.2 compression (126 KB) PS quality 10 640 x 480 - 1 : 9.2 compression (98 KB) PS quality 9 640 x 480 - 1 : 11.1 compression (81 KB) PS quality 8 640 x 480 - 1 : 13.7 compression (126 KB) PS quality 7 So, for 1280 x 960 size: FINE, Photoshop's 9+ NIKON COOLPIX E4300, QUANTITY OF PHOTOS PER CARD if you wish to give up a little quality and size, even the 'Starter' 16 MB card can shoot many images. 16 MB * 1024 = 16,384,000 bytes per card (bit less because of formatting). Windows shows the capacity as 15,876,096 bytes Thus, figuring that 1 KB = 1024 bytes, a 16 MB card can hold approximately: 640 x 480 FINE - (117760 bytes), 134 Photos 640 x 480 NORMAL - (82944 bytes), 191 Photos 640 x 480 BASIC - (68608 bytes), 231 Photos 1280 x 960 FINE - (436224 bytes), 36 Photos 1280 x 960 NORMAL - (262144 bytes), 60 Photos 1280 x 960 BASIC - (155648 bytes), 102 Photos 2272 X 1704 FINE - (1108992 bytes), 14 Photos 2272 X 1704 NORMAL - (751616 bytes), 21 Photos 2272 X 1704 BASIC - (444416 bytes), 35 Photos There's one TIF quality (HI), and three JPEG compression qualities (FINE, NORMAL AND BASIC). There are six different sizes ranging from 2272, 2048, 1600, 1280, 1024 and 640 pixels wide (All with a 3 to 4 aspect ratio, such as 640 x 480), all at 300 dots-per-inch. This shows that even if you only had the 16 MB card, you could choose NORMAL JPEG compression level and 1280 x 960 as the size. This would still let you shoot 60 images at a JPEG quality that's higher than Photoshop's level 8 JPEG images. This only goes to prove that you shouldn't 'throw away' the 16 MB starter card (as I've heard certain photo snobs suggest on websites). Moral of the story? Buy a 128 MB card. Make sure the store will let you bring it back if it doesn't work with the camera. Use the 128 MB card with a 'FINE' setting at the highest 2272 x 1704 resolution until you've shot your 60 photos. Bring along the 16 MB card as a backup in case you fill up your 128 MB card, once you fill the 128 MB card, switch the size to 1280 x 960 and the quality to NORMAL (don't forget to change it back after you get home), then shoot another 60 pictures. However, if you wish to use the best quality 'FINE' JPEG compression level and the largest 2272 x 1704 pixel size, you'll have to purchase a 128 MB Compact Flash card (which would let you shoot 66 images of this type). The problem with saving images in the TIF format (HI, which is only available in the 2272 x 1704 size) is how big the images are. With a 128 MB card, you can only store 10 of these images, and they take much longer to save to the card. The difference in quality is remarkably small. NIKON COOLPIX E4300, COMPACT FLASH CARD & READER Nikon's website only recommends the high-priced Lexar media. Neither the manual, or their website, ever say anything about either using 256 MB cards or 1 Gigabyte hard drive cards. Larger cards tend to have more problems, it seems, getting them to take and keep a reliable format. Don't ask me why. It seems to be a crapshoot when you use larger format cards. My own experience with a 128 MB card has been excellent. In my case, I bought a Memorex 128 MB Compact Flash card for $32 and it's worked perfectly. 
I can format it either by using the SIIG USB Compact Flash card reader I purchased, or by formatting the card inside the camera. Both ways of formatting the card have worked beautifully for me. I always fill the card, then attach it to the reader, and then delete the pictures on the card from the computer. I've never experienced a problem. It lets you store TIF images for super-high quality images. I've always found that their highest JPEG quality works fine, though. Although it's theoretically possible to transfer images from your camera to your computer via the supplied USB cable, it's very awkward and not half as easy as just treating the Compact Flash card like it were a hard disk partition. Thus, I bought a Compact Flash reader which plugs into the USB port. I bought one with the USB 2.0 standard even though my Dell Dimension 4100 is not the newer standard for when I upgrade. Even with the older USB standard, the transfers are lightning fast. I decided upon the SIIG USB Compact Flash card reader. The only problem I've had with the reader is, it can't read more than 199 images for unknown reasons. I've contacted the company, and he wanted me to call the factory about the problem (not an 800 number). I wrote back an E-Mail asking, "Can't we resolve the problem via E-Mail?", but have received no reply, as yet. When I try deleting the 199 images, the rest of the images on the Compact Flash card are still there (unless I make the mistake of thinking they aren't there, and formatting the card - which is what I did the very first time it happened to me), just inaccessible via the SIIG interface. 
DIGISNAP 2000 One of the things I like best about the camera is it gives you the abilty to be controlled by a DigiSnap 2000. The DigiSnap 2000 costs around $120.00. When used in its simplest configuration, you can use it as a shutter release or you can shoot time lapse photographs (programmable from a computer's serial port with the supplied Null Modem Cable. The DigiSnap 2000 from Harbortronics is an amazing little device. 
(The unit also has an external switch capability (if you modify the circuit board using a doc file from his website). This allows you to externally trigger the camera just by connecting one place on the circuit board to ground. I chose to use the external switch input as a fifth button which I program to shut off the DigiSnap. When the DigiSnap shuts down, it automatically shuts off the camera's LCD display and goes into a low-power state. To wake it back up, I just press any button for 1/2 second. If you're interested in externally triggering your camera (with a bite switch for handicapped photography - available through him, night-time nature photography, etc.) but you're not into soldering things yourself, he also has a model that brings this signal to an external connector. You can program it to shoot Bulb exposures at night, so the shoot picture button acts in a 'half-press' mode (like your camera does, where it focusses with the press and takes the picture with the release), and you can even tell it particular times you wish to do time lapse shots. If your camera has a serial port, it's at least minimally controllable with the DigiSnap. You need to get a serial port cable that fits your camera. The E4300 does NOT come with a serial cable, so you have to order that as well (on the Nikons, the USB port doubles as a serial port, whether it tells you that or not in your manual). Only four old Nikon models won't work with the DigiSnap. If your camera supports 'Extended Protocol' then you're in luck... All functions will work if your camera does that (the E4300 does support that protocol). The only other item you'll need is a camera tripod. The E4300 has a tripod mount on the bottom. Be careful when you screw the tripod screw in as it is made of plastic. Also, don't tighten it too far. SHOOTING PANORAMA IMAGES After you have all of the proper equipment, the shooting of the images isn't too hard. You want the light levels to match, as best they can, as you rotate your camera. In completely automatic mode, it might stop way down to handle a backlit situation. The best panoramas are done with the sun overhead and all things equally distant from you. Of course, I don't let equipment control me, if I can... I control the equipment, so I'll be doing a shot from inside a cave, looking outwards, it's 5:30 am and the sun is just rising. That's about as difficult a situation as you'll ever find. The steep cliff is completely cutting off light to the valley. The newly breaking shaft of sunlight is in stark contrast to the wash, the opposing cliff wall and the slope to my left. Behind me, the cave walls can barely be seen. The morning clouds are moving quite fast. Since I've become closely acquainted with the Manual operation of the camera, I will be controlling the shutter speed and the aperture opening myself for each shot. But, I will also use the time lapse mode (set at 10 seconds between images) coupled with the Auto mode to get a second set of images in all directions, just in case I need them. Let me start by showing the finished panorama. Since it will be used as a spherical map, it needs to be twice as wide as it is tall. If you think a minute, the width of the image will need to wrap all the way around a circle. However, the height will merely have to wrap around from the North to the South pole of the circle (which is exactly half the diameter). 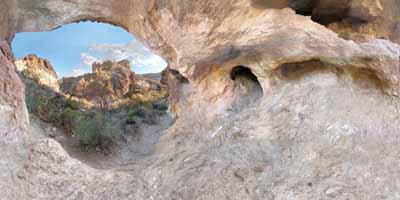
A SIMPLE PANORAMA SHOT The simplest panorama shot is done by positioning the camera on the tripod so it has no side-to-side or front-to-back tilt. 
The closer you can get to it being at perfect right angles, the easier it'll be when you patch the images together. You can either mount the camera vertical or horizontal. If you mount it sideways, then pivot it by rotating the shaft. The advantage of mounting the camera vertically is you get more height. If you mount it like the image shows, then use the tripod head's lock nut release to pivot the camera. When you shoot a picture, make sure you identify something in the image that's about 7/8ths of the way across the frame. Then, when you position for the next shot, position that same object about 1/8 of the way from the other side. That way each photo will overlap the next photo. For example, in these successive photos, in the top image you'll see a conspicuous Cottonwood tree that's being hit by the light. It will be easy to spot once I've pivoted the camera to the right. I use the DigiSnap as a remote cable to keep jitter to a minimum. With sunrises, the shutter speeds will be long. You should keep the aperture as far open as possible so you can have good depth of field. Don't be surprised if each exposure is as long as 2 - 8 seconds (particularly in the shadow areas). There's no way anybody can hold a camera steady for 8 seconds, so you will absolutely HAVE to have a shutter release (DigiSnap), in that case. In the second image, I've made sure the Cottonwood tree is still within the frame. This allows the images to overlap when I import them into Photoshop. 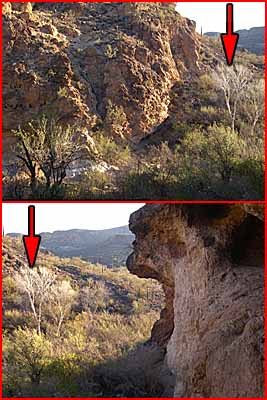
And, once I've completed a full circle, I make sure that the last image also contains that same tree. 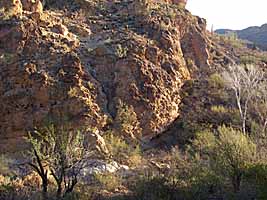
The light may have changed a little... the camera might have shifted; but if I've overlapped the end ones I know I have every image. You might even take one more photo past the first one just to make sure. Nothing worse than a panorama which is a bit less than 360 degrees. The light will NEVER be the same again, and if you go back, it will be impossible to put the camera in the exact same place. If you don't get a complete panorama the first time, do it all over again the second time. Better to start from scratch than try and match the angle and time. ASSEMBLING PANORAMA IMAGES Once you've gotten home, bring all images into Photoshop. Do a 'Levels' adjustment on each one by pressing CTRL-L Move the left slider to the right until any flat line in the histogram is gone. Move the right slider to the left in the same manner. This generally equalizes all images until they're quite close to each other. In this case, all I had to move was the right-most triangle. I moved it until it was at the beginning of the color area in the histogram. 
Remember that just because you started shooting the shots at a particular place, that doesn't mean your panorama has to begin with that image. You can decide whichever image you want to be the last image (I'm calling the right-most image that will be in the panorama the last image). You can either start with the first image, working forward, or the last image and work backward. In my case, I choose to import the last image first. I choose 'Image->Canvas Size...'. I anchor the image to the right side of the canvas, choose a white background color and a width of 800 percent. (You might also wish to increase the height by 120 percent as the camera is never exactly 90 degrees, so the top and bottom of the panorama tends to waver up and down from a perfect line). 
Then, you paste each image, arranging them so they perfectly overlap each other. Set the visibility of a layer to 50 percent as you're arranging them so you can view the amount of overlap until they coincide the best that they can. The three arrows indicate three edges of three images that are overlapping each other. 
After you've pasted them all in, adjusted the levels on each image so they match the best that they can, then you have a simple panorama shot. You use the clone, dodge and burn tools to meld each layer into the next. Set the clone tool to 70 percent when you need lots of duplication and 4 - 17 percent when you're darkening or lightening an area so they match. This isn't a book on the use of Photoshop, so refer to a Photoshop manual for more detail on how to use the Clone, Burn and Dodge tools. Here's the same general area from the finished panorama. 
The result will be skinny and long, nowhere near the half-the-width size that you need to cover a sphere. 
WIDENING THE HEIGHT OF THE PANORAMA When you want more height than one simple pass will give you, you'll have to tilt your camera and make multiple panorama sequences. When you do this, you start to realize the problems map makers have when they are asked to portray a round object on a flat piece of paper. As you tilt your camera, then pan, each image will be warped from the way it was when you just held your camera at a pure 90 degree angle. When you take the sequence of images just below the first sequence, each image will not perfectly overlap with the next image. Each image will be compressed on one side and stretched on the other because the camera is at an angle relative to the view. Here's an example where three overlapping images all have an area which is the same area. Each is at a slightly different angle from the other, they might be different sizes and the relationships between this feature and another feature might be different. 
Sometimes you'll have to rotate the frame, at others you'll have to use 'Distort', 'Perspective' or 'Scale' to warp each frame so the equivalent keypoints in each frame match up with the same areas in the original panorama frames. In the completed 360 degree (all directions) panorama, after I've matched the rotations, colors, and distortions... After I've cloned and painted all overlap lines... this is what the same general area looks like: 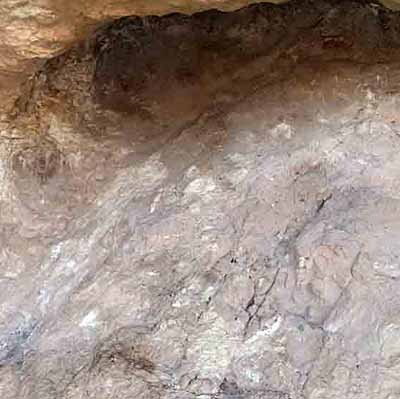
And, finally, you end up with the right size panorama.
This can then be used as a map in LightWave to map a sphere. However, don't expect the top and bottom to match up properly. To do that, you'd need to do much more work in Deep Paint 3D using this image to clone from near the poles. However, as long as the camera doesn't point towards the poles, this world would hold up pretty well. This method works best if there are no details towards the poles. Try and have open sky (all of the exact same color) on the North Pole, and something with an even color at the South pole. That way, it won't smear together when you map it. This panorama could very easily map onto a cylinder, as well, as long as you ensure that the camera doesn't point past the edges of the cylinder. Here is an example of a scene I rendered using a modified version of this panorama. 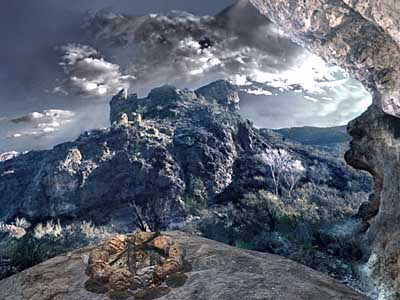
Using Photoshop, I've changed the lighting in the panorama to feel more like a brightly-moonlit nightime sky. I've set the camera to look like it's inside the cave, looking outwards. Since I'll be creating flames for the campfire, I didn't wish to create the moonlit mood using LightWave lights, as blue light might affect the hue or feel of the campfire's flame. If you'll be creating a LightWave world with your panorma, remember to flip the image left-to-right before you use it as a spherical projection map. If you're inside a globe, a spherical projections will look reversed, otherwise. Here's a close-up of the campfire, minus animated flames (the tiny amount of flame that you see is part of the ash UV Map). As you can see by the shadows of the rocks, the campfire isn't yet embedded in the ground. At the moment, it's hovering above the land. 
| ||
