Ready to get started? Hope you enjoy this.
First you will need to download the following zip, included in the zip are all the selections required, plus two psp images. Download and open the zip. You must have a good understanding of psp by Jasc. This can be created in both psp7 or 6. This tutorial can be created in under 1 hour.
The Selections File
The Psp Files
___________________________________________
___________________________
Once you have opened your zip file, open your PSP program. Then create a new image, 400 x 400, transparent background, 16.7mil colours.
You can flood fill the background for viewing purposes now, whatever colour you desire, you can change it later.
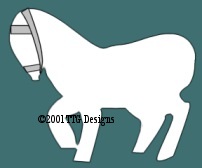
1) Then create a new layer and call it horse body. Change your foreground colour to black, your background colour to white.
2) Go to selections, load from disk, open your mgrhorsebody.sel file.
3) Get your flood fill tool, using the following
Flood fill solid, blend mode normal, texture off, match mode RGB value, tolerance 200, opacity 100.
Flood fill twice with the black.
4) Go to selections, modify, contract by 1. Change your foreground colour to white. Flood fill once. Deselect.
~Note~..these above 4 steps you will be repeating throughout this tutorial, changing colours and adding different details as you go.
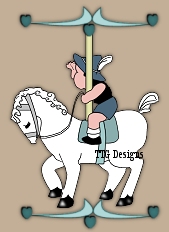
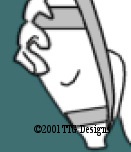
Open your horsereigns.psp file. Edit, copy, edit paste as a new layer. Position the reign as following:
This image is reduced and cropped.
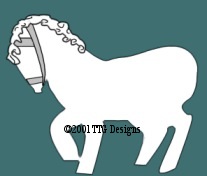
Open a new layer name it horse mane, change your fill colour to black by switching your colours on your palette. Go to selections, select from disk, open file mgrhorsemane.sel.
Flood fill twice with black, same settings. Now you could leave the main black if you like, or go to selections, modify, contract by 1 and fill with white.
To makeyour horses hair curly, go to your draw tool, using freehand, size 1, solid line, fill colour black, stroked line, draw curls like a c stroke and a few wavy lines as following. These require some practice to get them correct. They do not need to be exact.
Ok, were ready for the next step, her tail. Go to layer 1, under the layer called horse body. Add a new layer, name it horse tail.
Go to selections, select from disk, mgrhorsetail.sel. Open, change your flood fill to black and flood fill twice with the black. Now if you made the main black you can leave the tail black as well or selections, modify, contract by 1 and flood fill white.If your tail is black, change the fill colour to white. If the tail is white, change your fill colour to black. Using your draw tool, same settings, draw a few lines on the tail to create sections of hair as following

Select none. Now go to the top layer and add a new layer called hoofs, DO NOT DESELECT. Make certain your fill colour is black. Go to selections, load from disk, mgrhoofs.sel. Flood fill with the black twice.You may need to fill each hoof seperately. Add a new layer, you can name it hoof highlight. Change your fill colour to white. Now using your draw tool, point to point, fill instead of stroke, draw triangles on each hoof as following. Start at the top, draw directly down, then over to the right and back up to the starting square.

This leaves a triangle shape, once you have clicked on the start triangle click on the side of your image. Try to make them go the shape of the hoof. Draw one in each hoof. Here is what you should have:

Now go to image effect, blur, gaussian blur, radius 2.50, apply. Now you can deselect.
Our horse is almost done. Next we need to add a few lines to define the body of the horse and to add her eye. Using your mover tool click anywhere on the horse body, do not move, this just highlights this layer or look through the layers and highlight this layer. Go to select all, select float. Make your fill colour black. Get the draw tool and reset the draw to freehand stroked, width 1, antialise checked, vector not checked. Following the next diagram add lines, follow the numbers.
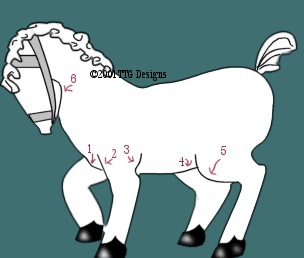
For the eye, make a curve as following using the draw tool, same method.
Now change only the stroke to fill and draw another curve under the eye as follows:

The horse is completed and the hardest part is done..Smiles..No more draw tools required for the rest of the image. Oops, did I say that? Laughs, well there is a little more draw used, but not nearly as much. Just a little. I know the draw tool is a workout but the experience gained will aide you later on.
Turn off the background, layer 1. Go to a layer above and right click, merge visable. If you haven't previously saved your image do so now. Also go to edit, empty clipboard and command history. This frees your psp program and allows for faster action.
Add a new layer call it saddle. Make your fill colour black. Go to selections, select from disk, open mgrsaddle.sel. Flood fill twice with the black. Select modify, contract by 1. Do not Deselect. Fill with a colour of your choice. With your image still selected, go to image, effects, blinds, change your settings to colour black, width 2, opacity 30, horizontal and light from left unchecked. Apply. Deselect.
Add a new layer. Selections, load from disk find saddlestrap, flood fill with Black twice, select, modify, contract by 1, flood fill with your colour choice. Deselect.
Now for the boy..again its pretty much the same.
Add a new layer, select, select from disk, mgrboyfararm.sel. Flood fill with black, twice. Selecy, modify, contract by 1. Then change your colour to #F3C0B9. Flood fill once. This is your skin colour. Do not deselect, change your colour back to black..go to your paint brush tool, size 1, hardness 30, opacity 50, step 25 density 100. Draw fingers and a thumb or use your draw tool freehand. Deselect. Here is what it should look similar to..

Add a new layer, selections, load from disk, mgrboyface.sel. Flood fill twice with black. Selections, modify, contract by 1. Flood fill with your skin colour. Deselect.
Add a new layer, selections, load from disk, mgrboyhair.sel. Flood fill twice with black. Deselect. I know, looks like he is bald..laughs, but he really isn't.
Add a new layer, selections load from disk, mgrboytop.sel. Flood fill twice with black and deselect.
Add a new layer, selections load from disk, load mgrboyhat.sel.Flood fill twice with black. Selection, modify, contract by 1. Now fill with a colour of your choice. I used a darker version of my saddle colour. Deselect.
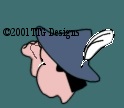
Add a new layer, selections load from disk, load mgrboyfeatherneye.sel. Flood fill twice with black, both the eye and the feather. Selections, modify, contract by 1. Flood fill once with white, only the feather. Do not deselect, using black draw a few lines for your feather. Try and stay within the selection. Here is what you should now have. Deselect.
Add a new layer, selections, load from disk, mgrboyhattrim.sel. Flood fill twice with black, selections, modify, contract by 1, flood fill with white. Deselect.
Add a new layer, selections load from disk, mgrpole.sel. Flood fill twice with black, selections, modify, contract by 1, flood fill with #FFFFC0. Selections, invert. Image, effects, drop shadow. Using black, change your settings to opacity 65, blur 13, vert and horiz. 0. Deselect.
Add a new layer. Selections, load from disk, mgrboyarm.sel. Flood fill twice with black. Selections, modify, contract by 1. Flood fill with #F3C0B9. Deselect.
Add a new layer. Selections, load from disk, mgrboyshortsbottom.sel. Flood fill twice with black. Selections, modify, contract by 1. Flood fill with white. Deselect.
Add a new layer. Selections, load from disk, mgrboyleg.sel. Flood fill twice with black. Selections, modify, contract by 1. Flood fill with #F3C0B9. Deselect.
Add a new layer. Selections, load from disk, mgrboyshorts.sel. Flood fill twice with black. Selections, modify, contract by 1. Flood fill with a colour of your choice. I chose the same colour as my hat. Deselect.
Add a new layer. Selections, load from disk, mgrboysock.sel. Flood fill twice with black. Selections, modify, contract by 1. Flood fill with white. Deselect.
Add a new layer. Selections, load from disk, boysocktop.sel. Flood fill twice with black. Selections, modify, contract by 1. Flood fill withwhite. Deselect.
Add a new layer. Selections, load from disk, mgrboyshoe.sel. Flood fill twice with black. Deselect.
The boy is done. Add a new layer, get out your draw tool. Draw the reigns strap, using the freehand tool and stroke. Duplicate this layer and move this reign down slightly..as following..
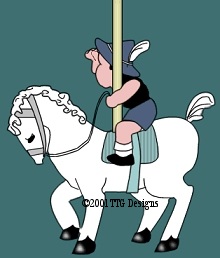
Turn off your background layer, layer 1 and merge visable. Edit empty clipboard, edit empty command history. Now you have two choices. If you would like to save this without a background, I would suggest resizing. Image resize percentage of original, maintaining aspect ratio, checked, resize all layers unchecked, resize by 50%. File open mgrdeco.psp. This is greyed so that you may colour it to your choice. Use color, colorize. Image resize it by 70%, same settings. Then edit copy, edit paste it as a new layer and move it to the top of the pole. Duplicate and add another below the horse.
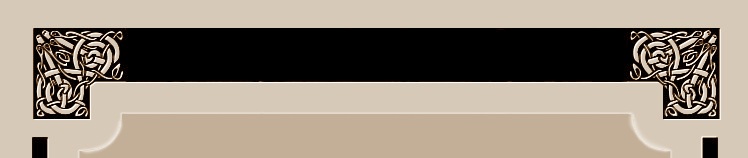
If you want to know how I created the background in the picture above follow these few simple steps.
Add a new layer. Selections, load from disk, mgrtopscallop.sel. Flood fill once with black. Selections, modify, contract by 1. Flood fill your colour choice. Go to blinds, with the same sttings, apply. Deselect.
Add a new layer. Selections, load from disk, mgrtopfringe.sel. Flood fill once with black. Selections, modify, contract by 1. Flood fill withwhite. Deselect. Move this layer up until the fringe is right below the scalloped edge.
Now go to your bottom layer then..
Add a new layer. Selections, load from disk, mgrbottomlace.sel. Flood fill twice with black. Selections, modify, contract by 1. Flood fill withwhite. Deselect.
Add a new layer. Selections, load from disk, mgrbottom.sel. Flood fill twice with black. Selections, modify, contract by 1. Flood fill with the same colour as your scallop. Add the blind effects, deselect. Crop it down to where the bottom lace begins, resize it down some. Add a frame of your choice and you are done. Save!