|
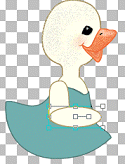
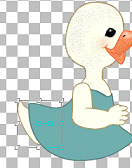
Now isn't she a Sweety? She really isn't that difficult to make.I have included around 30 graphics full of explanations. I have kept things as simple as I can, but yes, as all graphics she takes some time to do and some knowledge of PSP. I have even given you a head start..Grins.. This is a characature, meaning it isn't realistic see the arm..Smiles..it is meant to be this way.. This Tutorial Teaches: This tutorial teaches vectors, a satin effect for clothing, some freehand and depth using an air brush technique.
Materials Required: This tutorial requires your PSP program and of course, your time. This tutorial can be done with either level 6 or 7. I choose to work with PSP6 because I find it a challenge converting tutorials from level 7 to 6. You will require this download. Its your head start, surprise! The rest is all PSP and your talent. Now this tutorial is advanced. Use the following colour codes, just left click and download this graphic. I am not adding colour codes in the tutorial unless I have not included it with this graphic. Also, remember your foreground is now called stroke colour, and your background is fill colour.
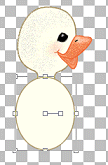
Lets Begin: Open your psp program. Open a new image transparent background 250W x 350L. Open your colour codes. Flood fill the background if you have difficulty seeing, with a soft yet darker colour. You can change this later. Open your head start. Edit copy this, then edit paste it as a new layer on your working image, and move it up near the top and to the right, but do leave space for the hat. Go to your layer palette and rename this layer head. Close the headstart. Add a new layer to your working image. Change your fill colour to the light cream and your stroke colour to the taupe. Open your preset shapes from the task bar. Using an ellipse, stroked and filled, line width 1, antialised and vector checked, solid line, draw a shape similar to the following..
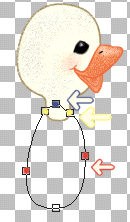
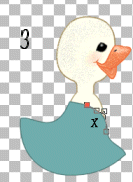
Time to begin some vectoring..Go to your Vector object selection. Click on the palette and click node edit. Move both side nodes, ~the red squares in the following image.~ down and in. Then holding the control key on your keyboard add two new nodes, ~The yellow squares in the following image~ where this oval meets the neck section of the head. Move these in slightly. Then click on the blue square node in the following graphic and hit your delete key. Then move the two new nodes to join evenly with the neck.
Click on your layer palette. Right click on this layer and change it to a rastor and name it chest.
The Dress
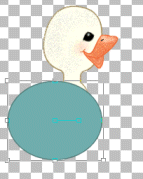
Change your stroke colour to the darer teal and your fill to the lighter teal. Teal is greenish blue. Select the preshapes ellipse, same settings, draw a larger ellipse about the following size. Save your image.
Now time to vector the dress..
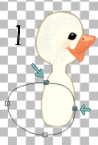
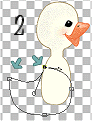
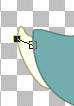
The following screen shots plus this explanation should help guide you through this. First move the top node down. Then move the right node in as image 1 shows. Then following image 2, with the top node, make certain this is a cusp node, how..by right clicking on the node going to node TYPE and clicking on cusp, it should already be cusp. Right click again and move the arms out slightly and then down until they look similar to image 2. Also click on the left node, make certain it is a cusp node, right click and move the arms so they are square and the top one is pointing down some. What your wanting to create is a nice curve over the back of the dress because Goosy has a tail! Smiles..
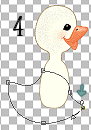
Now following image 3, make a node by holding down the control key on your keyboard and clicking your mouse placing this node between the right and bottom node. By the way, I'm leaving out the technical names of these nodes to keep the work in progress simpler to understand. Make this node a CUSP. Now move the arms following image 3. Make the front curve and make the bottom curve by moving the bottom node down and changing it to a symmetric the same way as you change a node to a cusp. Now following image 4, bring the front hem of the dress up a little in the front.
Click on your layer palette and change this layer to a rastor. Save your image. Rename this layer dress.
Using the same colours and again using your preset shapes, but changing this layer to a rectangle, all other settings the same, draw a square as following:
Time to vector this. Click on node edit. Then move the top right corner node down following image 1, then move the left node up.
Now following image 2, move the bottom right node in towards the tummy. Then create a new node, between the top two nodes right in the center. make it symmetric and move the arms out very gently.
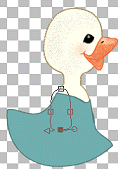
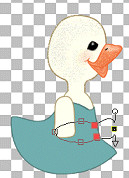
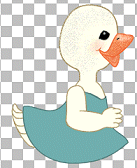
Now following image 3 move either the dress layer and or the vector square until the top left node, the one in red lines evenly with the dress. Then click on the left corner node, and hit your delete key. The x shows the node to delete. Move the right top corner up a bit and then change this layer to a rastor layer. Save! The following is what you should have. Turn off layer 1, chest and head. Then merge the two dress pieces together and rename it dress. I advise you to take a break and get a drink before continuing. Hope I haven't confused you. I have done my best to explain this clearly by using several screen shots.
The Arm
First change your stroke colour back to the taupe and the fill colour to the light cream. Using preset shapes ellipse, same settings as previously, draw a narrow long oval half the size of the dress. Use the dress as your guide. Here is your size and your positioning.
Time to node edit..
First right click on the top node and move one of the arms out giving more of a square shape but rounded corners, then do the same to the bottom node but make it slightly wider, then move the left node out slightly.
Make this layer a rastor layer now. Then draw a second oval same size, long in width, but narrow in height.
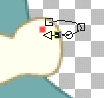
Now make two new nodes where it shows red in the following diagram and move these nodes in and make them cusps, then right click on the node to the right and move the arms out creating the hand.
Now right click on the new node you made and with the tip of the arrow arm, move the arm up a little. Then following the next diagram move the node on the top of the arm, the mauve node, up and over the arm slightly, then holding your control key, and clicking on your mouse, create another new node where the red square shows, then hit your delete key making a curve and the inner bend of the arm but joining this section to the top of the arm.
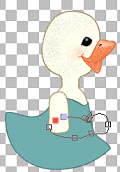
Now my arm was slightly longer than I wanted so holding the right node, move the node in before hitting node edit. The hand should be lined evenly with the front of the dress. Convert this layer to a rastor.
Turn off your chest layer, your head layer, your dress layer and layer 1, and merge the two arm pieces together and rename this arm.
Keep the rest of the layers turned off, enlarge so you can see, and draw a wide but narrow little oval for the finger. Following the diagram, move the top and bottom node over the hand slightly, click on the left node and delete it, where the red shows in the diagram now you may need to widen the top and bottom node to round the finger.
Change this layer to a rastor layer and edit copy it then edit paste as a new layer 4 times. Then using your deformation tool make them a little shorter. Here is a close up of the hand, merge the fingers to the arm and rename.
With the same stroke colour and fill colour, go to your draw tool, the one that looks like a pencil. Change the settings to stroke and fill, solid colour, no pattern, antialised and vector checked. sorry PSP7 I do not know the term you use. (I should reload mine, but I have too much fun with PSP6.) Now at the far left side of the dress draw a curved tail similar to below. If you need to refine your line, go to node selection, then node edit. One thing I did was on the second last node at the bottom, I changed it to symmetric. To do this just follow exactly how you did it with a preset. Right click on the node, go to node type and select symmetric. Convert this layer to rastor.
Now still using your draw tool, change the setting stroke and fill to just stroke or line, also select vector and point to point. Draw two points exactly as the following diagram shows.
Now go to node edit, then right click on the node to the left, and select symmetric and move the arms making a downward curve. Draw a few more curved lines. You could do this freehand without the vector if your very good at creating curves. Or you can just duplicate the original and move them into position. Here is what you should have.
Turn off the arm, chest, dress, head layer and merge the rest visable. Rename tail. The tail layer must be second from the bottom, under the dress layer. If not, move it there.
Legs and Feet
Add a new layer. Now change your stroke colour to the medium orange. With your draw tool, straight line, stroke, width 13, create it as a vector, other setting should still be the same. Draw a slight diagnal line, then release your mouse, then draw anotherline WITHOUT moving your mouse pointer, draw a straight line down. Draw a second line straight down but over to the right some. The reason I suggested creating these as vectors incase you need to move them once you have them created. Just click on node edit, and move the section. Then once your satisfied change this layer to a rastor. Now go to selections on the task bar, then go to select all, select float. Go to your airbrush. Change the settings to round, size 18, hardness 15, opacity 13, step 19, density 34. Change your stroke colour to the light orange, and the fill to the darkest orange, at the knee joints highlight with the left mouse button, the lighter orange. Then at the top of the legs near the dress and down near the ankle shade with darkest orange using your right mouse button. Select none.
Now for the feet. Using once again your preset shapes tool, changing your stroke colour to the medium orange, using vector and ellipse, fill only, all other settings the same as previously, draw a circle for the feet. Go to node edit and between the top and bottom nodes, on the right add 4 new nodes. Then move every other node out making webbed feet, then open each arm to give some roundness.
Now without going to node edit adjust the sides of the node bars resizing the foot to fit the goose. Using the turn arrow move the foot as following.
Now go to node edit once more and create a node then hit your delete key where the GREEN square shows in the following.
Now move the nodes beside the foot ontop of the foot. Convert this layer to rastor, then edit copy and edit paste as a new layer and move it towards the other foot. Then select the feet and add highlights and shades using the lightest and darkest of colours and of course the airbrush tool. Turn off the head, dress, chest, tail and arm layer, merge the rest visable. Rename legs. Now if you have a line where the foot and leg meets, using your soften tool, size 9 round, harness 76, opacity 100, step 25, density 100 soften the lines slightly. Now using the dark orange shade around the foot giving the foot some height.
The Finishing Touches!
You can leave the feet plain or add sandals. To add the sandals, select a dark and the taupe brown, using preset shapes rounded rectangle draw a square the size of the foot. Move the top nodes in slightly, and rotate the sandal evenly to the foot. Then change this layer to a rastor and move this layer below the legs layer. Duplicate. Move the duplicated layer over under the other foot. Using the dark brown, and freehand, size 3 add a layer above the legs, and draw the straps. Follow the diagram at the bottom of this page.
Change your stroke colour to the darker teal, and the fill colour to the lighter teal. Add a new layer on the top of all your layers. Draw two straps for the shoulder ties then two loops over the nearest most visable arm. Add a new layer and draw lines on the dress following my example. They do not need to be perfect as we will be blurring them. But try and bring them to the edge of the dress. Select the dress layer, select all, select float go back to your lines on your dress and go to gaussian blur. Now change your fill colour to a very light teal.
Add a new layer, then go to your airbrush tool and add highlights, using your right mouse button, between the lines and on the dress giving it a nice shine. Then add some shade under the arm around the right side, and over your blurred lines and across the top back near the tail. Do not worry about the arm, we will be moving this layer down under the arm. When your finished shading and highlighting deselect. Then move this layer just over the dress layer. Now click on the dress layer, we are going to add a few curves to the edge of the dress. Using your push tool, which is on the second tab of your retouch tool, and only changing the size to 18, click below the dress edge and move pushing the dress up and making little curves. Then take your draw tool, solid line, stroke or line only, draw where the curves are.
Merge all of it visable, add a new layer and add a hat or head band, whatever suits you. This finishing touch is up to you! Add a flower or a book or a sign in her hand. Make a background and frame..or not! Smiles..You are done!
©2001 The Tilly Garden
|