<XMP><BODY></xmp>Flexible Weapons

        First of all, a big boo for Yahoo! This article was originally on a Geocities site owned by someone I used to know. The other night I discovered that they had terminated the site without the courtesy of even a warning. Before you practice any of the following techniques think really bad thoughts about the little bean counter responsible. Maybe if enough people do this the focused negative energy will give him an ulcer or something.
        That's the bad news. The good is I've rewritten some of this to make it clearer, added at least one new technique and more links.
        A very big thank you to Jason, for scanning in the images.
        Printer Warning. This article is a bit long. If you are having to pay for your printing, be advised that it will print out to at least 13 pages long. Save paper, save as an e-copy.


Added 11-4-02
Updated 19-11-12
Whips, Chains and Scarves, your Flexible Friends.

        This article began life when my friend Michael mentioned that Comtech were soon to release a video on Bandana fighting.
        Given that America used a different TV system to much of the rest of the world, I'm not likely to ever see this video but it did inspire me to jot down any ideas I could think of. The letter turned into a discussion of flexible weapons in general and eventually this became a webpage.

        The techniques here should work with scarves, bandannas, belts, ties, chains, ropes, shoe laces, towels, electrical flex, gun slings and lanyards, jumper cables, straps, phone cord, twisted bedsheets etc. This is by no means a complete list- the reader is advised to spend a day thinking how any items he encounters or has that could be used as a flexible weapon.

        It's often said that anything can be used as a weapon. What many people do not consider is that some weapons are more effective than others. Hitting someone with your handbag will usually do much less damage than if the wielder used their hands or feet- and it should have already occurred to you that the strap of the bag is a potential weapon.
        Why do I mention this? Because some flexible weapons can be difficult to use, and if your life is in danger you may be better off using unarmed techniques- find out what suits you.
        I've not included in this article joined weapons such as the Numchuka or three section staff. Many of the techniques described can be applied to similar weapons such as the medieval ball and chain, the Kusarigama and the Ninja Quarterstaffs with sections of chain concealed in them. In the past chains have often been added to other weapons to extend their reach or entangle a foe. One variant of the Kusarigama is comprised of two Kama joined by a short length of chain. This was used to parry and bind in exactly the manner that will be described later. For convenience I'll talk about scarves for most of this article.

1) The Unweighted Scarf.
        These techniques can be used with weapons that are not heavier towards one or both ends and also with those that are.

The “Down and Out” Defence.
        This can be an outward or an inward defence, or even an upward or downward one. “Down and Out” is my aide memoire for which hand to perform the wrap with.
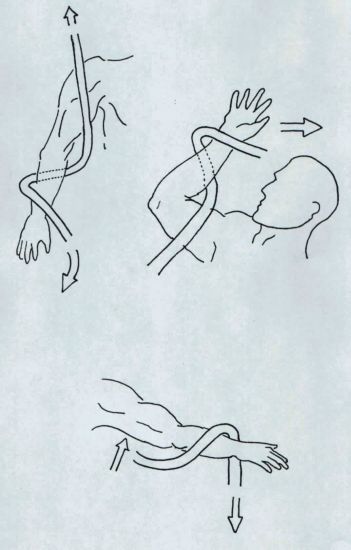
        The scarf is held between the two hands and used to block or parry like one would use a Quarterstaff “Little John-style” –being pulled taunt just before or on contact. The defender is on the attacker's inside gate and his weapon has made contact with the inner or lower side of the arm. Now use the outer hand to wrap the scarf over the top of the arm, because you want to pull the arm downward –hence “Down and Out”. When you are on the inside gate you are vulnerable to the attacker's other hand so you want to apply the bind and move to the outside as quickly as you can.
        In the lower illustration (left) the defender has parried so that he is on the attacker's outside gate and his weapon is on the outside or upper surface of the attacking arm. The defender would wrap with his upper (right) hand, and it could be argued that that isn't what many people would term his outer hand. As long as you understand the principle and can remember the technique let's not argue over semantics.

        The scarf can therefore be used to pull the arm downwards either into a throw or a lock. A good tactic is to use this to apply a half-nelson which will also position you for a knee strike to the foe's coccyx (the tail bone).

The Up and In Defence.
        Not so useful in my opinion, but still a valid technique. The block or parry is made in the same way as before, but this time the inner hand performs the wrap. The arm is then forced upwards, usually with the attacker's elbow bent and sometimes with your outer hand pushing on the foe's upper arm of elbow, ideally on a nerve point.
        This is best performed by stepping to the foe's outside gate to reduce the opportunity for strikes from his other hand.
        The bent arm can be forced back behind the foe's head to force him downwards, maybe with the assistance of a reaping Judo style leg action. An opportunity for a hammer-fist strike to the face with the inner hand may also occur.
        When using flexible weapons, or any weapon for that matter, you should be aware that it's not just the weapon you have available to fight with. For example, if you have a knife it's not just the edge and point you can use. You have the back edge to club with, the pommel to strike with and the hand holding the knife to punch with. Don't forget you also have the other hand, the feet, knees, elbows, shoulders, head, buttocks, hips and teeth.

The Even Simpler Option.
        Block with the scarf between both hands as has been described. Once the force of the blow is redirected, step in and still holding the scarf punch or hammer strike with one or both fists.
        This is a better option if faced by more than one attacker. The strike can also be followed or replaced by wrapping the head or neck. More of this later.

The Hand Bind.
        A variation of the above wraps, applied to the hand or wrist area either as a follow up to a block or offensively. This is also the defence to someone grabbing the scarf with one or both hands.
        Once the scarf contacts the foe either the inner or outer hand is moved in a circle, wrapping the hand(s) one or more times. This secure grip can now be used to apply various locks, pulls and throws.


        With a very long weapon such as a sarong or bullwhip the same techniques can be used to bind the arms to the torso. Basically one or both arms are pinned to the body and the other end of the scarf swing in an orbit around the foe. One coil should be applied to the neck to assist in pulling the foe from his feet.
        The weapon can also be held in both hands and one end moved in a spiral like a gymnast's ribbon. Smaller spirals are made against the limbs to aid control.
        Once a foe is grounded the weapon may be used to bind him.


        Rear view of tying technique: the cord is knotted or looped around the left wrist, then wrapped over then under the right biceps, then around the throat, then under then over the left upper arm then down and around the right forearm.


        Another quick tie is to wrap the wrists several times then tie an overhand knot, give a quick half twist then tie another overhand knot.

The Handcuff Knot.
        This is actually a modification of the slip knot. Once the two loops are pulled closed the free ends are tied together. Despite the name this is apparently not the most secure of restraining ties. It is useful for rescue workers since it can quickly tie an unconscious person's hands together to make them easier to carry. It is also suitable for hobbling horses.
         To tie quickly, hold a cord between both hands and twist both hands clockwise to form two loops. If these loops were now slipped over a post you would have a clove hitch. Instead, overlap the two loops as shown and pull the two “inner curves” past the “outer curves”. Interestingly using this method you can create the knot in the centre of a cord without needing to access the ends.


Click For image on its own

        This knot can be quite effective even with just fishing line if applied to the thumbs.

Another Knot.
        This one was taught by W.E.Fairbairn. He called it the “Highwayman's Hitch”, but I think I've seen this name used for other knots.


        Basically, you pass a loop (A) behind the post, reach through it with one hand and pull loop B through. You then reach through loop B and pull through C. B is part of the standing end, C the free end. You then pass the prisoner's hand through C, pull both the ends and tie them off as appropriate. Typically the free end would be half-hitched a couple of times around the standing end.
        I've shown this tied around a post, but obviously this could be tied around his other forearm.
        An interesting thing about this knot is you can tie it without releasing the free ends. These can be used to tie other knot, bind the ankles etc.
        Below is an example of this knot used as a quick release hitch.

        The art of bindng people who don't want to be bound is Hojo-no Jitsu and a video on the subject may be found at the BUGEI TRADING COMPANY. Some links on this art will be at the end of this article.

        As well as wraps against the arms and body, you can also attack the head and neck. I've already covered this partially-the weapon can be pulled while a fist, elbow or shoulder can be used as a fulcrum for a throw. The weapon need not be applied against the neck. Across the eyes or under the nose will also be effective.
        Garroting techniques are an obvious neck attack but are usually only effective if applied from the rear or side of the foe. For this reason you need good footwork and they are preceded by parries, strikes and binds.

Some Forms of Garrote Attack
        Garotte attacks are usually combined with a technique to disrupt the target's balance such as lifting, tripping, kicking the back of the knee or kneeing the tailbone.
        Often throwing attacks will be quicker than conventional strangulation.

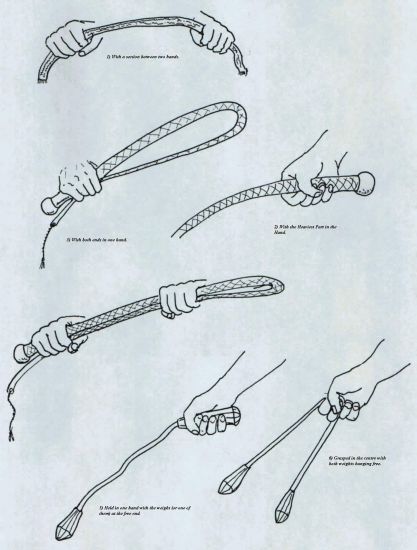
Ways of Holding a Scarf type Weapon.

1) With a section between two hands.
        
This has already been covered in detail for binding, parrying and strangling. The ends can be held palms down, as shown in the illustration, hands vertical or palms up with the handle ends pointing inwards. I'm told the latter is rather like holding a horse's bridle and was the preferred method of a karateka I knew.

2) With the Heaviest Part in the Hand.
        This allows the weight to be used for butt strikes. This is the conventional way of holding a whip.

3) With both ends in one hand.
        The loop can be thrown over targets and if heavy enough can be used to strike. If one or both ends has a handle then butt strikes can be used.

4) With the weapon doubled and stretched between both hands.
        This is a close range hold for a bull whip allowing parries, blocks, binds and butt strikes.

5) Held in one hand with the weight (or one of them) at the free end.
        
The weight is available for striking or wrapping around targets.

6) Grasped in the centre with both weights hanging free.
        This is a close range version of 5.

2) The Weighted Scarf.
        Weights can take many forms. Simply knotting a rope or chain at the end may increase the local mass sufficiently for the following techniques. A padlock on a bike chain will readily serve as a weight. Less obvious are the handset from a phone, a plug on an electrical flex, buckle of a belt and the mouse on a computer cable.
        The Thugee of India placed a coin or two in the ends of their strangling scarves (Rumals) so they could be swung more readily. Sewing magnets into a bandanna adds weight, holds it in place without tying and allows the weapon to be brought into action quickly. It also counters a foe grabbing the bandanna to use it to pull or strangle you.
        You can, of course, remove your belt if an attack is suspected. I've seen a youth in Israel using a belt to deter attackers. If the fit of your trousers is such that they are unlikely to stay up without the belt you may need an alternate defensive strategy!

        Many of the following techniques will be described as performed with the Masaki Ryu version of the Manrikigusari. This was two feet of no.3 (US) size chain (3-4mm thick with internal link dimensions of about 6 x15mm) terminated in 3½” handle weights. Personally I prefer a chain of about 18” since this is the distance that I can comfortably hold my hands apart at shoulder width. Serge Mol's book (qv) says the Masaki-Ryu Manrikigusari is about 2 shaku, 60cm or 24” long overall, which is closer to my own conclusions on a good length for this weapon.
        A friend of mine maintains the correct way to hold a Manrikigusari is with your palms up and thumbs on the outside, so the chain passes across the backs of your hands. This certainly seems to take up the slack of most shop brought Manrikigusari.

        Gruzanski's book mentions that the weight of the chain and handles must be balanced otherwise the weapon will be less responsive to manipulation and tend to whip or snarl. However he doesn't mention how this is done. Serge Mol's “Classical Weaponry of Japan” clears this up by explaining that the combined weight of the handles should equal the weight of the chain. He also details that the final link that joins the handle to the chain was usually circular and thicker for increased strength and flexibility.

        Chain weapons can range from one to ten feet in length. Even a short chain can have a considerable reach once you add in the length of your arm and body motions. Chain techniques are best practiced outdoors or in a very large room such as a gym or dojo. Smash up your own bedroom and wreck your computer and stereo and you have only yourself to blame.

        When I first wrote this article the Manrikigusari was not particularly well known in the west. That has now changed but unfortunatly a lot of the information on the web is flawed. I have seen statements such as “the difference between a kusari-fundo and a manriki is that the manriki is much longer”. Some words are therefore in order.
        “Kusari-fundo” means weighted chain. The term fudogusari has effectively the same meaning and ryofundogusari (two-weighted chain) is also used. Other names for these weapons include manriki, kusari-bundo, ryo-bundo, sode-kusari, kusari, kusari-jutte, ryofundokusari, tamagusari (ball-chain), futokorogusari, and inyogusari. “Kusari-jutte” is also the name of a weapon that is a jutte to which a weighted chain can be attached.
         Manrikigusari (ten thousand strenght chain) is the name used by the Masahi-ryu for the kusari-fundo and a case can be made that the name only applies to kusari-fundo of the size used by Masahi-ryu.
        The kusari-fundo/manrikigusari is often claimed to be a ninjitsu weapon, alongside several other chain weapons. Given that chains rattle weapons using them would not be my first choice for activities that involve making minimum noise. The names sode-kusari (sleeve chain) and futokorogusari (pocket chain) are also used and this suggests that these weapons were useful for spys, ninja and any other individual wishing to appear unarmed. Masaki Tarodayu Dannoshin Toshiyoshi, founder of the Masaki-ryu and creator of the manrikigusari was a samurai charged with guarding a gate to Edo castle. Chains were also popular weapons with Edo-era police, who were required to take pains to make arrests without fatalities.
        The Kusari-fundo is an advanced weapon in that to use it effectively one must be well practiced with it but also an appreciation of correct tactics is needed. Gruzanski notes that fundamental to the effective use of the Manrikigusari are surprise and speed. The Marikigusari is kept concealed and strikes suddenly. It attacks rapidly so that its reach cannot be gauged, and the direction of attack is varied so a pattern cannot be spotted and the opponent is kept confused. When held between two hands the user should be able to make attacks from either hand.

        Most of the Manrikigusari I have seen on sale are disappointing. One design has small weights that would not be particularly effective handles in that they are not very well suited to being used for yawara/kongo type striking. The other model has handles five to six inches long and a 26” chain. I am above average height (5’ 11”) and this is a little too long for me. In the Issei-no-kamae position the arm is supposed to hang naturally by the side and the chain is either gathered up in the hand or hanging down the leg.. The chain should not be so long that the weight touches the ground. Nor should it be so long that when one weight is released from the hand it hits you on the top of your foot. Gruzanski's book suggests handles 3½” long joined by two foot of no.3 wielded link machine chain. Such handles are short enough that both can easily be held in one hand but they can still be used for yawara-style strikes. The correct length of chain for your physique you will have to determine for yourself. In Issei-no-kamae the lower weight should probably hang no lower than your ankle bone.
        A good way to determine the length of your manrikigusari is to hold a cord in your hand and extend that arm out in front of you. Pull the cord back towards your face and adjust its length so that the end of the cord is two inches from your face or chin. Measure this length of cord. The measurement you get will equal the total length of the chain and one of the handles.

        Weighted scarves can be used in the same way as unweighted, but offer several additional options.
        Most notably, the end of the scarf has more momentum, allowing it to be used as a flail to strike with. The weight also allows the weapon to be swung single handed to execute wraps and binds. A classic example of this was the Thugee use of the Rumal. The end weighted with a coin was swung around the victim's neck and caught with the other hand. With a weapon such as the Manrikigusari or Bull whip the weight may be a handle that also provides a harder object to execute hammer-fist strikes with.

Striking with a Weighted Cord or Chain.

        My personal experience is not to try and wield a chain like a Numchuka. If you keep it moving for any length of time you'll lose control and probably hit yourself. Also the foe will gauge the length of your weapon and your timing and step in at the wrong moment.
        Better to make a couple of swings at the most then regain control, ready to react to your foe rather than your weapon.

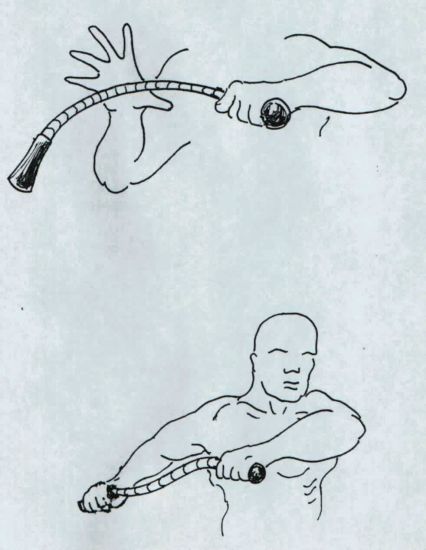
        Ready, (left, lower) with the chain pulled taunt. From this position one has the option of parrying, binding, butt striking etc.

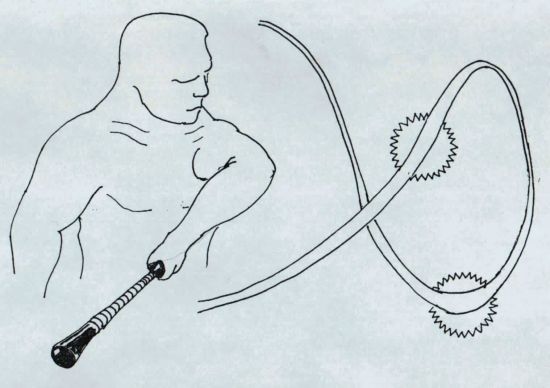
        The weapon is swung, (right) the movement coming from the wrist like Charlie Chaplin twirling his cane. It is important that the swinging action centres on the hand and comes from the wrist. If you try to power the swinging from the shoulder it will not be as effective. The weapon spins in the hand and the rest of the arm moves the hand around. There are several chances to strike as the weight swings. A figure 8 movement is shown, but circular paths can also be used.

        The Catch (left, top). The chain is caught to resume control and the hand slid along towards the end. This catch can be turned into a sudden strike with the doubled chain. The weapon is ready once again. From this position the user can suddenly thrust with the handle, swing the chain in a downward arc or suddenly swing the chain with the other hand.

        Using a longer chain or rope one can twirl part of it like a lasso, varying the length and reach. Some martial arts also make use of 5-6ft chains that are whirled around the centre like a propeller, the momentum keeping it rigid.

        There is a strike that can be made using a variation of the grip described as "3". The weapon is held in a circle with both ends in the palm. When the attack is made the weight (a belt buckle, for example) is released and swung upward to deliver an uppercut to, say, the chin or testicles.

        So far we've only considered swinging attacks with the chain. It may surprise you to know that thrusts can be made with a chain too.

        The classic way to do this is known as Kusumi (Hazing) by the Masaki Ryu.
        The chain is scrunched up in the hand, one weight held by the last two fingers and the other held between the first and second fingers. The hand is punched straight at the foe and the top weight released as the arm reaches extension. The weight flies in a straight line and hits the foe. This is often used as a surprise first attack, since the chain often can't be gathered up in the hand during combat. A further advantage is that the technique is usually executed from a distance at which the opponent considers himself out of range. While the weight can hit with some force it is unlikely to be a fight finisher. This technique is therefore used to startle the enemy and buy a moment to get the chain spining.
        To help conceal the weapon the attack is usually made with the hand down by the side, or in front of the body with the other hand covering it. Charles Gruzanski maintains that this technique should be made as a straight punch, like an “O-zuki”, and never with an underarm or overarm action like throwing a ball. My friend Michael shared some interesting information about US agents being taught chain techniques and that they were taught a Kusumi like technique that used an overarm action like throwing a baseball.
        It is worth noting that after the weight has hit, a well timed pull on the chain will snap the weight back towards the user where it can be caught. Try catching the weight in the throwing hand with the palm upward and you may be able to throw a second Kusuki strike. Try practicing volleys of Kusumi, moving around a target to work on you accuracy as well.

        The second form of throw-strike is suited to longer weapons than the Masaki Ryu Manrikigusari. A length of chain is held in one hand and twirled around like a bolas, lasso or sling. At the correct moment the chain is released so that the weight flies at the target. The other end of the chain is retained in the other hand. Like the above technique a timed pull on the chain will return the weight to the user. One should practice at getting the weight up to speed with as few rotations as possible. A practiced slinger can often launch a stone in less than one rotation.

        The third throw-strike is also for longer weapons and is even simpler. A weight is held in one hand and thrown at the target as one would throw a rock. The other end is held in the other hand, and as before, the weight can be returned by a timed snap of the wrist.

        Another thrust type attack is the flick, made by pulling the weapon taut and flicking it just like one would a towel. An interesting variation of this is made with the handkerchief with a weight sewn into the end. The flick is made as part of the act of drawing the handkerchief from the pocket. Often the target won't expect that weight and won't make much effort to avoid a wisp of cloth.

Using a Whip in Combat and Weapon Snatches.
        We'll consider long flexible whips such as Bull whips and Stock whips. Shorter, more rigid whips such as riding crops will be considered later.
        Whips are rather unusual since one uses the lighter end to hit the target. Because of the taper and the flexibility of the whip, this end is travelling at great speed when it hits.
        This article will not try to teach you how to crack a whip. See the References section for that information. Some comments on combat applications are in order though.
Ideally you'll always hit your opponent at the moment that the whip cracks, since this is when the whip has maximum energy to pass on. In practice this may not be possible and my feeling is that it is better to hit before the crack, when the whip has a lot of energy/velocity, than after when it has discharged its energy.
        This will still hurt. Everyone who learns whip handling spends some of their early time hitting themselves on bad casts, so I speak from (painful) experience.
        To begin with, concentrate on accuracy rather than noise. A whip makes a lot of noise, which is intimidating. They also cause a lot of pain but very little physical damage, so may not be effective on someone who has a high pain tolerance, such as attackers on certain drugs.
        Many attackers will try to rush you to counter the reach you have with a whip. Use the whip butt to strike and a length of whip between your hands in the manner already detailed. Many whips have a lower section rigid enough for single handed parries.
        Like weighted weapons the whip can be cast to wrap around the neck and limbs or weapons. Snatching a weapon out of an opponent's hands is feasible but bear in mind that you could end up with a length of sharpened steel flying right at you. Better to direct a snatched weapon towards the ground at one side. Comtech practices the snatching and catching of dummy weapons by the hilt. This seems to work, but practice with a variety of different weights and types.

        The only other combat use of a bandanna that I can think of is to knot the thing into a sling and throw rocks with it.

Miscellaneous Ideas.
        
When I saw Dan Inosanto teaching when I was over in LA he threw a handkerchief with weights sewn along the edge. This was intended as a distraction device.

        The Masaki Ryu teaches throwing of the Manrikigusari. The weapon is gathered up in the hand and thrown at the face of the enemy at ranges of twelve foot or less. This does, of course, disarm you and a lot of people will recite the tired old dogma:-

"You never throw your weapon away".

        This is one of the many instances when you do throw your weapon away. Hitting the opponent with the Manrikigusari or making him avoid it buys enough time to draw your sword and strike. In a modern setting once can close to fighting range and get in some good strikes, such as the ever useful Side Kick to the leg. You always have your hands, feet, knees, elbows, shoulders, head, buttocks, hips and teeth.
        Like wise, should you be lucky enough to wrap both an opponent's legs together with a shorter variety of flexible weapon you'd probably have to drop the weapon to push home your advantage. If you have a longer weapon it may be possible to bind his upper regions too.

        When casting a weapon to wrap around a limb, neck or weapon it helps if the weight passes over rather than under the standing part, so it hangs down and binds up. Experiment with angle of cast and impact to achieve this.

        Comtech have suggested that in a fight you could break off a car aerial to hit a foe with and to parry a blade.
        A friend of mine points out that modern American car aerials have a wire running down their centre so you'd remain attached to the car. This may be different for CB antennas. In my home town aerials of parked cars are nearly always retracted so people don't break them off.

        A more useful idea from Comtech is to add whip poppers to various items such as riding crops. These are mainly used for feinting and flicking in the opponent's face to distract them.
        I know of someone who has tried a popper attached to a telescopic pointer, of the type used in presentations. He'd mainly intended this pointer to be a parrying device but the addition of the popper allows him to harass opponents and regain the initiative.
        There is no reason why a popper can't be added to a more robust weapon, such as a truncheon. Poppers used in this way are improved if a yellow section is added. The brain tend to retain this colour so the popper is more distracting.
        One weapon the popper is effective on is a Sjambok (I have the Cold Steel 41" plastic model -the 36" had not been released then). The Sjambok as it comes is a good parrying weapon and hits hard and fast. The taper and flexibility allow an added popper to travel quite fast. It won't crack but I've managed to cut spruce twigs with mine. The popper is mainly there for feinting but it is nice to know that if I miss with the Sjambok tip the popper may still inflict some pain.

        The Sjambok is an excellent police weapon since it does the job but it is near impossible to cause serious physical injury. Sadly, because of its "Apartheid" associations most Police forces are unlikely to adopt them and continue to quell civil disorder with far more dangerous batons.
        The grip that comes on the Cold steel Sjamboks is quite simply horrible. Mine has been covered by a length of black kangaroo leather and this was done for me by Joe Strain, the same guy who made the whips used in Zorro.


References.
        This article was compiled from various sources, some of which are detailed below. This is not intended as a further reading list since hopefully all your questions have been answered above –if not, or you have any other information to add, please let me know.

Spike and Chain by Charles V. Gruzanski Tuttle Co. Press 1968 ISBN 08045407.
        Now published as "Ninja Spike and Chain" Contains most of the basic techniques for the 2ft Manrikigusari as used by the Masaki Ryu, and also a brief introduction to throwing the Bo-shuriken.

Tanikala by Amante Mat P. Marinas Sr. Published in World of Martial Arts magazine Jan/Feb. 1997.
        An account of the use of the chain in Filipino martial arts. Mentions ways of holding the chain not mentioned in Spike and Chain.
        Many thanks to Michael Christensen for passing a copy of this on to me.

Forbidden Fighting Techniques of the Ninja by Ashida Kim. Citadel Press 1984 ISBN 08065 0957 0.
        Covers a wide range of topics but was used for its information on tying up prisoners and the use of the Koketsu shoge.

The Death Dealer's Manual by Bradley J. Steiner Paladin Press. 1982 ISBN 087364 247 3.
        An account on the use of some of the weapons that can be used by an assassin, including the garrote.

The Whip Page at the Thrower site. All the links on whips that you could want. Go to the Bullwhip FAQ to learn how to crack a whip.

Comtech Whip Video From Comtech. Possibly most interesting for its techniques for when the foe gets inside you cracking range.


Two sites of links about Flexible Weapons.

http://martialarts.about.com/cs/weaponsflex/
http://www.artrans.com/rmsg/fire/field.htm

Hapkido Rope Techniques.

US Army flexible weapon methods.

The Japanese Art of Rope use and binding is detailed at

http://www.webcom.com/jikatabi/hojo.html
http://members.aol.com/squaddiejh/Hojojutsu.htm
http://homepages.paradise.net.nz/sukisha/hojojutsu.html
and here

        Rex Applegate's book "Kill or Get Killed" (FMFRP 12-80) is available as a 17.5MB down load in Adobe by right clicking on

http://www.selbstverteidigung.org/images/Applegate.1280.pdf
and selecting "Save target as.."
The 53rd and 54th pages detail the "Outside Choke"

An article on the Sjambok

Police Numchuku

Update
        I found an article on Garottes, and was going to add it to this page, but it turned out the website has so many good articles I'm adding a link to the whole thing.
Don Rearic's martial arts articles

By the Author of the Scrapboard :


Attack, Avoid, Survive: Essential Principles of Self Defence

Available in Handy A5 and US Trade Formats.


Crash Combat Fourth Edition
Epub edition Fourth Edition.
Back to the Scrapboard
>