This tutorial was written for FlyByNightGraphics June Challenge of the Month and is not to be copied, uploaded to another site, or group list without prior written consent by the author.
All rights are reserved.
June 6, 2001.
Set your foreground and Background color to White
or a Light Gray
or a color to match your picture.
Go to Layers> New Raster Layer
Name it Frame 1.
Selections> Select All.
Go to Effects> 3D Effects> Buttonize
Settings: Height and Width> 25
Opacity> 100
Solid Edge> Not Checked
Transparent Edge> Checked
Click OK.

Go to Selections> Select None.
Go to Layers> New Raster Layer
Name it Frame 2.
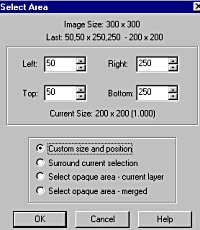
Double Click on your Selection Tool
Settings: Left> 25, ĀRight> 275,
Top> 25, ĀBottom> 275
Custom Size and Position> Checked
Click OK.

Go to Effects> 3D Effects> Buttonize
Use the Same Settings
Click OK.
Go to Selections> Select None.
Go to Layers> New Raster Layer
Name it Frame 3.
Double Click on your Selection Tool
Settings: Left> 50, ĀRight> 250
Top> 50, ĀBottom> 250
Click OK.
Go to Effects> 3D Effects> Buttonize
Use the Same Settings
Click OK.
Go to Selections> Select None.
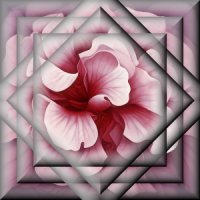
This is what you should have.

Now Save this as a PSP File.
Name it Pillow Frame 1.
But don't close it.
We will use it to continue to
Open your Layer Palette
Click on Frame 2
to Highlight it.
Double Click on your Selection Tool
Settings: Left> 25, ĀRight> 275,
Top> 25, ĀBottom> 275
Click OK.
Go to Image> Rotate
Settings: Left, Free 45, All Layers> Unchecked.
Click OK.

Go to Selections> Select None.
Open your Layer Palette.
Click on Frame 3
to Highlight it.
Double Click on your Selection Tool
Settings: Left> 50, ĀRight> 250
Top> 50, ĀBottom> 250
Click OK.
Go to Image> Rotate
Settings: Same Settings
Click OK.
Go to Selection> Select None.
This is what you should have.

Save as a PSP File.
Name it Pillow Frame 2.
Open your Pillow Frame.
Go to your layer palette and click on layer 1.
Add New Layer.
Go to Selections> Select All.
Open a Picture you want to use.
Go to Edit> Copy.
Click on your Pillow Frame
to make it active.
Go to Edit> Paste INTO Selection.
Go to Selections> Select None.
Another way to Paste your Picture.
Open your Pillow Frame.
Add a New Layer.
Go to Selections> Select All.
Open Your Picture.
Go to Edit> Copy
Click on your Pillow Frame
to make it active.
Go to Edit> Paste INTO Selection.
Go to Layers> Arrange> Send to bottom.
Go to Selections> Select None
I hope you have enjoyed this tutorial.
Written by
Frdsnomr
aka LinS46
Mail Questions to
Frdsnomr@aol.com

Thank You FlyByNightGraphics for this Award!
This tutorial was written for FlyByNightGraphics June Challenge of the Month and is not to be copied, uploaded to another site, or group list without prior written consent by the author.
All rights are reserved.
June 6, 2001.
My Favorite Web Sites
FlyByNightGraphics
FlyByNightGraphics
Back to my Home Page
Thank you for visiting my page at Angelfire.
Please come back and visit again!

Home Page