Tutorial
By Frdsnomr

Example of other tags I made with this turorial
are at the bottom of page.
This tutorial was written for FlyByNightGraphics and is not to be copied, uploaded to another site, or group list without prior written consent by the author.
All rights are reserved.
June 14, 2001.
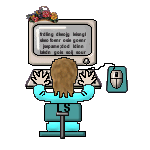
Here is the Picture I used to make
Here is the Bear Tube that I use.
Here is the fonts that I used.
Open a Picture you want to use.
Go to Edit> Copy
Go to Edit> Paste> As New Image.
Minimize the original Picture we will use it later.
Now resize the new picture so the Height is 150.
Click on your Selection tool
Draw an Ellipse in the middle of your picture
Go to Edit>Copy.
Open a New Image 250 x 250 Transparent.
Go to Edit>Paste as New Layer.
With your Move Tool>
Go to Layers> Merge> Merge Visible.
Go to Effects> Geometric Effects> Circle.
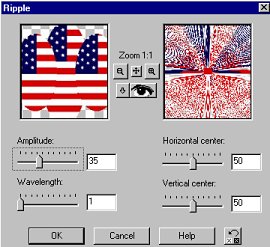
Go to Effects> Geometric Effects> Ripple
Go to Effects> 3D Effects> Drop Shadow
This is what you should have.
Now decorate how you like.
When you are done decorating it.
Go to Layers> New Raster Layer.
Go to Layers> Arrange> Send to Bottom.
Click on your Flood Fill tool.
Now go to Selections> Select All.
Go to Selections> Float.
Go to Effects> 3D Effects> Cutout
Do the same Cutout
Selections> Select None.
Set your background color
Go to Image> Add Border
Click on the border with your Magic Wand.
Go to Effects> 3D Effects> Inner Bevel.
Selections> Select None.
Change your Background color to White.
Go to Image> Add Border
Click on your Border with your Magic Wand.
Change your top Style Box to Pattern.
Click inside your top Style Box
Click on your Flood Fill Tool.
Go to Effects> 3D Effects> Inner Bevel
Selections> Select None.
We are done.
Here are some others that I made.
Mail Questions to
This tutorial was written for FlyByNightGraphics June Tutorial and is not to be copied, uploaded to another site, or group list without prior written consent by the author.
My Favorite Web Sites
FlyByNightGraphics
FlyByNightGraphics
Back to my Home Page
Thank you for visiting my page at Angelfire.
Please come back and visit again!
The Ripple Burst in this tutorial.
Right Click on it to save.

Click on the Bear to download him as a PSP file.

Click on the Fonts to download it.

to Copy your Picture.
Remember to Sharpen if your Picture is Blurred.
setting: Ellipse
Feather 0
or the part of the picture you want for the burst.

Turn on Your Ruler (View> Ruler).
Do this 4 times.
(You should have 4 Ellipses on your Image).
Move one Ellipse to the Right,
one to the Left,
one Down,
and one Up.
Make them overlapping
so they look something like a Diamond.
Staying away from the sides by about 1/2 inch.


Settings: Horizontal and Vertical Center> 50
Wavelength> 1
Now the Amplitude you can set where you like.
I used 35.
Play with the Amplitude until you get what you like.
Setting: Vertical and Horizontal> 0
Opacity> 40
Blur> 2
Color> Black

Fill this new layer with a color you like.
(This is your Background)
Setting: Horizontal and Vertical 4
Opacity> 100
Blur> 30
Color> Same as your Background but a darker shade.
Changing the Horizontal and Vertical to> Minus 4.
This is what you should have.

to one of the colors from your tag.
(Don't use the color you use for your background).
I used Red.
Setting: Symmetric> Checked
Size> 5
settings:
Bevel> top row, second from the left.
Width> 8
Under Image: Smoothness> 40,
Depth> 2,
Ambience> 0,
Shininess> 10
Under Light> Color White,
Angle> 315,
Intensity> 50,
Elevation> 20.

Setting: Symmetric> Checked
Size>20
to bring up the Pattern Window.
In your Pattern Window> Pick your Original Picture.
Scale> 100
Angle> 0
Fill your Frame.
Same settings.
I hope you have enjoyed this tutorial.


Frdsnomr@aol.com

Thank You FlyByNightGraphics for this Award!
All rights are reserved.
June 6, 2001.

Home Page