
 PORTRAITS
LESSON #6
PORTRAITS
LESSON #6
THE MOUTH
People who are not artists believe that
the eyes are the hardest part of the head to draw, but in my
opinion, the eyes are simple compared to the mouth. Each
time a new thought passes through
your sitter's mind his or her mood changes, and the expression
around the mouth changes as well.
Anger, boredom, fatigue, disdain, petulance - all these
feelings and a million more show around
the mouth. Let me just give a word of advise: When you're
working on your portrait and you get
to a stage where the mouth is just right, LEAVE IT ALONE!
Don't go back to the mouth for any
reason. You can lose the likeness in a split second by
adding just that "one more touch" to the
mouth.
 |
The lip tissue is darker in value and warmer in color
than the surrounding skin. When the mouth is open and the lips are parted,
we see the teeth. Infants have very full, soft, rounded lips. In old age,
the lips become thinner.
The upper lip is often in shadow, as it is a receding
plane. The lower lip catches the light, as it is a
projecting plane. The mouth is the most challenging part
of the portrait for the artist because it is constantly changing, but the
changes are usually extremely subtle. As John Singer Sargent once said,
"A portrait is a picture with something wrong with the mouth".
|
OBSERVING THE MOUTH
When drawing the mouth, remember that the upper lip is made
up of three parts, the lower lip of
two. (see drawing above) The line between the upper and
lower lip should be broken, varied in
weight and intensity, to avoid a strained expression.
In every part of the portrait you want to give the illusion
that the image MIGHT move. Nowhere
is this more desirable than the mouth. We must be extremely
careful not to draw firm dark lines
AROUND and BETWEEN the lips. The edges must be drawn
or painted softly, particularly on
women and children.
Note the way the corners of the mouth tuck into the adjoining
cheeks. Pay a great deal of attention
to these corners. Do they go up? Down? How dark are they?
If you paint them TOO dark, the
mouth will appear very tight.
In a small child the upper lip is frequently much larger
and more protruding than the very small
lower lip, for the lower jaw is undeveloped.
Study your mouth in a hand mirror. See how soft the lip
tissue appears. The center of the upper
lip projects, and the corners really recede as they go
back into the cheeks. Turn your head slowly
to one side. As you approach a three-quarter view, the
far corner of the mouth tucks in and
disappears. Turn slowly to the other side; watch as the
other corner disappears.
Now raise your chin, putting your head back. See how
the mouth curves around the teeth. The
corners of your mouth point down in this perspective.
Try smiling. What happens then?
Put your chin down on your chest and notice how the mouth
curves around the teeth. The corners
go up now; they go up even more when you smile. Throw
your head back and look up at your
mouth. The lower lip appears thinner than the upper lip.
Conversely, when your chin is down on
your chest and you are looking down on your mouth, the
upper lip appears thinner than the lower
lip.
DRAWING THE MOUTH, FULL FACE AND IN PROFILE
1.Studying your mouth in a mirror, indicate with a light
line where you want the mouth to be
on your paper. Look first for
the corners of the mouth and place them.
2.The line between the lips comes next. Try not
to draw this as one continuous line, but break
it somewhere. This little break
softens the mouth and prevents a tense expression. The viewer
will mentally complete the line
for you.
3.Now form the upper lip, developing it from the
three oval parts. The light coming from the
upper left or upper right throws
the top lip into shadow. Add this tone.
4.While you're working on the upper lip, note
the vertical indentation from the nose down to
the lip and the shadow on the
plane slanting back toward the cheek. If you're a man, you'll
have facial hair growing in
this area, which will tend to darken this part of the face.
5.Now look for and place the shadow under the
lower lip as it travels down to the chin. Squint
hard and study your mouth. Do
you need to add tone to the lips? A woman wearing lipstick
may need to add tone; a man
might leave the lip as is.
IN PROFILE
1.Now let's try drawing the mouth in profile. Holding a mirror
at the side of your face and
looking at the reflection of
your mouth in a second mirror, block in the mouth by first
indicating the angle of the
line between the lips.
2.Block in, in a straight line, the angle of projection
of your lips. Is the upper lip protruding
more - or the lower?
3.Tuck in the corner of the mouth.
4.Darken the upper lip if it appears to be in
shadow.
5.Add the shadow under the lower lip and at the
corner of the mouth. Keep the edges soft
where the shadow blends into
the light. Is the lower lip darker than the skin surrounding it?
Add this tone if you see it.
Now, with your eraser, pick out the highlight where you see it.
You'll find the mouth is there
without lines circumscribing it.
DRAWING THE MOUTH, THREE QUARTER VIEW
1.Study your mouth in the mirror. Keeping your lines soft,
draw the line between the lips, and
break it somewhere.
2.Lightly block in the upper lip by drawing the
three ovals. Squint hard. Where do you see
shadow? In the vertical indentation
between the nose and the upper lip? On the shadow side
of the lips from the center
to the far corner of the mouth?
3.Tuck in the corners of the mouth. On the far
side, the side turned away from you, the corner
may not be visible at all. Don't
put it in if you don't see it!
4.Add the shadows under the lower lip. Is the
upper lip in shadow? Should the corners of the
mouth be accented with darks?
If the lips are darker than the surrounding skin tone, darken
them. Now lift out the highlights
with your eraser.
EARS
 |
Students think ears are more difficult to draw than they
really are. Some dedicated observation will eliminate this fear. Whether
ears are quite flat or protrude, it's convenient to think of them as flat
oval disks set at the side of the head. The ear is made up of cartilage,
not bone, and has virtually no movement, so it doesn't change as ones expression
changes. On an adult, the ear extends in a vertical shape from the brow
line to the base-of-the-nose line.
In profile, the ear begins at the halfway mark between
the front and the back of the head and
extends toward the back. It also slants backward slightly,
sometimes paralleling the line of the nose.
The inner line around the top of the ear seldom follows
the outer shape exactly. Don't forget that both ears usually line up with
each other and are seen in perspective when the head is tilted.
|
OBSERVING THE EARS
Oddly enough, although ears usually don't contribute very
much to the likeness, when they're
incorrectly placed they can cause you a great deal of
trouble. And it's a very subtle kind of
trouble, for no one is expecting ears to matter much.
The face can be perfect, the ears beautifully
drawn, but you'll sense there is something wrong.
For students, the biggest problem seems to be aligning
the ears with the eyebrow line and the
base-of-the-nose line. Make sure you follow the curving
eyebrow line when the head is tilted and
hang the ears from that. Like the mouth, when the head
is tilted back, the ears appear to be lower;
head tilted forward, the ears appear higher.
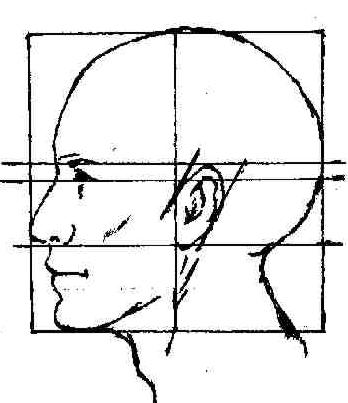
Before you start to draw, sit up very straight, holding
your head absolutely erect, and look in a
mirror. Envision an imaginary line at the top of the
ears and another at the bottom of the ears
extending across the face. (see drawing above) As you
learned from the lesson on the proportions
of the head, we have a rule of thumb that tells us the
top of the ear usually lines up with the
eyebrow, and the bottom with the base of the nose. But
YOUR ears may be positioned differently;
look hard and decide.
You will need a pencil, drawing paper, kneaded eraser,
and mirror for this exercise;
1.Block in the full-face diagram of the head using
a light line to position the ears, top and
bottom, where you see them.
2.Think of the ear as a flat oval disk and begin
drawing your ears with that form on both sides
of the head. Now refine the
outer shape of the disks into the actual shape of your ear. (see
drawing above)
3.Add the inner line curving around the top to
form the rim or fold, called the helix, as shown
above. Now define the bowl-like
indentation of the ear and the small flap at the lower area.
Draw the small flap at the front
of the ear opening. Follow this procedure for both ears, and
be sure to do both ears at one
setting. Does your hair cover part of your ears?
DRAWING THE PROFILE EAR
 |
1.Draw a square profile diagram of the head and lightly
position the ear as indicated here. |
 |
2.Draw light lines indicating the top, bottom, front,
and back of the ear (seen here). Then begin with the oval disk, slanting
the top slightly toward the back of the head. Now refine the outer shape
of the ear, top to bottom, as shown in the top row of illustrations here. |
3.Add the inner line inside the top of the oval as shown
above right. From the fold (the helix),
and carry it down to the lobe.
4.Draw in the circular line describing the deep
bowl; follow it down to the two quite rigid flaps
which protect the ear opening
- one at the lower back, one at the front toward the face. Add
shadows and highlights. Now
turn your head and draw your other ear. It is a different
experience, drawing an ear from
the opposite direction.
BACK
TO PORTRAIT PAGE
BACK
TO ART SCHOOL ON LINE

