
1.The nose is always centered between the eyes
and is narrowest at the top, or bridge, where
eyeglasses rest.
2.The nose is a vertical form, never horizontal,
and is normally straight from top to bottom. If
the nose has been injured or
broken, it may veer slightly to the right or left.
3.There are two openings at the base of the nose
on the bottom receding plane - the nostrils.
Very often these are not clearly
seen from the front view, and sometimes not even from the
side view.
4.The nose has far less mobility than the eyes
or the mouth. The nostrils can dilate, and the
nose can wrinkle when a foul
smell is noticed, or when someone is talking baby-talk to an
infant, but these movements
are fairly infrequent and rarely occur in portraits. Thee only
other way the nose changes is
when the subject is smiling. Then it appears wider as the
nostrils are stretched laterally.
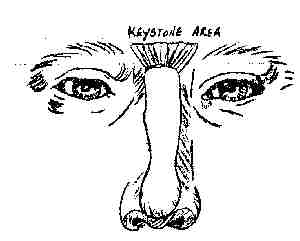 |
The nose begins where it meets the forehead and brow
in an inverted wedge shape between the eyes
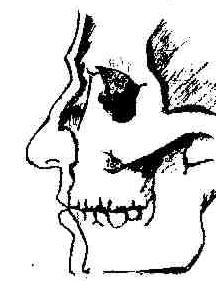
and at the level of the eyebrows. Narrowing at the bridge, it then widens as it travels down the face toward the bulbous tip. On either side of the tip, the nose flares out, forming covering for the nostrils. The underplane recedes - hard to indicate from the front - and progresses to the indentation between the nose and the upper lip. This is a good time to talk about the wedge-shaped area where the nose meets the forehead and the brows, called the keystone area. (see the drawing ). There is a delicate shadow here and a light just under it where the bridge of the nose is indented, the spot where eyeglassers rest when they are worn. Experienced portrait painters work out this wedge and bridge area with extreme care, while beginners overlook this area entirely. Nostrils are dark, but don't indicate them as black holes. Just incorporate them into the shadow area beneath the nose. When working with color, always make the nostrils warm, a reddish hue. On the drawing below, you'll see that beneath the skin and the muscle, the nasal bone extends downward from the frontal (forehead) bone of the skull about a third of the length of the nose, and ends at the nasal cavity, an opening in the skull |
 |
Looking in the mirror, study your nose and try to see
it as a triangular block projecting from the facial surface. This form
has a top plane, two side planes, and an underplane. You can't really see
a line where the side plane of the nose meets and changes to the front
plane of the cheek, but it helps to imagine such a line. It's easier to
feel it than to see it. Press hard enough to feel the side planes of your
nose, then the cheeks.
|
 |
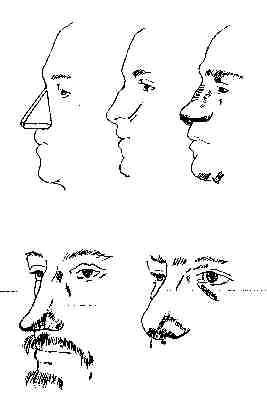
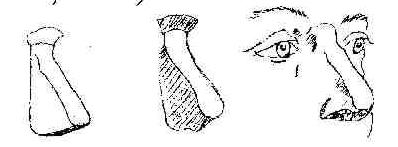
Refer to the top drawing above and start to draw. Begin
with the deep indentations on either side of the bridge of the nose, near
the inner cornors of the eyes. Then make a mark at the base of the nose.
Whenever you draw any form, always lightly indicate its boundaries first.
You can't just begin at one end and hope that all will come out right at the finish. Lightly draw the triangular shape of the nose as shown in the middle drawing above. Thinking of the nose form as a solid block, draw the side plane on the shadow side, the side plane on the lighter side, and the top plane. It's important that you begin your noses this way, even if you do not actually see all three of these planes. It is important that you understand this structure. The lines can always be erased later. Now draw the fleshy rounded ball of the nose, as shown in the bottom drawing above,with rounded lines to express its more bulbous shape. Then the flaring wing-like shapes on either side. Now indicate the bottom plane, the underside of our solid triangular block. Draw a light line where you think the side plane of the wing-forms turn under to become the bottom plane, and also where you see the top and front of the ball of the nose become the underside - and you're done! The nose casts a shadow on the cheek or the area between the nose and the upper lip - or both. Do you see any cast shadows? Add them, but don't go too dark, or they'll look like holes. Clean up your drawing now by eliminating your construction lines. Add small dark accents where your drawing needs more definition. Round off forms where necessary. Lift out the highlights (with your kneaded eraser): (a) at the bridge of the nose just below the keystone shadow; (b) on the bony part of the nose, a third or halfway down; and (c) the shine on the tip of the nose - the brightest, most obvious highlight. You might minimize this highlight on a beautiful woman; it could be a dashing slash on a man, second in importance and vigor only to the bright highlights in the eyes. On children this highlight is usually round and sharp. The proper placement and brilliance of this highlight will accomplish many things for your portrait. Look at John Singer Sargent's portraits for highlights; he was the master of them all! |
1.Make the shadows on the side plane and the underplane
of the nose darker than the shadow
on the side plane of the face,
going back toward the ear.
2.Draw the tip of the nose crisply, not softly.
3.Make the highlight on the tip of the nose crisp
and sharp.
 |
Study your nose from the side in a second mirror. Now
block it in as a triangular shape projecting from the facial surface. Then
start at the top with the keystone area between the brows. Look for the
curved indentation at the bridge. The nose then projects from the bridge,
rounds off at the tip, and recedes to the area above the upper lip. Add
the curved wing growing into the cheek, then the nostril.
This appears easier than drawing the nose in the front view, but this is only partly true. While you can more easily percieve the shape in profile and therefore more easily draw it, it's more difficult to make it appear solid. This is one of the problems you'll encounter in drawing any of the features, and even the head itself: The drawing will look flat in profile, like a silhouette. |
 |
Each time you look up from your drawing to study the
nose, make sure you see the nose at precisely the same angle as
before. You can check the angle by taking careful note of how much of the
cheek you can see beyond the nose.
Lightly indicate the angle of the nose. If it's hard to determine, hold your pencil up and align it with the angle of the nose in the mirror, then place your pencil carefully on the paper at that same angle. Starting at the keystone area between the brows, block in the top plane, the side plane nearest you, and any suggestion of the far side plane that you see. |
 |
Draw the wing area covering the nostril. Define the ball
or rounded area, and the slight shadow where the ball meets the bridge.
Is these shadows on the side plane?
Is there a front plane at the tip of the nose? If so, indicate the underplane as the nose recedes to the facial plane. Then draw the nostril. Pick out the highlights on the bridge area, the bony area, and the main highlight on the ball. |
