
It is helpful but not necessary to have had some previous
experience in drawing and painting
before tackling these lessons. To learn the use of charcoal,
oil, or watercolors by painting people is
a most difficult task, and as a beginner, you may lay
down your tools in frustration. However,
once you've had some success with faces you may never
again find the same sort of excitement
depicting landscapes and still life.
If you can achieve a recognizable image in charcoal and
understand something about mixing and
applying colors, you will gain a great deal from these
lessons. Just remember, no one is born
knowing how to paint a portrait. Each of us has to learn
- by studying, thinking, and working. If
you have the desire, you will surely learn too.
CONSIDERING SOLID FORMS: Before we can draw and paint
portraits we must learn to
simplify complex subject matter - the human head and
body. Every portrait painter trains him or
herself to percieve these forms in simple masses, overlooking
details until the larger forms are
satisfactory.
It is possible to draw a head shape using line alone.
A circle is a basic beginning, but an egg shape
resembles the human head more closely. If we want to
draw or paint a head that will appear to
look solid, round, three dimentional, we have to begin
to think about light and shadow and how
to add these elements to our liner egg shape.
First we need to decide where the light source is that
shines on the egg shaped head. Study the
drawings below. The part of the form that faces the light
source is in the light area, A. Another
part will recieve no light, the shadow area, B. Notice
that this very distinct jump from light to
shadow really doesn't help to indicate round form - do
you agree?

MAKING AN EGG HEAD: As a prelude to working with an actual
head, we'll learn about the
relationships between light and dark by using an actual
egg. Experimenting with an egg head has
an advantage at the beginning of your study of the head
and features: You can set it at any angle
you choose - yet it won't move. To make an egg head,
take an egg and make a hole in each end
with a pin. Hold the egg over a bowl and blow into one
end, and the inside will come out, leaving
the empty shell. Rinse it out with clean water, handeling
it carefully. (When you begin to use your
egg as a model to draw from, you'll find you can make
it stand on end by using an empty pill
bottle or bottle cap as a base.)
EXERCISE: (1) Hold the egg upright and draw a line with
a fine marker or a pencil straight down
the shell's center, top to bottom. Now draw a second
line horizontally around the egg, halfway
down and at right angles to the first line. on either
side of the vertical line, draw eye ovals on the
horizontal line - this is called the "eyeline".
(2) Add a second horizontal line just above the eye ovals.
This will be the "eyebrow line". Now,
not quite halfway down between the eyebrow line and the
very bottom of the egg, make a mark for
a nose, crossing the central vertical.
(3) Now try turning the egg a quarter turn to the right.
You may need to add another vertical line
from top to bottom halfway around the side where the
ear would be. The egg now resembles a
football.
(4) Tilt the egg slightly forward and draw the eyeline
halfway down at the SIDES of the oval, but
rounding downward at the center. Place the eye ovals
on this curved eyeline and add the eyebrow
line following the curved eyeline.
EXERCISE: Make twenty drawings of egg heads, tipping your
egg slightly to the right and left.
Also try turning it a quarter turn to the right, then
left, or looking up or down. Note; When you
add mouth lines to your ovals, think of the mouth line
as closer to the nose mark, not halfway
between the nose and the base of the egg.
 You'll
need a pen or pencil, paper, kneaded eraser, and ruler for these exercises.
For a change of pace, you may want to draw the proportional divisions you'll
work with here over photographs of heads in magazines. This should help
carry you from the idealized proportions you'll learn here to actual ones
of real people of all ages and types. You'll be amazed at the variety you'll
find. Since the most basic way to get a likeness is in profile, we'll begin
with that. The drawings you'll study are based on two-inch squares, each
divided into four one-inch squares. On your paper, make several squares
in ink, and chart the heads on them in pencil. In actuality, the life-size
head of a six-foot tall Caucasian male would measure nine inches from the
top of the skull to the bottom of the chin, and nine inches from the tip
of the nose to the back of the skull.
You'll
need a pen or pencil, paper, kneaded eraser, and ruler for these exercises.
For a change of pace, you may want to draw the proportional divisions you'll
work with here over photographs of heads in magazines. This should help
carry you from the idealized proportions you'll learn here to actual ones
of real people of all ages and types. You'll be amazed at the variety you'll
find. Since the most basic way to get a likeness is in profile, we'll begin
with that. The drawings you'll study are based on two-inch squares, each
divided into four one-inch squares. On your paper, make several squares
in ink, and chart the heads on them in pencil. In actuality, the life-size
head of a six-foot tall Caucasian male would measure nine inches from the
top of the skull to the bottom of the chin, and nine inches from the tip
of the nose to the back of the skull.
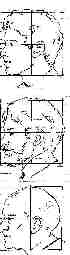
Now look at the figure;
1.Place the eye on the horizontal halfway mark
(1-3) as if the line passed through the lower
eyelid. (the eye is actually
halfway down the head.)
2.Divide the left edge of the square into seven
equal parts. Try to measure by eye, not with a
ruler.
3.The eyebrow sets at line C, along with
the forward projection of the skull above the eyeball.
4.The bottom of the nose sits at e, halfway
between the brow line and chin line. There is a wing
of cartilage flaring over the
nostril, and the bottom of that curve is on line e. The tip of the
nose may turn up above that
line or curve down below it.
5.The top of the ear also lines up with the eyebrow
at c. The bottom of the earlobe lines up
with e at the base of
the nose. The ear is placed at the vertical halfway mark (2-4) extending
toward the back of the skull.
6.Draw the forehead up from c in a squared
curve to top center 2 and continue in the squared
curve to 3 at the back of the
skull. Continue the curve until a point level with the base of the
nose and ear is reached, lined
up with e, forming the base of the skull.
7.The mouth is between e and f,
with the lower lip projecting above f. Drop a chin line to g
on
the bottom line and extend it
to h.
8.Now with a slight curve, draw the jawline from
h to the back of the skull with a dashed line.
9.Sketch a light diagonal line from the brow projection
at c through h under the chin for the
front of the neck.
10.Sketch in the back of the neck.
PRACTICE; Now for some fun. Place tracing paper over the
charted head you just drew and add
hair, or a beard, a hooked nose, or a receding chin.
Draw twenty heads a day until you become
fluent at this.
 |
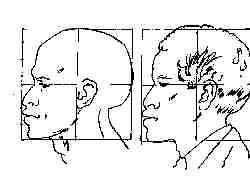
Here is the classic Caucasian male (top), the same man with longer hair, a moustache, and a beard (center), and a Caucasian male at age eighty. His teeth are gone, so the lower part of his face has become shorter. (bottom) |
 |
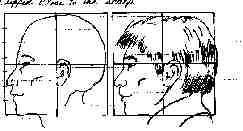
The classic Black male. Notice that the mouth structure
may protrude beyond the nose, which
tends to be flatter than the nose of a caucasian. At right is the same Black male with tightly curled hair clipped close to the scalp. |
 |
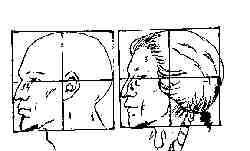
The classic Oriental male. Notice the flat, broad face,
high cheekbones, and heavily lidded eye that
are characteristic features of Orientals. At right, the Oriental male has straight black hair and very little facial hair, so, no heavey beards, please. |
 |
The classic Native American male. The facial structure
actually varies from tribe to tribe; this head has the strong, angular
features most of us picture as Native American: A very pronounced brow
and arch of the nose, high cheekbones, and a lean, square chin. At right,
the same man shown
with long, straight, black hair. Native Americans have no facial hair, so never draw them with a moustache or beard. |
