PORTRAIT - COLOR #11


PORTRAIT
In spite of the old adage that the face reflects the soul, the foibles, failings, and weaknesses of man are not usually shown openly in the portrait. The reason for this, of course, is that the sitter, or whoever commissions the portrait, invariably wishes to present his or her best appearances, as the actor will insist on the camera catching his "good side". In spite of this, the true portrait artist - as opposed to the photocopyist - will often show depths of character and shades of cunning or synthetic emotions better than any other means of making a likeness of the sitter.
Likeness is an indispensable part of portraiture, but by no means the whole story: qualities of color can aid the feeling of the spirit of the sitter; intelligent composition can render frailty or pompous bulk.
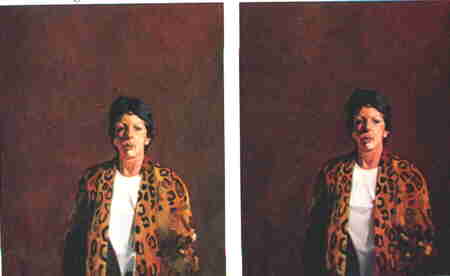
As silly as it may sound, I have often seen instructors who attempted to lead a student through a painting without the student knowing just where it was they were headed! To avoid just such a pitfall I now show you below just where we are headed in these next few frames:
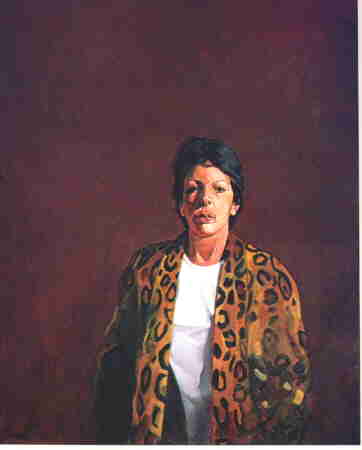
On of the most interesting aspects of this painting is how few colors are used to effectively render the subject and its environment. We have relied only upon tones of burnt umber, burnt sienna, ochre, and white for almost the entire painting. This stresses the wisdom of an artist familiarizing himself with the many color mixes that can be attained from using a limited palette. The knowledge gained from working this way is greater than using a variety of colors as the same principles to using many colors as to using a few. Thus the knowledge and experience gained by using a limited palette can later be used with any number of colors.
The strength of the picture comes not only from the simplicity of the palette, but from the composition as well. This is - as any successful composition should be - not obvious, but has the subtle effect of directing the viewer's attention where the artist intends it to go. We intentionally leave a great deal of space around the figure. Coupled with the off-center placement of the subject, the viewer's eyes are drawn directly into the figure.
Let us examine ONE way to get where we intend to go;
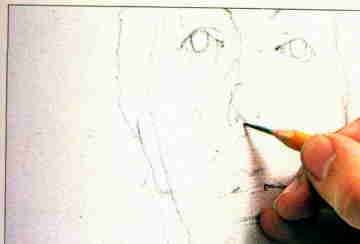
The figure is first drawn in with light pencil strokes including as much detail as possible.
 (above left) Begin to block in shadow areas in burnt and raw sienna with a No.5 sable brush. Add white to the sienna and work into the eye area in detail with a No.2 brush.
(above right) Continue to block in the shadows of the face with a thinned mixture of burnt umber and white.
 (above left)Continue to block in highlight areas with white and ochre. Add a touch of scarlet lake to warm the flesh tones.
(above right) Put in the mouth details with the No.2 brush and scarlet lake, yellow ochre and white. Add touches of highlight in the ear. Blend with a clean, large brush.
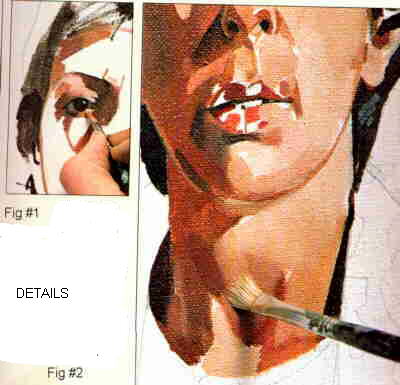 DETAIL - Using a small sable brush and warm and cool flesh tones, begin to model the face of the figure working from one point outwards. Moving downwards, larger areas of highlights are blocked in and then blended into surrounding areas with a dry clean brush.
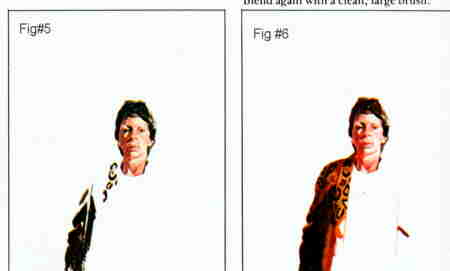 (above left) Begin to lay in the pattern of the jacket with loose strokes of burnt umber with a No.4 brush. Rough in the outline of the arm and scrub in the shadow area.
(above right) Next block in lighter jacket areas in yellow ochre. With a one and one-half inch housepainting brush, blend tones together.
 DETAILS - To create the pattern of the coat, first describe the lighter pattern and fill in the white areas with a darker tone. Then, with a clean, dry housebrush, blend the colors together with a feathering motion, the brush just lightly touching the surface.
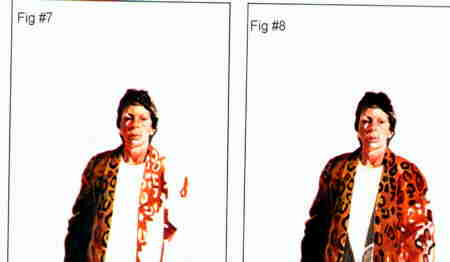 (above left) Continue to define the pattern in burnt umber and fill in with yellow ochre. Darken shadow area around collar. Block in the right side with burnt sienna.
(above right) Continue to put in the pattern in burnt umber and yellow ochre. Mix scarlet lake and yellow ochre for the highlight areas. Rough in the blouse shadow in gray.
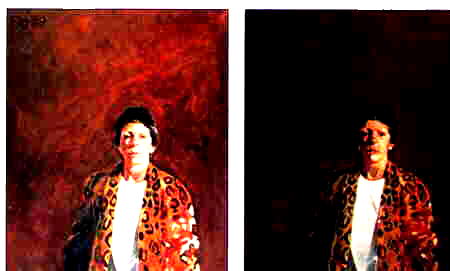 (above left) With a No.4 brush and gray paint, block in the blouse. With burnt sienna, raw umber, and the housepainting brush, cover the background area.
(above right) Smooth out the background with the housepainting brush and a lighter brown made from burnt umber and white.
 (above left) Work back into the right side of the jacket with gold ochre, scrubbing in highlight areas.
(above right) Block in the pattern with the No.4 brush and burnt umber.
So there you have it!
While a successful portrait is never an easy thing to achieve, there are certain techniques which will facilitate the process.
In terms of capturing a likeness, the key to a successful portrait is to make sure that the first step - the preliminary drawing - is as accurate as possible. If the features are not correctly positioned and described at the outset, there is little chance of success and the artist will find himself repeatedly laying down paint, scraping it off, and reworking in an attempt to correct the original drawing.
Once the preliminary work is as accurate as possible, do not be overly concerned with details. The most important thing at this stage is to check and recheck the positioning of the features as you work. A face is not made up of a series of individual parts; always judge distance and relative size by comparing one feature to another.
If you work in thin rather than thick washes of color, there is less danger of building up the paint surface too quickly. It is easier to correct and revise thin layers of paint than thick. Work in light-dark and warm-cool tones and keep the palette as simple as possible.
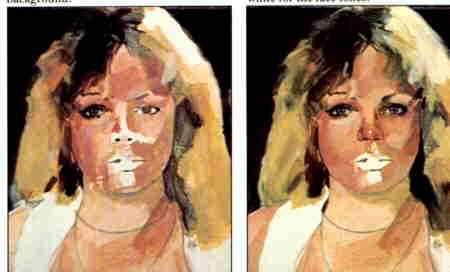
Now let us try one more. Here is ANOTHER way to get where we are going, and below is where we want to go;
Remember that drawing with a brush is very different than with a pencil. Be careful.
 (above left) With a No.4 sable brush and a wash of tuprentine and burnt umber, block in outlines, facial features and the start of the background.
(above right) With a No.6 bristle brush, block in the hair in gold ochre and the background in thinned umber. Use burnt sienna and white for the face tones.
 (above left) Mix a deeper shade of burnt umber and paint over the background. Work into the hair. With burnt sienna and white put in shadow areas on right.
(above right) Put in lips with cadmium red and white mixture. Put in touches of dark shadow with the sable brush and burnt umber.
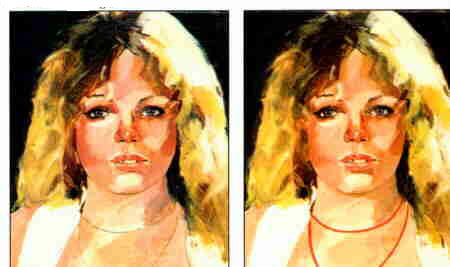 (above left) With pure cadmium red, paint in the necklace. Mix warmish tones of burnt sienna, red and white and work over the face, blending the paint.
(above right) With a mixture of burnt umber and white, re-define the facial planes with even strokes. Mix white, cadmium green and yellow ochre and cover in the background.
I hope that you can see that there are many ways to get the job accomplished. Do practice. Get some of those small paper canvases and paint two, three portraits every day for a month. You will be amazed at the return you will get from this effort. There is no substitute for doing.
This will conclude the portrait series. Next week we will move on to even more fun and exciting painting adventures. I hope you have had as much fun from this series as I have had. In the coming months we will investigate landscapes, seascapes, still-life, acrylics, watercolor, and lots of other things. I hope you will gather with me here each week. -
Roger Elliott
BACK TO PORTRAIT PAGE
BACK TO ART SCHOOL ON LINE
Email: elliot@eurekanet.com

