FTP using FrontPage
How
to establish your site in FrontPage 2002 (XP)
1. In FrontPage,
select File > Open Web from the menu. This
will bring up the Open Web window shown below:
- Within this
window click on the My Network Places section
(lower left) and then click the create new folder
icon (the small file folder icon with the star-burst).
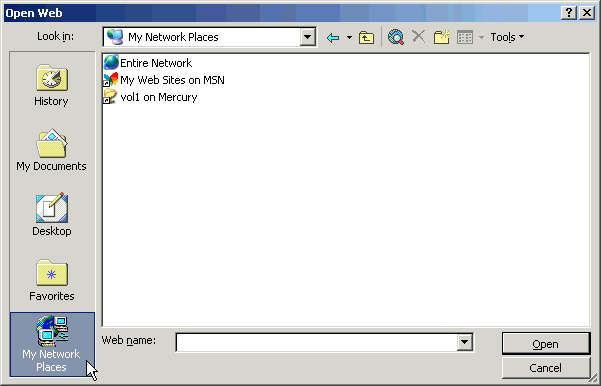
(Open Web window)
3.
This opens the Add Network Place wizard (shown
below). On this window select the first bullet (create
a shortcut to an existing
Network Place) and then click Next >.
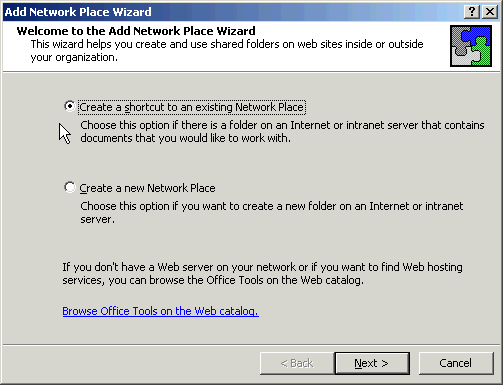
(Add Network Place wizard)
4.
This brings up the Create Network Place Shortcut
window (shown below).
- Within
the Location field type: http://myweb.uiowa.edu/HawkID
- Within the Shortcut name
field choose a name for your folder. Note: The name can be
anything you want as it only names the folder on your local machine.
It has no relation to the URL of your site.
- Click Finish
and you will be prompted to authenticate (log in) to your site.
- Login with
your HawkID and Password as shown below.
- For
information on the HawkID system go here: http://www.its.uiowa.edu/cs/helpdesk/hawkid
- That's
it. Once connected you should see two folders name images
and _private. These are created by
FrontPage and are required for use with certain FrontPage
Extensions. Do not delete them unless you never plan to utilize
any FrontPage Extensions!
- Once connected
you can start adding files for publishing (see the next section)
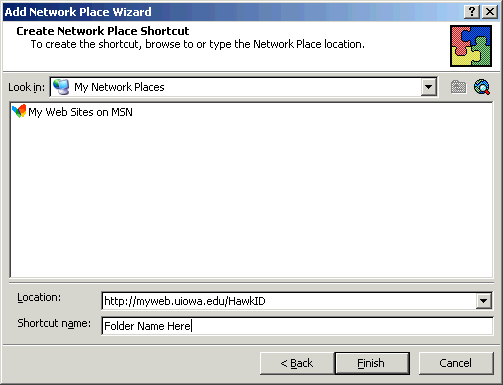
(Create Network Place Shortcut window)
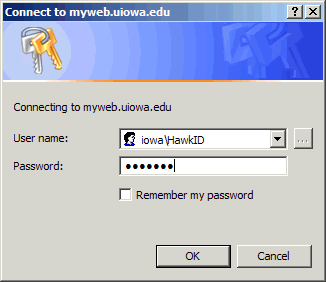
(Login window)
How
to publish your site using FrontPage 2002 (XP)
1. In FrontPage
2002, open the web you want to publish by selecting File
> Open Web from the menu.
2. Next,
highlight the top (or parent) folder of your site and select File
> Publish Web from the menu.
- This command
displays the Publish Destination window shown
below. Type the full path of the destination server-based
web using this format: http://myweb.uiowa.edu/HawkID
- Click OK
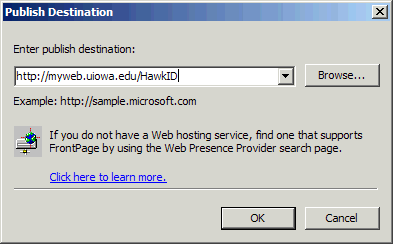
(Publish Destination window)
2.
This will open the Login window shown
below. Insert your user name and password as shown.
- Remember to
precede your HawkID with: iowa\
- Your password
is your HawkID password
(Login window)
3. A
successful connection to the server will then open the Publish
Web window shown below.
- From this
window you have a few options for publishing your files:
- Drag and
drop selected files individually
- Click the Publish
button to publish all new files automatically (designated with a check
mark)
- To prevent
FrontPage from automatically publishing a checked file,
right-click on the file and choose Don't Publish
from the menu.
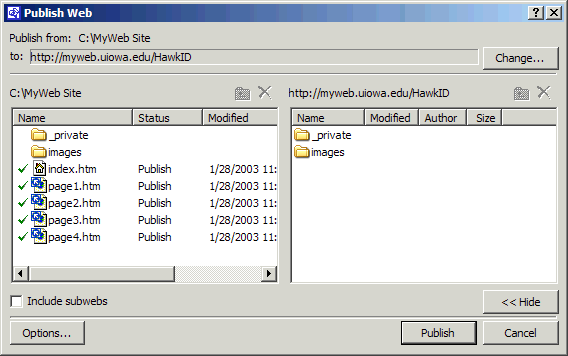
(Publish Web window)
Important
Notes
- The examples
shown above specify using iowa\hawkID when
prompted for a user ID when authenticating (logging-in).
However, it is possible that your HawkID may be contained within
one of the other Active Directory domains on campus. The
other domains are: uihc, medicine, healthcare,dentistry
and public-health.
- Your sites
main home page must be placed within your top-level
folder/directory (not within a sub-folder)
- Your home page
file must be named one of the following:
- index.htm
- index.html
- index.asp
- index.aspx
- default.htm
- default.html
- default.asp
- default.aspx
- Caution:
Saving a file you are working on while connected (logged
in) to your site in FrontPage will automatically publish the file
to the server. This is a nice shortcut to publishing single
pages, however, be aware of this when working on files while
connected.
- You can also
publish your files via FTP using WS-FTP, Fetch, Dreamweaver,
etc. For instructions please go to: FTP Publishing Instructions

