
How to apply iron-on coverings
(according to me)
This is one of those questions that's best answered by watching someone as they do it and have them explain it. After years of silk-n-dope, I began using iron-on's. I didn't come up with this method, but it works great. My last six planes have been foam which either didn't require covering at all, or used packing tape as covering. There is an art to getting iron-on coverings to look great. Each application will be different - take your time, practice, and remember, have fun!
Note: I've found it really helps the iron-on coverings to "stick" to balsa surfaces if you apply a coating of clear dope to the surfaces which will be contacting the covering (especially the ribs - apply clear dope just where ribs touch the covering). This might add some weight to the model, so don't go overboard. Make sure you sand smooth and remove dust from the surfaces that will be "painted" with the clear dope. Iron on coverings have an adhesive which sticks to the contact surface when heated with an iron.
Note: There are many different types of iron on coverings which vary in color, adhesive type, strength, weight and shrink factor. Iron on coverings allow lots of freedom in being creative and artistic with the finish of your plane. When learning this technique, be conservative, using simple color schemes. I've seen some planes that had some really lousy covering applied, but when they were 30 feet up in the air and flying around, you'd never notice. If this is your first plane, don't worry about aesthetics because it will most likely end up being trashed or discarded for something more exciting as your flying skills demand more performance (meaning you'll be wanting another, faster plane soon, hopefully). The more effort you put into making your trainer look good, the less relaxed you'll be flying it. You'll suffer from "I don't wanna crash my baby" syndrome, making you even more nervous than necessary when you take those first flights. Focus on learning how to fly - then start making planes that look great, if that's what you want.
Note: Make sure the heat setting on your iron is correct - practice using some scrap pieces of covering before beginning.
Note: I like to use an iron sock - helps protect the iron's non-stick coating.
Typically, you want to visualize the plane in "sections". For example, with a trainer wing, you would have four sections: top-right, top-left, bottom-right, & bottom-left. Start with covering the bottom of the wing:
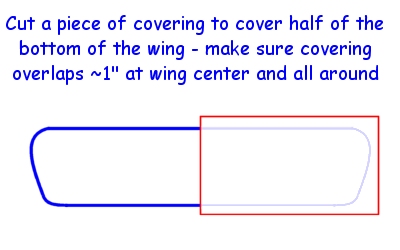
Take the sheet of covering, remove the protective backing and place it on the wing.
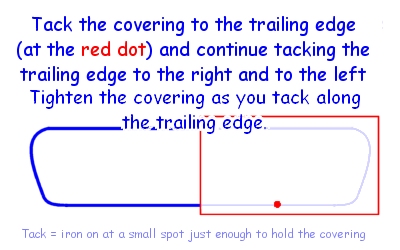

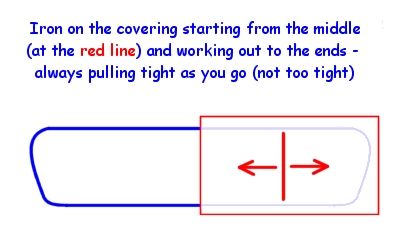

Using the iron, go over any areas that have sags or wrinkles to smooth things out and make the covering tight.
You'd cover the rest of the wing using the same method. The covering on the other side of the wing should overlap each previously covered section. I typically overlap my iron-on coverings about 1/4" from one section to the other. Make sure you cover the bottom first, then do the top. The reason for this sequence is so the "overlap" from the top of the wing won't be seen as easily when your plane is sitting on the ground.
When applying iron-on covering to a fuselage, typically, you'll want to cover the bottom first, then the sides, then the top last - again, this usually provides a better looking finish.
If you have very rounded surfaces (like a canopy, for example), you will have to compromise somewhat. Using iron-on covering to cover a very rounded surface - and having it look good - takes a great amount of practice and skill. Use paint for these areas instead - it's easier and looks much better.

