-
Open
an image of 600 width and
500 height which is doubled
the size of your main images
called main.
-
Add
a new layer and call it main
which was your main
picture.
-
Copy
and paste as new selection
placing it in the top half
of your new image.
-
If
you want a nice transparent
image then do not add a
shadow as it will show an
ugly black once you your
animation wizard.
-
If
you don't then omit this
step 6 to 12
-
Add
a new layer and go to layer
--down to arrange and send
to bottom.
-
You
need to be on a light
background. On this one I
choose a white background.
-
Okay
if you want a shadow. Make
sure your background is in
color of black.
-
You
need to add it by going to
image in paint shop 5 and
then down to effect---then
drop shadow like shown
in diagram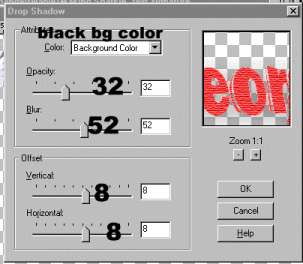
-
If
you find it too dark then go
to color and brighten it by
10.
-
Again
copy and paste as new
selection your main image
lining it with the first
layer and deselect
-
Now
copy and paste as new image
and return main to file by
pressing on the x.
-
Add
a new layer and call it
reflection. Then paste
your original if you want it
transparent. otherwise paste
the one you just pasted with
the shadow as
new image and paste as
new selection and paste as
new selection.
-
Go
to image and flip
-
Line
the bottom to your layer
name main to which ever is
the lowest in layer called
main. Look at the top
picture if you need to
follow what I mean as some
people are visual and need
to see. On the picture
above I had to line up the
feet of the angel.
-
This
is an important step.
If you want a transparent
image then lower your
opacity to 30 as
shown where to lower
with the lever in diagram
-
If
using the white background
lower your opacity in the
layer palette by 12 as
shown in the diagram where
the opacity is using the
lever.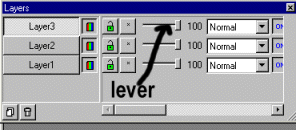
-
Now
merge visible layers. Resize
by 60% For the transparent one go
to http:/www.angelfire.com/ak5/angelswanie/angel_ani.html
to go through the steps like
an animation in order to
have it transparent in order
to finish the rest of your
steps for the reflective
signature
-
For
the white background merge
all and it will add a white
background and resize
by 60%
-
Okay
make sure the background is
like a blue or something
like it however not white.
-
Go
to image and add border of
17symetric as shown in
diagram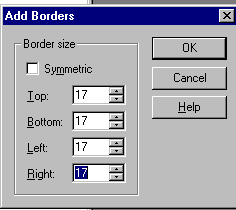
-
Use
your manifying glass and
click for bigger view.
-
Use
your magic wand and click on
the border you such added
and it will have marching
ants around it.
-
Flood
fill with pattern of choice
either the red pattern you
made earlier or the one I
use which is as below
-

-
Go
to copy and save picture as
watery in the same folder as
this tutorial
-
Go
to flood
fill bucket to fill an area with your pattern you
made
or the one I
have
provided.
-
Click on the Tool Control
tab  in the
Control palette.
in the
Control palette.
-
Set
the Fill
style to
Pattern and
click the
option button
to bring up
the Flood
Fill
-
Option
dialog box.


