

Hits since Jan 22, 1999

When you are done visiting my page, make sure to visit FRIT'S FARM!
Home| My Guineas| Links| My Pic| About Me| Quotes Page| Tarantula Page| My Guestbook
Please read while you wait for the images to load:
Hello there, and welcome to my brooder page! *G* Please keep in mind that this is more of a personal page than a professional page so there may be spelling errors and the like! I hope this page helps you get an idea for building a brooder. My brooder is built for 1 to 2 week old keets (baby guineas), no older. It can comfortably hold 25 week old keets or 12 two-week old keets, but after that they need more room to play. Once my keets were two weeks old I introduced them to their coop, but returned them at night to their brooder because it was very cold out. This brooder will work just as well for most other baby birds, like chicks, and many of the same "rules" apply. I know there are *alot* of pictures here but most are under 30k! I hope this does not take too long to load for you! Thank you, drive through please!
*IMPORTANT, PLEASE READ*
Okay, here's the deal... before you go any farther I would just like to thank Frit for all her help and guidance... she is the Guinea Queen! Thanks to her I have sucessfully raised several Guineas. She has provided me and so many others with the knowledge to properly care for guinea fowl and keets. She answers everyone's questions on her message board with patience and care, no matter how simple or "silly." If you have Guineas, are planning to get some, or are just interested in them, please make sure to check out her wonderful site by clicking on a link. There is a wealth of information there on raising guineas and more! Just take a minute to look through her site, I owe her a great deal and I want to increase her traffic, not steal it! Thank you for reading, the pics should be up by now so scroll down and enjoy! Oh, and one more thing: Her book is wonderful and I highly recommend it!
FRIT'S FARM, GARDENING WITH GUINEAS
*NEW* If you create a brooder based on anything you learned from this page, (or even if you have built a nice brooder period) you may submit a picture of it, with a medium sized description, to be displayed on this site. It can be a brooder for any type of bird. Please email me for more information (My email is located at the bottom of this page).
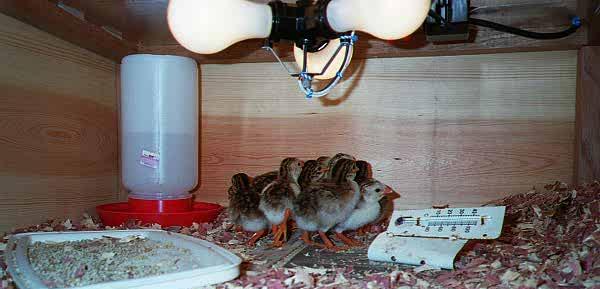
Here's a pic of my KEETS inside their very new brooder (I finished just before I found the keets and kidnapped them from their mother!) You can see the light at the top and how cute newborn KEETS are! :) hahaha! In the top right corner of the brooder you can see where the wire exits the lid.

This picture is similar to the one above but the keets aren't as camera shy. Also, you will notice the thermometer on the ground. I have found that it is best to have a thermometer that sits slightly above the ground because there is a large temperature difference between the floor and light, and keets dont flatten themselves out so they are Ľ an inch above the ground!
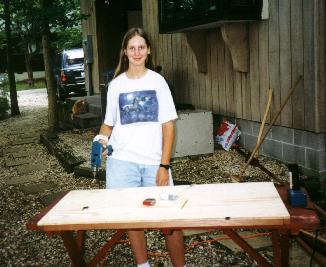
Here I am working on the base of the brooder. You can see the mahogony (spelling?) wood that is under the plywood. We then attached the walls of the brooder to the mohagony. We used a lot of screws in making this brooder so that it would survive all kinds of abuse. Mahogony is a very strong wood so that helped a great deal in reinforcing the brooder... best of all we got all our mahogony for FREE! Some crazy company was throwing it out as "trash." Also, in the background, is my cat, Dusty! :)
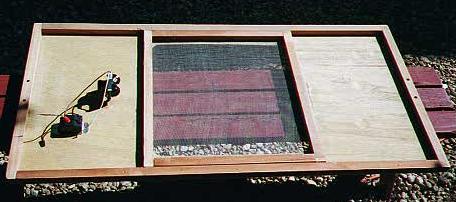
This is the underside of the lid. The light has not been completed when this picture was taken, however you can see the structure of the lid very well. We cut a hole in the center of the lid, placed the sceen on top of it and then added the four inner pieces of mahogony. The inner pieces reinforce that section and hold the screen down. If not for the mahogony there it would be possible for the keets to cut themselves on the edges of the wire mesh. Since my brooder is relativly small we did not add a "trap door" or a sliding lid to it for quick access, however I strongly recomend one for larger brooders.
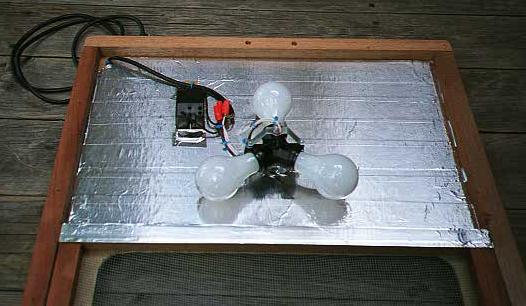
And here is a close up of the finished light. The 3 light bulbs are conected to a dimmer (the black box) that allows for very easy light adjustment. The metal tape keeps the lid from overheating and holds in heat. At the top, center, you can see two holes in the mahogony where we attached a handle. There is another handle on the opposite end. Having three lights instead of one keeps the keets from having to shove under one light and fight over limited heat.

This picture shows the inside of the brooder with the divider in place. The lid is lying against it also. You can see we added some brackets (those little L things) to the four corners for support. "We" refers to my dad and I- my father helped me with alot of the building. The mahogany on the inside is what the lid rests on, and the lid will not fit inless the divider is removed- This is VERY important because if the divider were in place while the lid was on, the keets could overheat and be unable to escape to the cool end of the brooder (notice that the screened hole in the lid is large enough to allow ALL the hot air to escape). The mohagony posts are also not touching the bottom which makes it very easy to put newspapers (or whatever bedding you prefer) in. Over the winter I will be adding a full rim on the inside of the brooder so that the lid will not accidently fall in if someone puts it on too fast. The *inside* area is 2' by 4' by about 1Ľ' tall.

Here is half of the brooder with the keets running amuck. You can see the corner post pretty well. The keets are begining to get their feathers on the tips of their wings. The food tray extends from being close to the light to being far away so that the keets can eat where they want. I also sprinkled food all along the newspapers so they would always have plenty to go around. I lined the bottom of the food tray with masking tape so that the keets would not slip when they stood in there. This tray has a removeable anti-roast bar, but the keets are too young to have that in place- they could hurt themselves with that thing! Ouch!
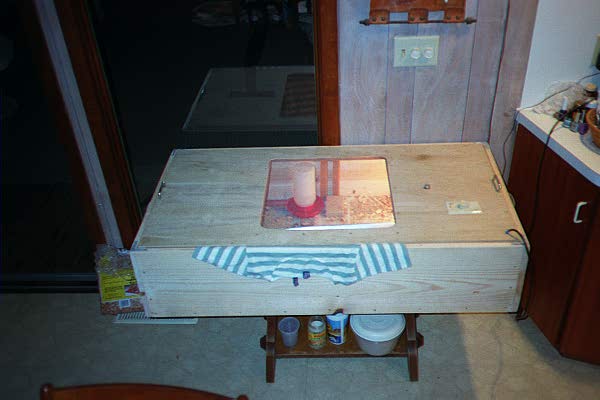
And this is the completed brooder with the lid on! There are 2 handles on the lid and 2 handles that you cant really see on the brooder. The striped shirt that is sticking out was used to make a shelter for the keets to go into if the so desired. The lid is made of a very thin sheet of plywood so that the keets won't overhead in warm weather, and in cold weather (below 50 or so) when it becomes possible that the brooder won't hold in enough heat I simply put a ˝ inch board on the top that it covers the lid from the dimmer to half of the screen- this holds in a great deal more heat and is very easy to do. With the screen in the middle there is no real need to worry about the keets overheating since the heat can not reach the opposite side of the brooder. At what temperature should the brooder be at you ask? Well for the answer to that and so much more you better check out (say it with me now) Frit's Farm!!! I will paint and/or apply finish to the brooder before next spring so that it will be well protected.
Click here to see more pictures of my guineas


Home|Top of page
Frit's Farm- Gardening with Guineas. Great site, take a look!
Email: (If you have questions about guineas, PLEASE visit Frit's Farm. Thank you!) BahamutChild@hotmail.com
