
Harvesting the Walnuts
Harvesting the walnuts is the easiest part of the process. So if you don't like even picking them up, you don't want to go any further. Being in Ann Arbor, there are several black walnut trees around, including the three that live in my neighbors back yard. If you check on Craig's list in the fall, there are usually several adds for people who have black walnut trees in their yards but would love to unload all the nuts on someone else. They are usually free to pick up, some people will even pick them up and put them in a paper bag and leave them at the curbside for you. I like to pick them up as soon as they're dropping on the ground. Most of them have green husks, some a bit brown but all of them are still good and juicy. If you wait until they are black they work just the same, but are simply more messy to work with.
Husking
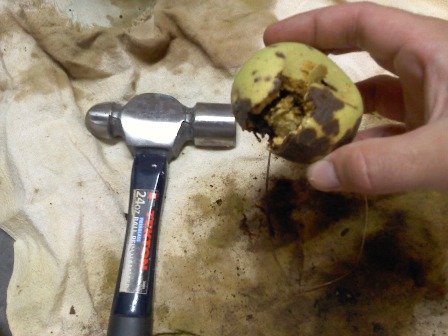
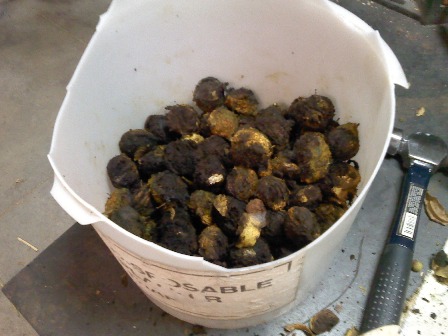
This is a pretty messy part of the process and with everything, there are several methods. Three methods that I feel are pretty good are: 1. husking by hand 2. husking with a drill and mud mixer in water and 3. husking with a pneumatic tire driven by a motor etc. I really like the tire one (there's a good video on YouTube) but I don't have a set-up like this yet. Husking with a drill and mud mixer can be fast as you can process a bucket full of nuts simultaneously and it works well for ripe, black and gooey husks. The problem with the drill and mud mixer is that it basically liquifies the husks and then you're left with 50 gallons of sluice juice to get rid of. As for husking by hand, the following procedure applies. Once you get home with a huge load of walnuts, the next step is to husk them. I wear a good quality pair of leather gloves to keep my hands from being stained a lot. Still even with the gloves the walnut juice soaks through and stains the hands for a week or so. To husk the walnuts, I dump a pile of them on my steel welding table and set up a 5 gallon bucket on the floor. So one by one, I slide over a walnut and give it a medium blow with a 24 oz hammer (I also saw a video of a guy using a croquet mallet.) You are not trying to crack the nut here, just enough to split open the husk so it can be easily removed by hand a bit later. I keep smacking until I get about a 5 gallon bucket full of split-husked walnuts. Then I set down the hammer and set up 2 buckets on the floor. One for husks, one for nuts. Then I use my gloved hands to peel off the husks. 20 gallons of whole walnuts gives about 10 gallons of nuts and 15 gallons of husks. The husks I just toss in the city compost bin because there's some chemical in there that would kill the entire garden if you tried to put it in there.

Washering
After being husked, I like to washer the nuts. This way there's not so much junk left on the walnuts to flake off later when you're storing them. To wash, I fill up a 5 gallon bucket 1/2 way with walnuts. Then fill with water and squirt some dish soap in there. To really mix that stuff around, I use my garden weed-twister tool for a couple of minutes. This turns the water really dark and gets a lot of the chunk-e-doo's off the walnuts. The drill and mud mixer method works very well for washing, I don't even bother with the dish soap any longer.


Dryering
After a couple rinses in the soap bath, I dump the cleaned walnuts on the drying rack. My drying rack is made of split 2x4 pine lumber frame with some HDPE extruded diamond pattern. This works pretty well for quickly drying stuff. I let the walnuts dry only a day or two on the drying rack. I've heard if you leave them in the hot sun too long, the nut shells will split open and you don't want that. Due to the heavy squirrel population, the drying rack needs to be covered or inside the garage. Recently I've been using a wood framed chicken wire rack with a box fan placed on top of it to dry the nuts inside my garage.


Storing
After a couple days in the sun, I move my walnuts to the garage for long term storage. You want somewhere cool and dry. The most important part about storage is putting the walnuts in a mesh bag. If you put them in an airtight container or even a bucket, the things will mold from the residual moisture on them. I usually use a mesh laundry bag for storage. You can sometimes find these mesh bags at thrift shops so when I see them I buy them for future nut storage.
Time to get crackin'
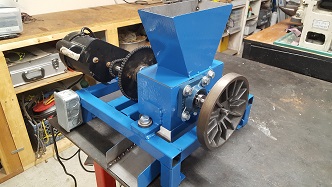
Ok, so now we've done a lot of work to get this far. Too bad there's a lot more work to be done. Black walnuts have the hardest nut shell of any nut I think. This is one of the reasons nobody eats them, in addition to the fact that most people think they taste like crap. So there are more ways to crack these things than there are hippies in Ann Arbor. One of the best manual ways I have found is to put them in a vise (I use my drill press vise) and crank down until the shell splits into 4 quadrants (well you can't have 5 quadrants you know). After I split a pan full like this, I sift and sort what I can and move on to the side cutters. Side cutters or heavy duty wire cutters are good for splitting those quadrants in half to get the nut out of there. It takes 30 minutes or so to get a cup of black walnuts cracked open. And try to be careful not to get a single small piece of shell in your nuts, because if you bite down on that thing, you'll bust a tooth. A better way to crack is by using a motorized cracker. I built a motorized cracker in a couple of weeks from a mixture of new and salvaged components. This cracker uses a rotary hammer to smash the nuts (about 800 hits per minute) through an adjustable gap. This results in a very speedy cracking operation and necessitates the use of a input hopper and output shoot to maximize the throughput.


Eatin on 'em
Well like I said, most people hate them but I like to eat them by them selves as a snack when I'm liquored up in the garage. Also like them on cereal and in things made of chocolate. Enjoy.