
Please click HERE for Dual Exhaust
Crossmember mods.
Installing
the 700-R4
I recently replaced my Turbo 350
3-speed with a Turbo 700-R4 4-speed overdrive. This helps keep
RPMs down on the highway, and saves a little gas too. The
installation was surprisingly simple and trouble-free. The whole swap was done in
one day in my garage.
I chose to run a non-lockup torque converter. I don't drive the
car everyday, so I didn't feel this was really necessary. B&M
and other transmission companies make wiring kits like part#
70244 to retain the lockup feature in car that doesn't have a
stock computer (ECM). Check this link for Summit Racing Equipment.
Follow the links "Trans Rebuilds/Mods" and then
"B&M Converter Lockup Controls."
The 700 is about 3 inches longer than a 350, but the mount is in a
similar location. However, the
driveshaft needed to be shortened. It does use the same yoke, so
this can be re-used if the stock driveshaft is shortened. In my
case, I had a local driveshaft shop make a new shortened shaft,
re-using only the stock transmission yoke. The shaft and
universals are new. They told me how and where to measure to
determine the appropriate length. In this case it was the
distance from the rear seal on the trans to the centerline of the
rear end universal.
| Transmission | Case length | Distance from Bellhousing to mount holes |
| TH 350 | 27 3/4" | 20 5/8" |
| 700-R4 | 30 3/4" | 22 1/2" or 27 3/4"* |
| TH 400 | 28" | 27" |
| 200-4R | 27 7/8" | 27" |
| *700-R4s
that came from Caprices have two mounting bosses; one on
the tail section, and one on the main trans case. I'm not
sure, but I believe Camaro and Corvette transmissions
have totally different mounting bosses. SIDENOTE: As you can see from the above chart, the Turbo 400 and 200-4R have the same mounting distance. Therefore, you can use a stock "straight across" style 200-4R crossmember (which most SS Montes have) to use a Turbo 400. However, the 400 uses a much larger spline yoke, so driveshaft modifications are necessary. |
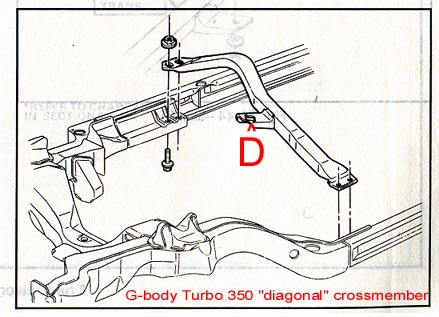
The
stock 350 crossmember had to be slightly modified, but overall,
it was easier than I thought.
I had to cut about 1" from the
front edge of the mounting perch on the crossmember (to clear the
trans oil pan [see "D" below]). I also had to cut a new
hole about an inch further back for the mount's stud. The same
weird offset mount was re-used. These measurments are not 100%
exact, but once your doing the job, you'll be able to see where
to cut. Once again, I used a Sawzall for the cut and a 1/2"
drill bit for the mount stud.
I discarded the original coolant lines and ran new #6AN stainless
steel braided lines to a Perma-Cool transmission cooler mounted
in front of the radiator. Be sure to wrap the lines in foam
insulation or rubber hose to keep them from chaffing everything
around them. Also be sure they are not too close to your headers
or exhaust.
Thanks to Big John and Colin for helping me out with the
installation, and John Lecuit from G-Force
Performance for some useful
information about the crossmember.
Free counters provided by Honesty.com.
