One of our first holiday tasks is the writing and sending of Christmas cards. The custom began in Great Britain around 1840 with the advent of the "Penny Post" -the first public postal delivery system. Legend tells that a procrastinating Englishman named Henry Cole actually started the tradition. In 1843, he found himself behind in his correspondence with friends and wanted to set things right with a cheery Christmas note to end the year. His resourceful idea led to a mass marketing of holiday cards, particularly after 1860 as printing methods improved. In Britain, sending season's greetings jumped in popularity when a card could be posted in an unsealed envelope for just one half-penny-- half the price of a regular letter. In 1865, Bostonian Louis Prang printed and sold the first Christmas card in the United States. The images and the message have remained fairly constant throughout the years -- pictures showing the Christmas story or other seasonal scenes along with wishes of a merry Christmas and a happy new year.
- Emilie Barnes, The Twelve Teas of Christmas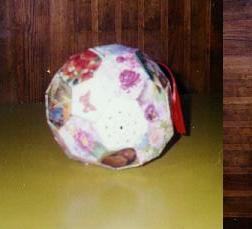
In some countries of the world, it is very common to receive and send greeting cards for any moment or occasion, some of which are often too pretty just to throw them away once the occasion for which they were received is over.
Here is an idea to turn them into a keepsake.
This card ball is based on a football or soccer ball.
To make it you need:
The size of the shapes decide the final size of the ball, the important part being that the sides of both the pentagon and the hexagon must be equal.
The pattern for the hexagon can be drawn using a compass, by drawing a circle, then using the same radius, put the compass point on the border and make a mark each side where it touches the border. Put the point on one of the marks and draw another two until you have six marks on the border, then join them up with a ruler. Also you can mark a radius from the centre of the circle, measure off angles of 60� forming six triangles which can be extended to reach the required size by measuring the same length on each.
The pentagon pattern can be drawn measuring a radius on a circle and then marking off angles of 72�. Of course "Microsoft Word" and other computer programs have an "Autoforms" section from which you can copy them.
Each pentagon is surrounded by five hexagons as shown by illustration #1. It is important to combine both shapes in order to form the ball. All hexagons or all pentagons would end up being flat.

On each edge of each shape remember to leave a small tab for gluing, as shown in Illustration #2, and the "seams" go on the inside where possible, fitting the dobled ribbon into one of them before gluing
Suggestion: If you have a lot of cards to use, you could separate them into themes like Christmas, Flowers, Animals etc I made one using Flowers as the theme, and changed two of the shapes for doilies as seen in the illustrations. Filled the ball with prepared "potpourri" and hung it up so its gentle fragrance can fill the air, giving it a double attraction.
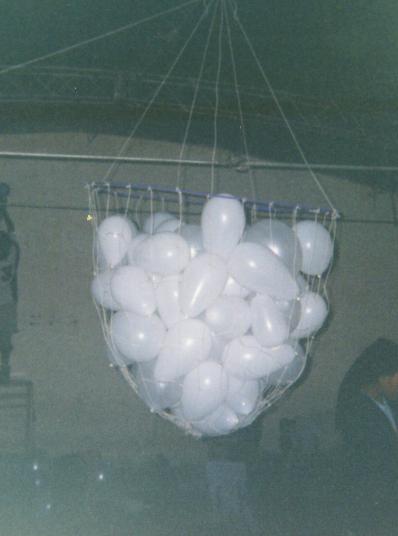
This balloon pinata (string basket full of balloons,) is a fun element for any big party - important birthday, wedding, celebration etc etc. and is really quite simple to make. It does need a high ceiling or outdoor branch though!!
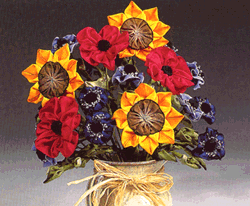
Materials needed:Put your creativity on display! Choose from a variety of beautiful summer colors and patterns to create this three-dimensional ribbon rose bouquet. Then, give it a custom-made frame for that designer touch. Use different combinations of colors for an entire gallery of handmade masterpieces.