Tutorials Index
Changing Skintones
Below is a skin chart for use with the dolls. I am going to try to explain how to change colors on your dolls in Paint Shop Pro 7.
 First open up the basebody that you want to change colors on. Then open your skintone chart up in Paint Shop as well. (I am fairly sure that this method can only be done in Paint Shop 7.)
 Now select the area you want to change the color of with your lasso or selection tool.
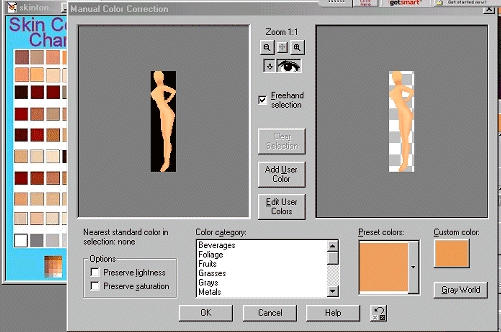
 Go up to "Effects", " Enhance Photo", "Manuel Color Correction."
This is what you will see: Click on your doll's skin inside the left window first and then go outside the window and click on the color you want her skin changed to. I am using the skintone chart (above) to get a color from but you can use anything, such as change a blue dress to red by clicking on another image, or there is a place inside the dialog box where you can choose skin colors as well among many others. Play with this effect a bit. You will come to enjoy it.
 Now if you will look at your image, the color should show up in the window on the right as the new color. Click okay.
 And now your doll will have changed colors.
 There are other tools you can use to work with color. I want to tell you a bit about a filter called "Variations". I could not live without this filter. lol! You can add color, lighten, darken color, highlight, shadow, add more blue or yellow or green etc with this filter. It can be used in both Paint Shop Pro and Photoshop that I know of. Perhaps others. And the best thing about it is that it's free and you can get it here. :)

Notice the differences just from me playing with this filter.
I use this the most just because I like seeing what happens. It aids in making clothes and many things. Changing shades etc. If you think you would find it useful, you can download it here:
Variations Filter
From Regular Dolls to Goth Dolls
Now to make a doll into a goth with white skin. Open your doll. Go up to "Color", Greyscale." Your orangey colored doll is now grey. Pay special attention here. This is important! Go up to "Colors", and then down to "Increase Color Depth", and 16 million colors. You now have a grey image that you can edit.
 Now once again, go up to "Effects", "Enhance Photo", and down to "Fade Correction." Play with this a bit until you get it as light as you want. On this particular picture, I used 100%.
 It is now white and ready for a little more shading if you wish. You shade a white Goth Base with greys usually, and just follow the Base Body tutorial about using darker and lighter colors to shade. And now for the finished product.....:)
 Sign up to be notified of new Dolls or Bases
Tutorial Index
The Doll Garden Homepage
The Olde Way Occult Site
Debi's Fantasy Art

|
|
|