
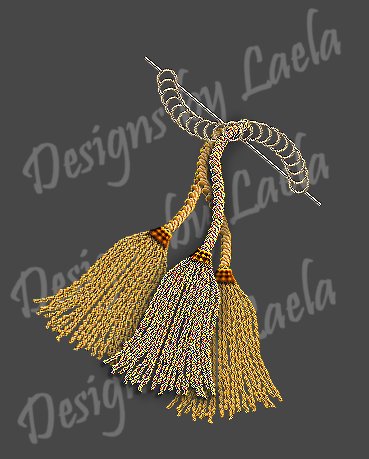
MAKING AN EASY GOLDEN VICTORIAN TASSEL IN PSP 7
BEGINNER - SKILL LEVEL
Completion Time ~ Approximately 5 minutes.
Written by: Designs by Laela ~ 6/21/02
_________________________________________________________________________
1.
Open a new transparent image or Flood Fill it if it's easier for you to work on. Make it's size an
area that you are comfortable working within. You can always resize your canvas later if you
need to.
2.
Click on your tube tool, and open the "Rope" Tube that comes standard with PSP 7.
I have my SCALE set at 60, STEP 1. Set your tube PLACEMENT MODE for continuous.
SELECTION MODE for incremental.
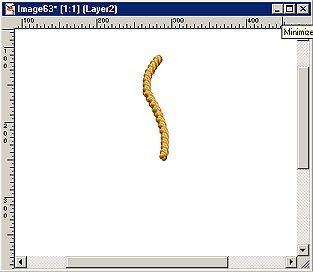
Go to your canvas now, and make a free hand slightly S shaped line, using the rope tube, And
keeping you left mouse button depressed. Doing this will give you a free flowing line, like a
paint brush.
This is going to be the cord that we will be attaching our tassel to.
3.
Add a NEW RASTER LAYER
4.
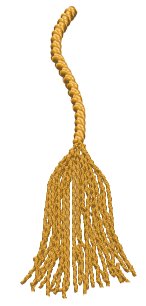
Go back to your tube tool again, using the rope tube, this time with a SCALE setting of 40,
begin to "draw" in your tassel cords. Don't be too percise, allow them to squiggle and overlap
slightly to give a more natural look.. Draw as many as you need to achieve the depth and fullness
you want.
TIP: You would use the same technique to add fringe to the edges of a rug as well.
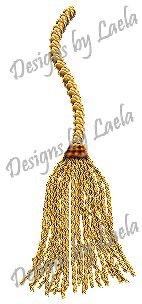
Here is what I have so far. Not to shabby eh?
OK, now, we want to give our tassel a more finished look, so we have to give the part where the
cords meet a binding of some sort.
5.
Add a NEW RASTER LAYER
6.
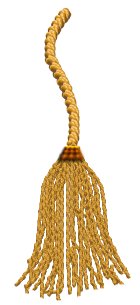
Again, go to your tube tool. This time, increase the SCALE of your rope tube back to about 50.
Draw a small line horizonally where all the cords meet. Use your deformation tool if you need to
resize or adjust the angle. Then add a very slight drop shadow.
7.
Now, DUPLICATE THIS LAYER ~ 2 TIMES
8.
Using your moving tool,
Arrange these layers so that they are one just below the other and your drop shadow is in the
proper place.
Zoom in on your pic if you need a better view of what you are doing.
9.
Once you have them lined up the way you want them, make your top horizontal line the active layer
We are going to brighten ONLY this cord layer, just to give a little more depth.
Here is what your tassel should look like now.
10.
That's it for making an Easy Tassel.
Resize, deform if you want to, and make it to your liking. Once you have, delete your background layer
And then merge your pic visible.
11.
HERE IS THE MAGIC SECRET:
Sharpen your tassel now until you get the "texture" of a gold twine
(I sharpened mine 4 times. Major difference isn't it?)
12.
Save your image in psp or tub format for later use.
Click
HERE
To Proceed to
PART 3
TO COMPLETE THE VICTORIAN ORNAMENT
TERMS OF SERVICE
Please do not reproduce or add my tut to any other website or collection, And leave all file names and credits, in tact. PSP Groups are however, welcomed to share this tutorial with their membership by providing THIS LINK
(www.angelfire.com/zine2/designsbylaela/index.html)
to my tutorial in their mailings. DBL's original Victorian Ornament Graphic may be copied and used as an example for those mailings as long as my signature &/or watermark, is left in place.
Return to Previous Page
..........
Return to PSP 101 Index
..........
Return to Home Page
|

