Mini Maker: Users Guide
Steps 1-2:Making the mini
Step 1: Select your props

Simply drag the buttoms,shirt,shoes,head,body, & any extras you want to the Mini Making area
Step 2:Put the props together

Im sure you understand what to do by the title
Steps 3-6:Getting the mini to your page
Step 3: Copying the Mini
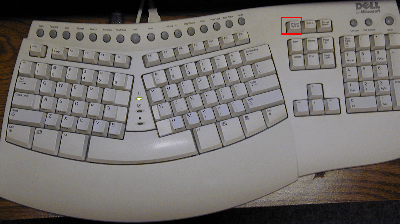
Click the Print Screen Button.(PrtScr/SysRg) It is located beside the f12 key.
Step 4:Getting the mini into ur Paint Shop

Open ur Paint Shop (Start, Programs, Accessories, Paint.) Type ctrl V. the IE/Netscape browser should now b in the paint shop.
Step 5: Edit the Mini & Save

Once the mini is in the paint shop simply click the button with the "dotted" square. Then make a square around what you want to take out. Now Click the edit drop down menu & go to "cut." Once finished editing, click file & save as 'name of mini.'
Step 6:Upload the mini

Upload your mini into your html editor or page builder. To upload you click the browse button, find the mini, click OK, then click the upload button.
Note: Uploading varies from one page builder/html editor to another, but you get the general idea.
Step 7: **Conditions of Use**
It has taken me a long time to get this up & Im still working!! If you use my Mini Maker, Link Me Back!
*Code*

