
|
|
||
|
7. Front/Back Images For Object Creation |
||
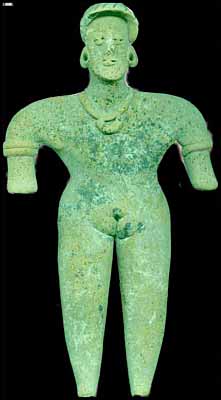 CREATING FRONT/BACK IMAGES OF A FIGURINE I will be doing a project from beginning to end illustrating all of the things you have been learning. I will create a figurine from a West Mexican Shaft Tomb which came from the year 200 BC. Nothing better than a little culture shock. It will be a simple shape, and I will be giving the implication of details using texture and bump maps. I hope that you will also follow along. All I will give you, though, is a BMP image of the flat-bed scanner scans. It is what I started with, but has been brought down to the appropriate number of dots-per-inch for the final texture and bump maps to make it a bit easier on you. Click here to download WinZIP archive containing Unprocessed Figure image (1.9 MB) Click here to download WinZIP archive containing Processed Map and Bump images (3.1 MB) SCANNING AND TOUCHING UP THE FRONT/BACK IMAGES First, I use Photoshop to create two images. One image will be the front of the object and the other will be the back. WARNING - This entire tutorial refers to keyboard shortcuts and screen grabs from Photoshop, not LightWave 3D. The two images will exactly match up once I'm done, then I will be able to use those images to both create the figure, and (with modifications) to map the front and back of the figure once I'm done. Know that the female figure also began as a front, back, and in that case, side photograph of a particular person, which were then manipulated in the same way I am about to show with this figurine. The only difference being that you would also have to correlate a side image to make sure that each respective key point in the front matched up to the same elevation in the side image (bottom of nose in side view to bottom of nose in front view, bottom of chin in side view to bottom of chin in front view , bottom of knee in side view to bottom of knee in front view, etc.) I will assume that you are quite adept at using Photoshop, but will tell you keyboard shortcuts or menu choices I use all the way through. I will use Photoshop version 7.0 to illustrate the techniques. First, I spray and clean my flatbed scanner using Windex and a lintless rag. I then lay the figurine on the scanner with the cover left open and I make two scans of the front and back of the object by doing an 'File->Import->(My Scanner)' and scan from the flatbed using a high resolution (300 - 800 dpi).  IMPROVING THE FRONT/BACK IMAGES I press CTRL-L to do a Layers adjustment on each image. This is what is called a 'Histogram' graph. It shows how many colors are a particular strength in a photograph, graphing the intensity of the black/white level with black on the left and white on the right. A long flat line before or after the histogram says that there are NO blackest blacks if it is at the front end of the histogram or there are no whitest whites if it is a trailing flat line. I will remove the front and back flat lines, thus making the blacks blacker and the whites whiter. After I've done that, sometimes the overall value of the image is too dark, so I will move the gray center of the image, thus making the whole image whiter. (Here, I would normally use what is called an 'Adjustment Layer' at this point, as that would allow me to do the same adjustments as I am about to do, but not damage the original images. So, even though I have said to bring up the Hues/Saturation requester, you could have also done a 'Layer->New Adjustment Layer->Hues/Saturation'. I have spoken of doing the functions directly upon the image as it is easier to explain that way).       ALIGNING THE FRONT IMAGE TO THE BACK IMAGE Next, is probably the hardest part. You will have to make the front and back line up perfectly with each other. When you photograph or scan the front and back of an object, then try and line them up back to front, you will find great discrepancies between the way they overlay because of perspective. Thus, you will have to nudge sections separately, and rotate them, and then touch up the gaps with the stamp tool. ISOLATING THE FIGURINE FROM THE BLACK BACKGROUND First, I start with the 'Front' layer. I use the magic wand tool  to outline the outside of the figurine with a selection, then press the 'Delete' key to clear it (Below the 'Insert' key). to outline the outside of the figurine with a selection, then press the 'Delete' key to clear it (Below the 'Insert' key).I save this selection of the outline of the Front of the figurine by doing a 'Select Menu->Save Selection...' and call the selection 'Front'. 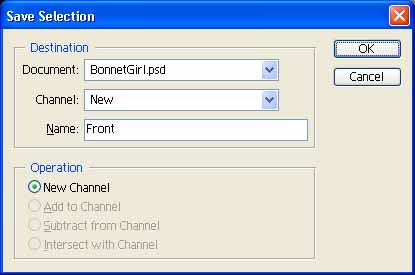 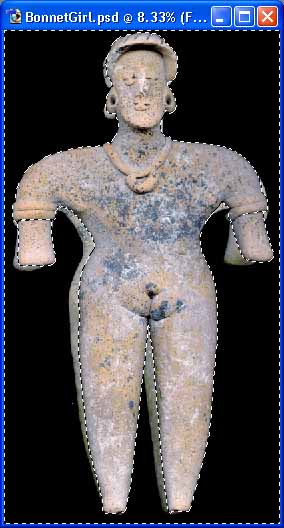  , ,...I make sure the old selection is deselected by pressing CTRL-d, then I again use the magic wand tool to select the outline and press 'Delete' to remove the border of the back layer. Now, the only black that's left is in the Background layer. I will try moving the 'Back' layer until I get the closest match between the two layers. I do a CTRL-a to highlight the entire image, then I make sure I'm on the 'Back' layer and I hold down the CTRL key as I click with the left mouse button and move the mouse sideways to tear the image away. It becomes a floating image. I am able to see the 'Back' layer behind the 'Front' layer so I move it around until I get the best match, then I click with the left mouse button to adhere it. I choose to use the V of the crotch as my point of reference, and you will see that the head and shoulders is now way off, but the legs are pretty much perfectly aligned except for the bottom part of her right leg (your left side). The crawling ants show the silouette of the 'Back' layer. 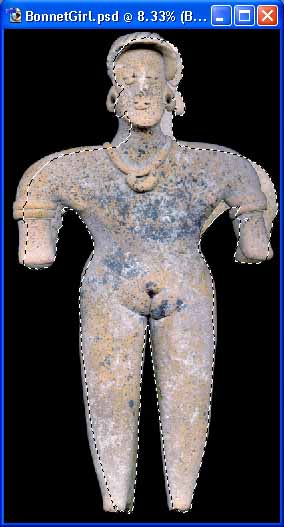 USING TRANSPARENT COLORED LAYER TO LINE UP BACK WITH FRONT It will be easier for me if, instead of having a fully colored 'Front' to compare with, I have a solid color which is very different in color from the 'Back' layer. That way I will be able to make it partially transparent so I'll be able to see what I'm doing when I start manipulating the 'Back' layer to match it. So, I do a 'Select->Load Selection...' and choose the 'Front' selection to bring back the outline of the 'Front' of the figurine. I do a SHIFT-CTRL-i in order to invert the selection.    ...then do a 'Fill' using the Foreground color.   SUPERIMPOSE GREEN 'FRONT OUTLINE' LAYER OVER BACK You can now see that it is much easier to view the differences between the back and front of the figurine.  ALIGNING THE BACK WITH THE FRONT I start with the legs. I make sure that the 'Back' layer is selected, then I highlight a section of the bottom part of the leg, tear it off with the same method I just moved the whole 'Back' layer ending up with a floating selection of the bottom part of the leg. I then use rotate to get it in the right angle, then stamp it down. I continue doing this in all places which don't come right to the edge of the green outline, not worrying too much about the cracks and irregularities I may be creating in the 'Back' layer but remaining aware of it, at least.  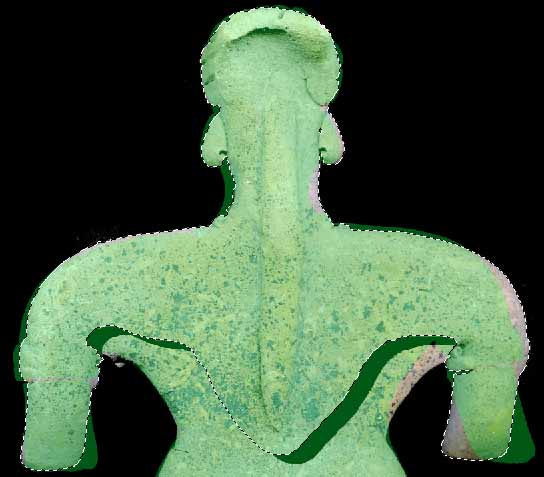 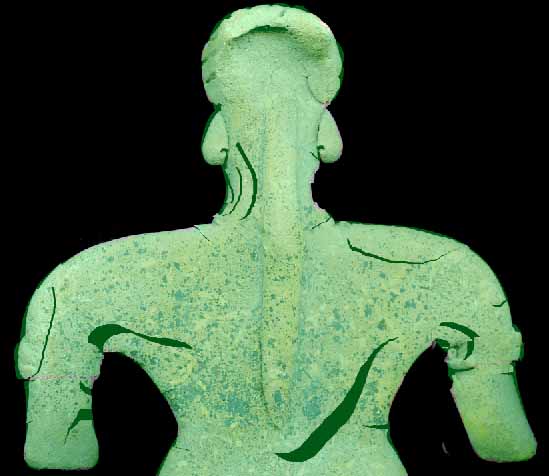 I select the clone tool, I turn off the 'Front' and 'Front Outline' layers, turn on the 'Back' layer, and begin patching the damage. 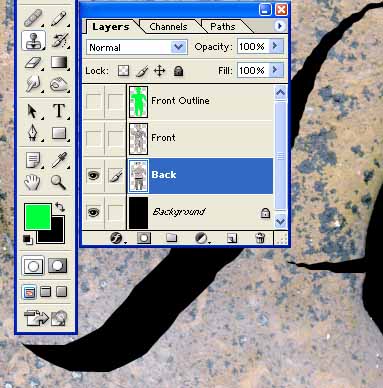  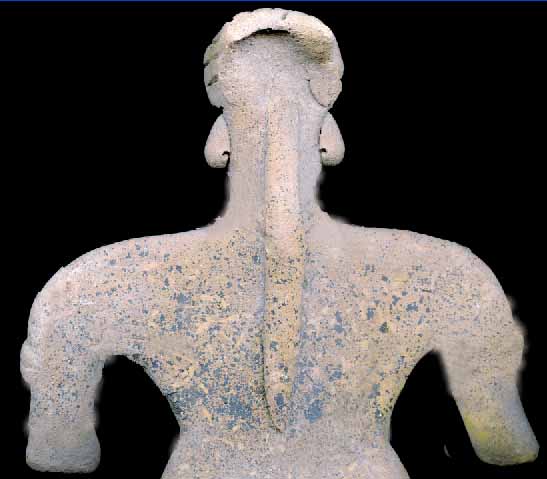 VERIFYING ALIGNMENT OF FRONT WITH BACK Now, when I turn the 'Front Outline' layer back on, you can see that just with this little amount of manipulation, the front and back are now almost perfectly aligned.  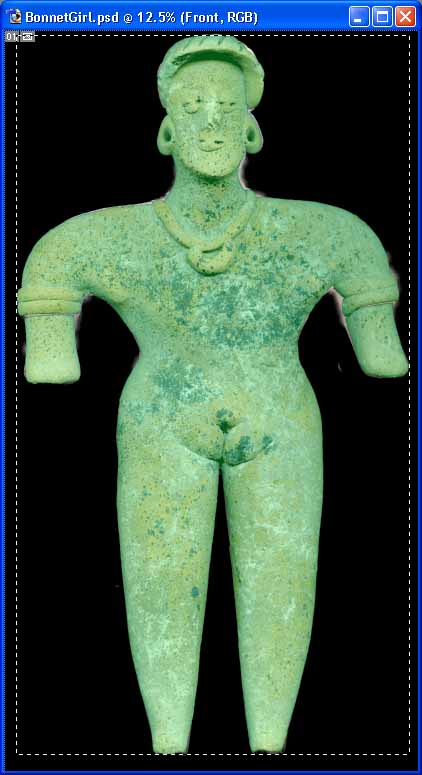 I will, first, create a new layer above all other layers and call it 'Side'. Then, I will start to try and build a side using key points such as the bottom of the ass, the tips of the fingers, the tops of the shoulders, the chin, the crotch V, etc. I'll copy each thing in a strip from the very top of the image to the very bottom while on a 'Front' or 'Back' layer, then I'll copy that strip to the clipboard and then flip to the 'Side' layer and paste it. (The paste will create a new layer, but I will move that new layer above the 'Side' layer and then do a 'merge layer once I'm done with it). Here goes. Realize that I have been saving the image numerous times as I worked to make sure that I never lost anything. There is one other thing you may wish to do. You will have to decide in LightWave just where to place your points. You may wish to think this through now by creating another layer called 'Front Points' where you create round red circles, then move them around while also seeing the 'Front' and then do the same calling it 'Back Points' for the 'Back' layer of the object. In that case, you would select the 'Eliptical Marquis Tool' holding down the shift key to contrain it to a circle as you pull it out, then you would pick Red as the foreground color and do a 'Edit->Fill' to fill the circle with red. Then, you could clone that red circle with a ALT-CTRL left mouse button and a drag. This creates a copy of the red circle so you could place another and another with the same ALT-CTRL- left mouse button method. Remember that if you are going to animate this figure later, it will need to have polygons that can bend at the joints. Thus, you should arrange that it has enough polygons and they're placed in the proper positions so that it bends where you wish it to. If you do it that way you might wish to do a 'Edit-Copy Merged...' instead of a regular 'Copy'. This will copy more than one layer to the clipboard and paste it when you wish to create your BMP files. That way you will overlay the red points onto the Front, and then the Back images.   I am now ready to create the object. From the front layer I grab a strip from the center of the image that's about the width I think the thing will be including the tip of the ass and the tip of the fingers and I paste it into the 'Side' layer. Then, I turn off all layers but the 'Back' layer and take a strip right down one of the ass cheeks that's very thin. Then, I paste it in the 'Side' layer (then merge the layer), positioning it about where the ass will be from the side. Doesn't look like much yet. 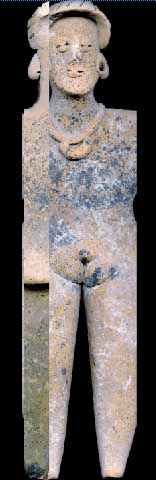 So, I chop out with CTRL and mouse on a selection, I then rotate, skew, shape and de-select sections of (with ALT key and loop tool), sometimes cloning, sometimes grabbing an area with a selection and making a floating selection out of an area, then painting with that selection. Sometimes erasing... Until I get something that might give me an indicator of size, placement and angle of things. When I copy it and paste it into its own window to save it as a BMP, I bound it to the fullest extents of the colored pixels just as I did the other ones (not on the original, of course, but on a copy/paste clone of it). 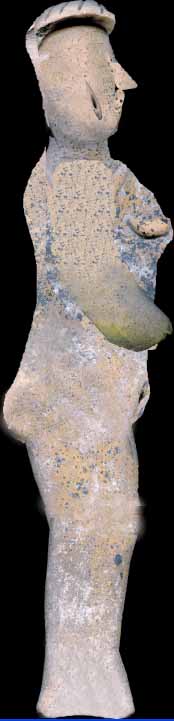 Finally, I save the image with all its layers as Figurine.psd in Photoshop format. |
||
