
|
To make a long story short, I did all things above in reverse order, except for
putting the new output bearing onto the new shaft. To do this, I placed the
shaft inside the housing, than placed a block of wood between the front of the
case and the front of the input shaft. 
Again, being careful not to let the
gears touch, I used another block of wood, and a hammer to pound the
new output bearing onto the shaft. You should use a press for
this, but since I don't have one, I carefully tapped it on in a
cirlcular motion. I than installed the new snap ring and removed the
block of wood from the front. I than placed the input shaft exactly
where it belonged, and continued to reassemble the tranny by installing
the input shaft and input shaft retainer. Once the tranny is assembled,
I had to check the gap between the third and fourth gear synchronizer
and the input shaft. It must be between 1.77-2.41mm (0.070-0.095in.).
If not, you need to install shims between the third gear and the
synchronizer. These are included in the Small Parts Kit I got from
Border Parts. I needed both. (Note: orignaly, I did this project, and
didn't think I needed any, but when I drove it, the tranny
wouldn't stay in third gear very well, so I took it back apart, and
installed the two that came with the Border Parts kit, and now it works
fine.) 
Here is the only problem I have so far, I don't have a tool to check the
input shaft end play :( so I took it to a tranny shop and had them
measure it. The input shaft end play is determined by the thickness of
gasket/shims that are installed inbetween the the tranny body, and the
input shaft retainer. There is only one gasket/shim included in the
small parts kit. See picture. 
The Transfer Case AdapterThis is the easy part. First I had to cut a knob off of the adapter
that is there for a different use other then my vehicle. Cutting
aluminum is tougher then you think. I used a sawzall, but the aluminum
would melt, and fill the teeth of the blade. After spending about 20
minutes, I was finally through. 

Next I had to bolt on the adapter to the tranny, and put the new output
bearing and bearing retainer on. Keep in mind, that there are two output
bearings. One is at the end of the tranny, and one is at the end of the
adapter. The tranny mounted one came with one of the kits from Border
Parts, the adapter mounted one came from Advance Adapter, along with the
associated retainer. Next, I attached the output gear from the old tranny
to the new one, using the new nut that came with the Advance Adapters
kit. Then bolted the tranny with the adpater to the transfer case, and
its all together. 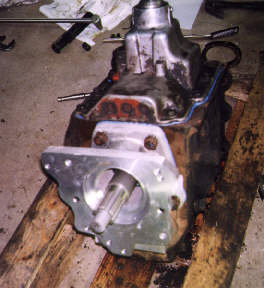

Since the adapter and tranny add up to be longer then the original setup,
my transfer case linkage doesn't fit through the hole in the floor. To
solve this, took about 3 hours of staring, and a lot of thought. I
originaly reused a bunch of parts from the original linkage and shifter,
but this didn't work the best. It can be very difficult to change from
2wd to 4wd sometimes, and in tough situations, I had to push so hard on
the lever, that I managed to bend the bracket I made. Currently, I have
the tranny in 4HI, and have no shift linkage at all. I am going to use
the shift handle from my old tranny, and make a new setup. The first one
I made, looked perfect, but didn't work so hot. My new one will work
perfect, but wont look so hot. I will have a 3 speed shift knob on top!
O-well. The reason I'm doing this instead of reinforcing the old one, is
to give me more leverage when I want to shift. The lever from the tranny
is at least 10" longer then the transfer case lever. I will update this
once I have that finished. In the next photo, you can see that the NP435
dwarfs the T150. Also, you can see the difference in length. 
Installing the new trannyAdvanced Adapters told me that I would need a new pilot bushing to complete this conversion. I figures it was because of a difference in input shaft diameters, but this is not the case. The difference is in the length. The NP435 has a 3/4" shorter input shaft, so the new pilot bushing gets "stacked" on top of the old bushing. You can either remove the old one, or leave it in, because there is a step in the crankshaft that only allows the new pilot bushing to go in a certain distance. It butts up against the original bushing location.


 You should keep the old tranny's input shaft incase you ever need to replace the pilot bushing. The shorter shaft of the NP435, doesn't work well if you use the old "pack the bitch with grease and pound it in" method of removal, which works surprisingly good.
On to the next page---->
|
