Home Individual Weapons Squad MG Squad Mortar
BACKGROUND 
|
Fallschirmjaeger Regiment of Washington
Updated 3-13-2004 
This page is dedicated to the making of a U.S. Browning 1919A6 gas gun. I made this prototype with the intent of using it occassionally as a "captured" gun and also for loaning it out to the GIs in our group for our annual public battles where we have to keep a constant 20 minute battle going at least 3 times over the weekend. The GIs had nothing really portable like my MG34 and MG42 gas guns that would shoot all day on a cheap tank of gas so I looked into making a 1919A6, the WWII GI equivalent of them. I put a lot of effort into squeezing all the electronics into the gun to make it a true walk-and-shoot model and I believe it is the first of its type ever. 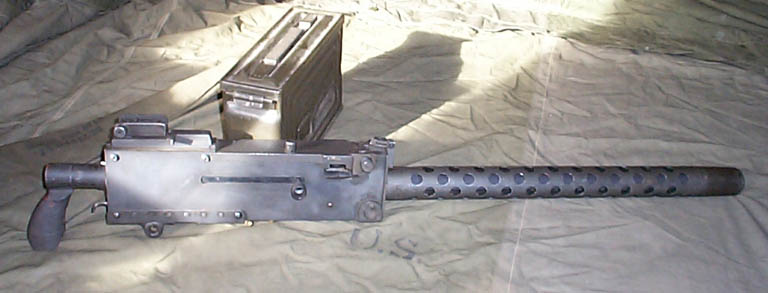 I started out with a 1919A4 kit and bought one of the Isreali A6 conversions that are so heavily advertised. When I received the Isreali kit it soon became apparent that it was nothing like a WWII GI one. About the only thing that could be used from the kit was the butt-stock and the carry handle. The more I got into it I realized it would have been cheaper to buy those parts seperately as the Isreali bipod and flash-cone could not be used at all and they were the most expensive parts in the kit. I strongly suggest getting a SARCO machine-gun catalog, their drawings will really help in putting together a realistic 1919A6.

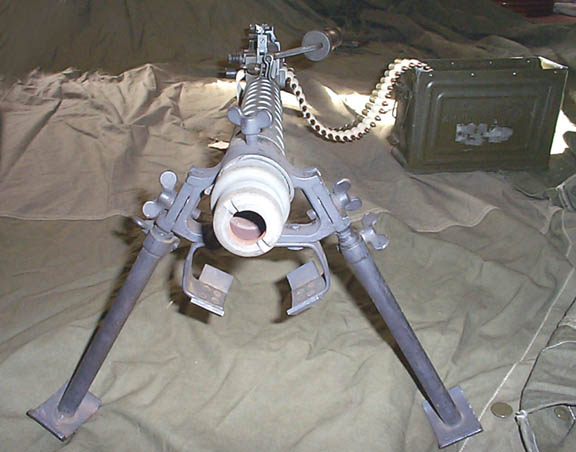
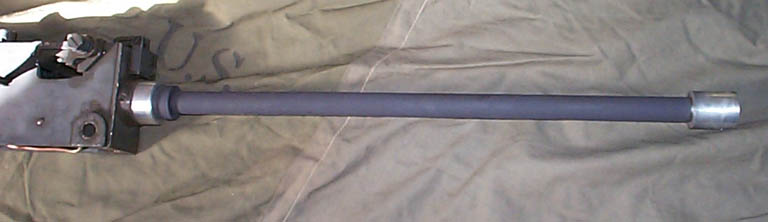
The A6 can be changed back and forth to the A4 by switching the barrel assembly and removing the stock. Unfortunately the M2 tripod that goes withe it is getting harder to find and more expensive due to all the Browning semi-autos they have been making lately. The big differences between the Isreali A6 and a real WWII one are the bipod, it doesn't really look the same and mounts in a different way also. The Isreali one can mount anywhere on the full length A4 ventilated barrel shroud whereas a A6 shroud is shorter and the bipod only mounts on a special front muzzle bearing. The muzzle cap clips onto the front of the bearing and some of the early versions did not even have a flash cone like my model. The Isreali flash cone is part of the front bearing and when attached to the A4 shroud the combination is longer than the real 1919A6. SARCO did not have a complete A6 bipod at the time but I was able to purchase the shorter A6 barrel shroud and the proper muzzle bearing. I wanted a shorter look to my A6 and wasn't happy with the long flash-cone available from SARCO but I did find an early muzzle cap from Philadelphia Ordnance. Unforturnately they did not have the complete bipod either so I went searching the internet. I lucked out and found one mistakenly listed under WWI parts on a Antique Militaria website and I was able to purchase it for about $40. SARCO and Philidelphia Ordanance do occasionally get the whole bipod in and may now even have one in stock but they usually run in the $125+ or more range.
 
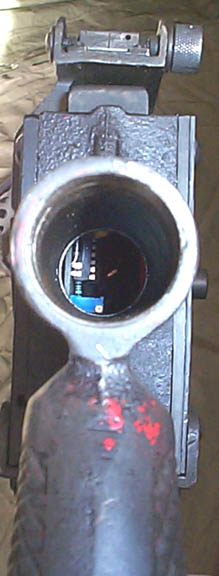
The side plate can be taken off by removing Allen head screws disquised as rivets. The plate was designed so there would be no possibility of converting it to a real gun, it is made of very thin sheet metal with aluminum jig-saw puzzle like spacers to give it the proper thickness. As an added precaution the bolt charging slot is cut almost half an inch lower than an original. The on-off "safety" switch shown just under the rear sight is a 12 volt automotive type.

It was only possible to fit all this stuff in by using the new mini-electric valves, available from Steve Smith . The 1/8" copper tubing comes out of them then bends off to go to the chamber. The the male ends of the quick-connects screw directly into the input side of the valves. There is just enough room with the valves and coil to be able to change the spark plug. The coil used is an expensive special order motorcycle one that I originally found for use in the MG34 drum. I now use a slightly larger snow-mobile coil but the inside of this gun is so tight that I am not certain the new cheaper coil would fit.


 Removing the pistol grip buffer screw allows access and adjustment of the tiny blue fire-rate pot with a long blade screwdriver.
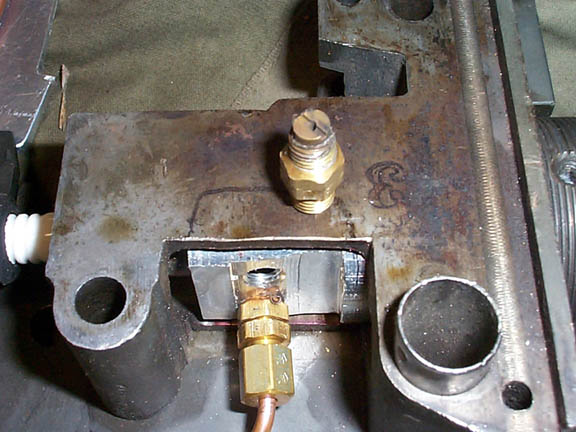
This is were the chamber fits into the gun. The original trunion block was machined out to accept the aluminum combustion chamber. One of the input jets is shown removed here. The barrel is heavy wall "Black" 1/2" NPT steel pipe. BATTERY:
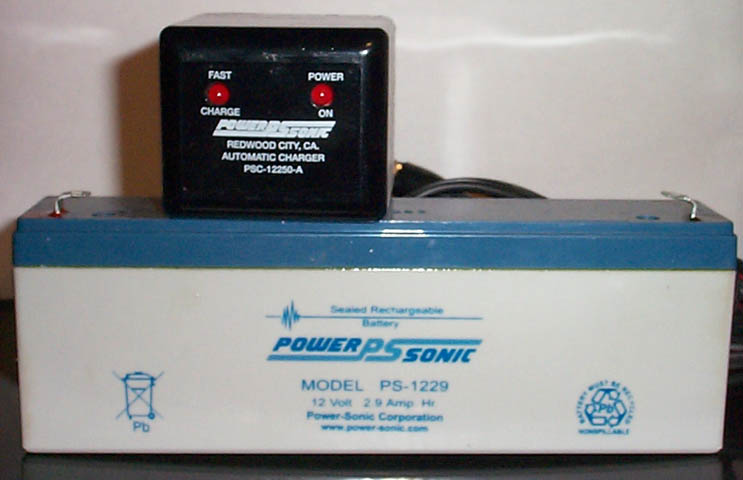 Gel Cell Battery and Smart Charger These batteries can be recharged hundreds of times and keep their charge for months but it is very important to get the right charger for your battery size. An electronic "Smart Charger" is really the way to go, they cost a little more but they reduce charging time and prevent over-charging that can quickly ruin you battery, and then nothing will work. The one to get is the POWERSONIC PSC-12250-A, the "A" stands for automatic and they are well worth the slight extra cost. They also are the only type that has LED indicator lights so you can make sure your charger is on. Again batteryweb.com has the best prices and you can find their chargers on this page. TANKS:
Here is a close up of the backpack. I used closed-cell foam sheet in this tiny 1928 GI pack with the battery in the meat tin pouch for the 1919A6 it will also fit in a Mussette bag for Airborne.
Above shows the old liquid "gas trap" I made out of 1/2" copper, this keeps liquid gas from going into the regulator when the operator is on the ground with the backpack on. You don't really need this if you have a vehicle mounted or stationary gun.
This is the new "Trombone Slide" gas trap, it is shorter overall and fits in the pack better. The cross piece is just 2 copper "T" fittings cut in half with a short section of tubing between them, they are soldered on the the OUTSIDE of the trap and are only for reinforcement. This helps strengthen the copper trap against the pull of the hose. There is a quarter turn ball valve for turning on/off the MAPP gas and a custom made adapter for attaching the Victor SR160AR regulator. I put a right angle connector on the output of the regulator to better direct the hose out the bottom of the back.
The yellow tank is a disposable MAPP gas bottle, the green and silver is the smallest Oxygen tank, holding 4 cubic feet. In case you didn't already guess I use MAPP gas exclusively, I have discovered that it ignites easier and does not produce water as a by-produce of combustion like straight propane (so it won't short out your plug). For those of you who are unfamiliar with MAPP it is a mixture of 56% Acetylene and 44% LPG, comes in a yellow bottle and costs about $9 at most hardware stores. It has more of a blue flame when fired but it really makes these things dependable, you have to watch long bursts however as it does burn hotter and will actually melt your sparkplug tip. I use the smallest regulators Victor makes, SR150CR oxygen and SR160AR acetylene and get them wholesale. Call a local shop and see what it will cost to order them, I can sell them for around $75 each. You can see the locking screws and nuts on the regulator adjustments, I have recently machined a new type that are a lot easier to use. I sell all the fittings and parts seen on this page at cost plus 10% and shipping if you are unable to find them locally. Since I can't ship filled Oxygen tanks anyway I recommend you purchase them yourself and have them filled locally. I use the #M004 Medical LUXFER solid aluminum tanks, (small steel ones are TOO HEAVY). I have found that the Industrial grade tanks are usually special order and more expensive, the medical ones have a much bigger market and are more common and thus less expensive and easier to get. The only difference between the Medical M004 and the Industrial N004 is that the Medical one is painted green around the top. If you have trouble having them filled (some shops require a Doctor's Rx) you can remove the paint or paint over them with grey or silver. If you just can't find anyone to purchase them from I can sell them for about $50 each plus shipping. The M004 are 3.2" Diameter and 9" in height and about 12" high with the #540 (regular welding type) valve installed. They hold 4 cubic feet of Oxygen at 2216 PSI. Weighs 1.9 lbs. without valve. I usually need three of these for a 2 day weekend battle event, changing bottles around noon on Saturday and then using the third for our half day on Sunday. There is also the M007, 4.4" diameter 9.3" high. ~12.3" with valve, holds 7 cubic feet of Oxygen at 2216 PSI. Weighs 3.6 lbs. without valve cost on that was around $55. For about $60 there is the M009 just 1.6" taller and .2 lbs heavier but holds 8.8 cubic feet at 2015 PSI, I use these on vehicle mounted guns, usually 2 for a weekend. Here is some info on cylinder suppliers, these are often special order tanks and it is almost certain that most local welding shops will not have these in stock so check into it early if you are working on a deadline for an event. If you are unable to find any locally I can get them for you. Cylinder Suppliers:
Conwin Carbonic
Special Gas Systems
DCG Partnership 1, Ltd.
Pacific Cylinders
Haring Cylinder Company
Pacific Cylinders

Here are some tools I find useful in the field, plug wrench, plug cleaning brush and a spark gap measuring/adjusting tool with file. |