Artemia FAQ 2.0
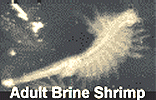
Adult Brine Shrimp
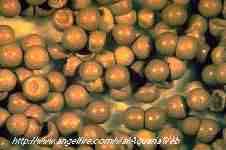
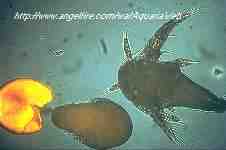
Baby Brine Shrimp
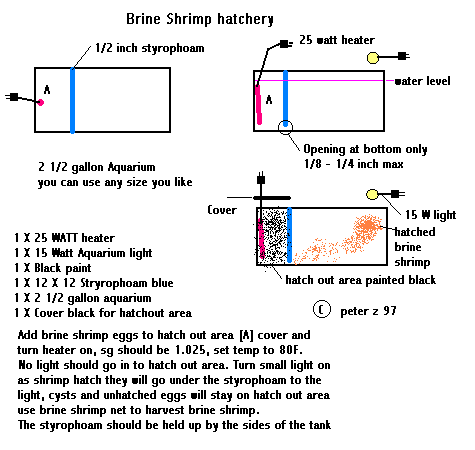
Hatchery Illustration #1
How I successfully hatch Brine Shrimp
Artemia FAQ 2.0
by Kai Schumann (KS@Lilly.com)
Having seen all the posts about brine shrimp questions, I have decided to create a FAQ for artemia culture. It is by no means the definitive source, and will be expanded as I collect information. I have gathered this information from various books, publications and my own experience in raising these guys. There is a wealth of information out there that gets real scientific, much of this I have left out as it really doesn't pertain to our goal of growing these critters. Anyway, here it is, hope you find it to be of use. Any comments or additions to this FAQ should be directed to me. What's in it:
1.0 Background
2.0 Hatching Requirements
3.0 Harvesting
4.0 Feeding
5.0 Growing Adults
6.0 Maintenance
7.0 Trouble Shooting
8.0 Artemia Storage
9.0 Decapsulating Artemia Cysts
1.0 BACKGROUND: The common brine shrimp (artemia) is in the phylum Arthropoda, class Crustacea. Artemia are zooplankton like Copepods and Daphnia, which are also used for live food in the aquarium. The artemia life cycle begins by the hatching of dormant cysts, which are encased embryos that are metabolically inactive. The cysts can remain dormant for many years as long as they are kept dry and oxygen free. When the cysts are placed back into salt water they are re-hydrated and resume their development. Artemia cysts are best stored in a tightly sealed container in a cool dry environment, if possible, vacuum packed. The refrigerator is usually best. After 15 to 20 hours at 25 degrees C (77 degrees F) the cyst bursts and the embryo leaves the shell. For the first few hours, the embryo hangs beneath the cyst shell, still enclosed in a hatching membrane. This is called the Umbrella stage, during this stage the nauplius completes its development and emerges as a free swimming nauplii. In the first larval stage, the nauplii is a brownish orange color because of its yolk reserves, newly hatched artemia do not feed because their mouth and anas are not fully developed. Approximately 12 hours after hatch they molt into the second larval stage and they start filter feeding on particles of various microalgae, bacteria, and detritus. The nauplii will grow and progress through 15 molts before reaching adulthood in at least 8 days. Adult artemia average about 8mm long, but can reach lengths up to 20mm in the right environment. An adult is a 20 times increase in length, and a 500 times increase in biomass from the nauplii stage. In low salinity and optimal food levels, fertilized females usually produce free swimming nauplii at a rate of up to 75 nauplii per day. They will produce 10-11 broods over an average life cycle of 50 days. Under super ideal conditions, an adult artemia can live as long as three months and produce up to 300 nauplii or cysts every 4 days. Cyst production is induced by conditions of high salinity, chronic food shortages and/or cyclic oxygen stress ( less than 2 mg/l).
Adults can tolerate brief exposures to temperatures as extreme as -18 to
40 degrees C
(0- 104 degrees F) Optimal temperature for cyst hatching and adult grow out
is 25-30 degrees C (77-86 degrees F), but there are differences between strains,
optimum for the San Francisco bay strain is 22 degrees C as compared to 30
degrees C for Great Salt lake artemia. Brine Shrimp prefer a salinity of
30-35 ppt (1.022-1.026 density) and can live in fresh water for about 5 hours
before they die. Caution should be used to not over feed in a fresh water
aquarium because of the rapid decomposition of the dead.
Many fresh water fish will tolerate and even thrive in a brackish water
environment of 1- 5 ppt easily, so it is possible to add saltwater to the
tank and extend the survival of the artemia if required. Other variables
of importance are pH, light and oxygen. A pH of around 8 is best; pH less
than 5 and greater than 10 will kill the culture. the pH can be increased
with baking soda, and lowered with muriatic acid. Strong illumination is
necessary for hatching. A standard growlite bulb available in an aquarium
supply is adequate. Most important is the level of oxygen in the water, with
a good oxygen supply, the artemia are a pale pink or yellow, or if they are
heavily feeding on microalgae they will look green in color. In this ideal
condition growth and reproduction is rapid, and a self-sustaining artemia
supply is possible. If there is a low oxygen level in the water with large
amounts of organic matter, or a high amount of salinity from evaporation,
the artemia will feed on bacteria, detritus and yeast cells, but no algae.
It is under these conditions that they produce hemoglobin and look red or
orange in color. If this environment remains they will start producing resting
cysts, and the colony may crash. It is very important to have a vigorous
air supply in the tank for two reasons, one is to keep the available food
supply in suspension where it can be filtered out, and the other is to promote
a good oxygen supply in the system.
![]()
2.0 HATCHING REQUIREMENTS: The optimal conditions
for hatching artemia are as follows - 25 degrees C, salinity - 5 ppt (1.030
density), heavy continuous aeration,
light - 2000 lux constant illumination, pH around 8. Good circulation is
essential to keep the cysts in suspension. A container that is V shaped is
best (two liter bottles work good, the absolute best I've found are separation
columns found in any lab supply - they're expensive though). glue a valve
on the cap and invert, this way unhatched cysts, empty shells, and hatched
nauplii can be easily removed separately. Another idea I would highly recommend
checking out was offered by Ken Cunningham (kfc@wimsey.com). His discovery
was to use pilsner beer glasses, Some of them have a conical point at the
bottom, these are the ones to look for. Ken places three or four in a ten
gallon tank and heats them by the water bath method. Put rigid air lines
in the glasses with no air stones, connected by flexible tubing to the
distribution manifold. 80 degrees, bright light at all times. In each glass
put 1/2 teaspoon of salt, 1/2 or 1/4 teaspoon of cysts, and bubble for 24
hours. To harvest, leave the rigid tubing in the glass, but lift it out of
the aquarium and disconnect the flexible air tube at the manifold. Let the
glass settle in relative darkness (i.e. not bright light) for 10 minutes,
and siphon the artemia out using the airline tubing into fresh water to rinse.
By using the glasses on a rotation, its possible to have hatched artemia
available at all times.
Still another good idea comes from Wright Huntley (huntley@ix.netcom.com)
who originally got the idea from Oleg Kiselev. Wright now uses Chianti wine
bottles found at Trader Joes for 4 bucks. By tilting the bottles on edge
and using the same salt and cyst ratio as Ken, quite high hatch rates are
being obtained. harvesting is the same, by siphoning using the air tubing,
but into a funnel lined with a handkerchief, then the artemia may be rinsed
if desired, and fed. There are many methods in use for hatching these guys.
Once you play with whatever particular method you chose to achieve
optimum performance, your results will probably be just as good as any other
hatching method. Don't be afraid to experiment. The hatching percentage and
density are usually a function of water quality, circulation and origin of
the cysts. Containers with flat bottoms have dead areas in the corners and
are not ideal for maximum hatch rates. It doesn't take allot of cysts to
get going, there are usually 200,000 to 300,000 nauplii per gram of cysts,
so a half teaspoon in a two liter bottle is more than enough for the typical
aquarist. With a setup of two or more bottles, one started one day, the other
the next, you can have a continuous supply of newly hatched artemia for that
reef tank every day. This is the method we used when I worked at Scripps
Aquarium - only with 5 gallon water bottles.
![]()
3.0 HARVESTING: Harvest the nauplii by turning off
the air, or remove the air stone, and let the culture settle for about ten
minutes. Hatched, empty shells float to the surface, and unhatched cysts
will sink to the bottom. The newly hatched nauplii will concentrate just
above the unhatched cysts on the bottom. Since the newly hatched nauplii
are attracted to light (phototropic), by shining a flashlight at the center
of the bottle, you can concentrate them where it is easy to siphon them off,
or drain the cysts off the bottom by using the valve, then drain the nauplii
onto another container. The unhatched cysts should be used in the next culture
and not thrown away, since part of them might hatch with the next batch.
![]()
4.0 FEEDING: Feeding - Since artemia are non-selective
filter feeders (meaning they don't care what they pick out of the water),
a wide range of food has been successfully used. The criteria for food selection
should be based on particle size, digestibility, and solubility (powdered
milk wont work). Feeds that have been used include live microalgae such as
nanochloropsis and a wide variety of inert foods, which are far more practical
for us aquarists. One caveat with inert foods is to be careful not to overfeed.
Inert feeds include yeasts, both active and inactive (a brewers supply is
the best source, bread yeast is expensive!) micronized rice bran, whey, wheat
flour, soybean powder, fish meal, egg yolk, and homogenized liver. ( I haven't
used the last four). Dried microalgae such as spirulina has also been used
with success (available from health food stores, but again kind of expensive).
The simplest way to measure food levels in the tank is by figuring the
transparency of the water. This is done with a dowel with measuring marks
marked off in centimeters, and a white disk with black fields on it is glued
on the end. The depth where the contrast between the white and black fields
just disappears measures the light penetration into the tank. The more stuff
floating around the tank, the less transparency.
With a stocking density of 5000 nauplii per liter, the transparency
should be 15-20 cm the first week, and 20-25cm thereafter. Of course it is
best to maintain an optimal food level at all times, so frequent feedings,
or better yet, a continuous drip feeding are mandatory for optimal grow out.
Food is not directly consumed, but rather transferred to the mouth in a packaged
form. The space between an artemias legs widens as the legs move forward.
Water is sucked into this space from below, and small filtering hairs collect
particles including food from the incoming stream. On the back stroke the
water is forced out and the food remains in a groove at the base of the legs,
this groove has glands that secrete an adhesive material that clumps the
food into balls, and microhairs move the food packages toward the mouth.
The optimal size for food should be less than 50 - 60 microns.
![]()
5.0 GROWING ADULTS: When feeding larger fish and
invertebrates where small food is not needed, adult artemia may be preferred
over nauplii. But why should you bother growing adults you ask? I will just
feed more newly hatched brine shrimp to make up the difference you say...
Well, adult artemia are 20 times longer and 500 times heavier than
nauplii and therefore provide more of a meal. There is a myth floating around
that adult artemia are not as good for your fish as newly hatched. There
is a tiny bit of truth to this, but it depends on what you are feeding. So
what's in it for your fish: Newly hatched artemia are high in fats, about
23% of dry weight. By mid juvenile stage, the fat levels have decreased to
about 16 %, and by the time they are pre-adults the fat levels have decreased
to about 7%. But, at the same time, the protein content has risen to replace
the fat, from about 45% in a newly hatched artemia to about 63% in an adult.
Based on this, you should determine what is best for your tank, young fish
larvae require a high fat intake for growth and health, while older juveniles
and adults need protein for health and reproduction. Also, nauplii are known
to be deficient in several essential amino acids, while the adult artemia
are rich in all essential amino acids. Adult artemia therefore supply more
biomass than nauplii and are more nutritionally complete. The best approach
to growing adults is to pick up a 10 or 20 gallon glass aquarium cheap someplace.
Take thin acrylic sheet or formica, and jam it in the tank, essentially making
an oval tank. ( this is important to remove the previously mentioned dead
spots, and improve circulation ) Glue all the seams with silicone (3M - Blue
tube). Circulation can be enhanced by gluing a partition down the middle
of the tank making a raceway arrangement. Best yields are obtained with a
good food circulation, animal distribution, and strong aeration. This next
step is the hardest to explain without pictures, You need to make six or
eight (depending on the length of your tank) air lift tubes. These are simply
1 inch thin wall PVC, cut at 45 degrees on the bottom, with a 90 degree elbow
on top. The water level should reach the middle of the elbow, with the tube
touching the bottom of the tank, 45 degree cut down. Drill a hole in the
90 degree fitting so you can feed an airline 3/4 of the way down the tube.
Glue these tubes to the center divide so that the 90 degree elbows all face
the same direction at a 45 degree angle to the divider. Your creating a mechanism
to make a constant flow of water in a clockwise or counter clockwise direction
(I don't think it matters which). Here is where I should bring up the subject
of aeration, avoid the temptation to put in wood airstones to increase flow
and aeration. Yes they make beautifully fine bubbles and you can get excellent
upflow with them. But its these same fine bubbles that will wreak havoc with
your artemia. Artemia can lodge air bubbles in the swimming appendages or
even ingest them, making them float so that they are unable to feed which
will eventually kill them. I haven't had much problem with water quality,
so filtration really isn't necessary on the small scale that were on.
Filtration can be included if you feel so inclined, but it will require
a screened overflow to a sump or cartridge filter. Moderate aeration with
coarse or no airstones, good water quality, and generally clean conditions
are all important for raising high densities of adult brine shrimp. Since
the artemia feed constantly, faster growth rates and better survival is achieved
by multiple or continuous feeding over a 24 hour period. Best growth rates
are achieved at 25-30 degrees C with salinities of 30-50 ppt and LOW light
levels. Remember, artemia are drawn to strong light, so if you install that
175 watt metal halide lamp you had leftover from the reef tank, the little
buggers are going to increase their swimming activity and have greater energy
expenditure, resulting in slower growth rates. In low light the artemia will
spread out in the water column, swimming slowly and achieving more efficient
food conservation.
![]()
6.0 MAINTENANCE: Being a low volume operation, water
quality can deteriorate rapidly, especially as biomass increases (I mean,
that's the whole idea right?). The problem usually occurs because of over
feeding, which leads to fouling and low oxygen levels. There is a fine line
between optimal feeding levels and wiping out our tank, especially when using
non-living foods. To help overcome this problem, you need to take care of
your artemia tank as much as you pay attention to your aquarium. Here is
what you do:
Clean the bottom every couple of days. You do this by turning off the
air, letting the tank settle, and using that handy flashlight again (I find
this works best when done at night) By now we know what our little buddies
are going to do. Meanwhile siphon the crap off the bottom of the tank, remember,
these guys are going to molt 15 times before becoming adults. (unless you
have three hands, prop the flashlight on something). About a 20% water change
per week is
adequate.![]()
7.0 TROUBLESHOOTING: My artemia just crapout and
die - several causes, there could be insufficient aeration leading to
asphyxiation, or you couldn't resist and used that damned wooden airstone
I told you not to use. Or - they're starving to death. The health status
can be checked by looking at how they're swimming, shine your flashlight
into the tank, and they all should rapidly concentrate at the source, this
is good. However, slow dispersed swimming indicates things are going to hell
quick. If you have access to a microscope you can examine their digestive
track, which should be full of food (assuming you've been feeding them, and
you have right?) If the swimming appendages and mouth region are clean, this
is good. If they are covered with food particles, this is bad. This condition
could be due to the nature of the food or the physiological condition of
the animals. Another reason suggested is that a virus infection has occurred,
very little is known about this, and it is impossible for us aquarists to
confirm this has happened - see the decapsulation section at the end of this
FAQ.
Slow growth - Temperature is too low, pH imbalance, salinity is off,
inadequate food or lousy food quality.
![]()
8.0 ARTEMIA STORAGE: Your artemia can be stored for
future use in several different ways, adult artemia will survive for several
days in the refrigerator (if your wife will let you, mine wont) If you
refrigerate them, be sure to warm them up and give them one last feeding
before you feed your fish. this will restore their nutritional quality, after
all, they've been starving for the past couple of days. You can also freeze
them, nope, afraid this kills them. An ice cube tray works perfect for this
(here we go with the wife again, I cant do nuthin) Be sure to freeze them
in 7-8 ppt saltwater for best results. Freezing is neat because all you have
to do is toss an artemia cube into the tank, and you have a nifty time release
food supply. You have to be careful not to over feed here, they float to
the bottom and decompose quick, and you can bomb your tank rather rapidly.
![]()
9.0 DECAPSULATING ARTEMIA CYSTS Having had several
questions on how and why this is done, I have decided to include this procedure
at the end of this FAQ. It is an involved process and not many people will
choose to perform it, but it is good information to have in case you get
a wild hair some day, or just want to impress your friends. Separating nauplii
from their shells may be desirable for several reasons. Cyst shells are
indigestible and can lodge in the gut of predators causing fatal obstructions,
the shells have been speculated to be a source of heavy bacterial contamination,
the nutritional content is believed to be higher because the nauplii don't
have to spend energy to break out of their cysts, because of this the hatching
ratio increases, and finally the de-cysted cysts can be fed to fry too small
to eat hatched nauplii. My thanks to Mike Noreen for the last three reasons!
While in all my years of messing with these guys, I have never heard of anyone
having problems with either of the first two scenarios, quite a few commercial
aquaculture ventures go to the trouble of decapsulation. Decapsulation is
accomplished in four steps: re-hydrating the cysts, treating with the
decapsulation solution, washing and deactivating the residual chlorine, and
the hatching of the embryos. Dry cysts have a dimple in their shell which
makes it hard to remove the complete inner membrane. For this reason, the
cysts are first hydrated into a spherical shape. The cysts should be re-hydrated
in soft or distilled fresh water at 25 degrees C for 60-90 minutes. The lower
the temperature, the longer it takes to re-hydrate them. But, no matter what
the temperature, never leave them longer than 2 hours, as by this time some
of the cysts will have restarted their metabolisms and will therefore not
survive the decapsulation procedure. Hydration should be done in a container
identical to the one used for hatching regular cysts for the same reasons
of circulation and aeration. Cysts should be filtered on a 100- 125 micron
collection screen and rinsed, but this step may be missed if you don't have
the screen. It is best to decapsulate the hydrated cysts immediately, but
they can be refrigerated for several hours if needed. During the hydrating
process, you need to prepare your chlorine solution. Either household liquid
bleach or powdered pool chlorine is mixed with salt water. In preparation
for decapsulation the cysts are placed in a pre-cooled buffered solution,
4 degrees C and about pH 10, consisting of 0.33 ml of 40% sodium hydroxide
(NaOH) and 4.67 ml of sea water per gram of cysts ( you may have a hard time
finding pure NaOH, most pharmacies should have it though, I got some from
work so I haven't really looked much). The buffer solution is prepared by
dissolving 40 grams of sodium hydroxide in 60 ml of fresh water. Decapsulation
will begin when you add 10 ml of liquid bleach to the buffer solution. You
will need to have a thermometer in the brew, because the chemical reaction
taking place gives off heat. It is important to keep the solution between
20 and 30 degrees C. Starting with pre-cooled buffered seawater makes it
easier to keep the reaction in the right temperature range. If you need to,
an ice cube or blue-ice packs can be added to help drop the temp. A second
method is to add 0.70 grams of dry pool chlorine powder per gram of cysts.
In this case the buffer is sodium carbonate consisting of 0.68 grams sodium
carbonate in 13.5 ml water. It is easier to split the water in two equal
parts, add the required amount of chlorine to the first part, and the sodium
carbonate to the second. Allow them to dissolve and react, which will cause
a precipitate. Pre-cool the two solutions, and mix them together, then add
the hydrated cysts. During decapsulation, stir the brew continuously to minimize
foam formation, and to dissipate heat. Note the color of the solution, it
will change from a dark brown to grey, to white, and then to a bright orange.
This reaction usually takes 2-4 minutes. With the calcium hypochlorite solution,
the cysts will change only to gray, and will take about 4-7 minutes. The
cysts must be filtered from the solution quickly and immediately after the
membranes have dissolved as indicated by the color (bright orange or grey),
otherwise you will simply dissolve the whole cyst instead of only the outer
shell. The chlorine should be washed off the cysts by rinsing with fresh
water or salt water until you cant smell the chlorine anymore. The residual
chlorine attaches itself to the decapsulated eggs, and has to be neutralized.
Do this by washing the cysts in a 0.1% sodium thiosulfate (0.1 gram sodium
thiosulfate in 99.9 grams water) for one minute. An alternative method uses
acetic acid (1 part 5% vinegar to 7 parts water). The first method works
better, but the second method is easier as everyone has the materials in
their kitchen. The cysts are then re-washed with fresh or salt water and
placed into the hatching container, and hatched as normal artemia. The
decapsulated cysts can be hatched immediately, or stored in the refrigerator
for up to 7 days before hatching. For long term storage, like the expensive
stuff you can buy, the cysts need to be dehydrated. Dehydration of the
decapsulated cysts is done by transferring your one gram of decapsulated
cysts into a saturated brine solution of 330 grams salt to 1 liter water.
Aerate this for 18 hours, replacing the solution every 2 hours. The cysts
are releasing their water through osmosis in the solution, so it is important
to keep the salt concentration high. After 18 hours, the cysts have lost
about 80% of their cellular water, stop the air flow and let everything settle,
then filter the cysts out. These cysts can then be placed in a container
and topped off with fresh brine solution. seal the container and store it
in the refrigerator or freezer. Cysts with 16-20% cellular water can be stored
for a few months without a decrease in hatching rate. For a longer term storage,
you have to reduce the cellular water content to less than 10%.
![]()
Uses: Baby brine shrimp are a food of choice for the newly hatched
fry of egg-layers and other small fish. They're also eaten voraciously by
some surprisingly large marine fish and make a good substitute macro-plankton
for some filter-feeding invertebrates.
Culturing: To hatch brine shrimp, one needs very little. A hatchery
can be built out of almost anything, such as 1 gal plastic milk jug to 12
oz soda bottles. Also, stores sell "shrimpolators" and plastic hatching cones.
Everything works, but a container with a concave or conical bottom is the
best because the water flow has no dead spots. Add air tubing connected to
a small pump, put a light over it and keep temperature around 85 degrees
if the shrimp are to hatch faster.
Ed Warner's book suggests 3.5 table spoons of uniodized salt per gallon
of water. He suggests using the cheapest salt available, like the water softener
salt at $3 for 50 lb.SF Bay Brand recommends hardening the water to improve
hatching and shrimp survival, so adding some Epsom salt and a tiny pinch
of baking soda may be a good idea.
In order for the shrimp to hatch and not die, the water in the culture
must be vigorously turned over to keep the shrimp in suspension. This can
be done by aerating the water just like everyone else, using a 12 inch length
of rigid air tubing attached to a 3 inch tail of flexible tubing attached
to an air pump. The rigid section keeps the hose from slipping out of the
container. Aquarists using airstones may find that they crud up and clog
too often in this environment.
To get nauplii (hatched brine shrimp) out, turn off the air, put a
piece of rigid air (1/8") tubing with 2-3 ft of flex tubing attached into
the culture, and let the stuff settle. The shrimp egg cases will collect
on top of the water, the shrimp ought to sink to the bottom (if the water
is not too saline). Then just siphon the wriggling shrimp off into a
brine shrimp (fine) net, dump the lot into a cup of water and use an eye
dropper to dispense to the fish.
The nauplii will live in the tank for up to 24 hours.
Sources: Eggs can be bought in most aquarium and pet shops or by mail
order. Eggs bought in bulk (such as 1 lb cans) will be much less expensive
than the tiny ampoules sold in stores. The cans may be held in the freezer,
with 2-3 weeks worth of supply held in a small, tight-lid jar.
Ed Warner insists that the eggs of brine shrimp need at least a year
of incubation to become ready to hatch. He goes on to say that a low yield
from a newly opened can of shrimp eggs may be due to insufficient incubation
time and that the best hatches come from the eggs that had been kept for
a few years, with the eggs kept for 5 years in a vacuum packed
airtight container giving perfect 100% hatch
rates.![]()
Uses: Just about all fish under 5" long will readily eat brine shrimp.
Culturing: Don't bother. The yields from the cultures are very low
and it's easier to culture Daphnia and buy live brine shrimp in the pet
shops.
Those who REALLY want to try to culture brine shrimp should get a large
open top container
(an aquarium, a garden tub, a baby wading pool), fill it with real or synthetic
salt water and seed it with some green water and nutrients (fertilizer tabs
or what have you) and wait for the water to turn yellow-green. Throw in some
baby brine shrimp or live adult shrimp (available from the pet shop) and
wait. Adding small amounts of brewers yeast, APR and other micro-foods will
help promote the shrimp growth. It helps to put the culture in a brightly
indirectly lit place to promote microalgae growth.
Sources: See
above.![]()
How I successfully hatch Brine Shrimp
by Ken Ringold
© 1999
1/2 gal. pickle jar |
Uniodized Morton salt |
25 watt heater |
thermometer |
small lamp |
white, large Christmas tree light bulb |
40 watt light bulb |
air pump |
electrical switch |
10.5” rigid tubing |
12” soft tubing |
10 1/2” rigid tubing |
1/2” soft tubing |
airline T |
7” rigid tubing |
10” soft tubing |
Brine Shrimp net |
Small cup (Betta cup) |
Brine Shrimp (Artemia) cysts |
small piece of styrofoam |
Directions
First off I modified my air pump by adding an electrical switch. This
saves in having to unplug and plug in the pump every time you want to turn
off and on the air. I used one of the simple wheel types that attaches right
to the electrical cord. This works allot easier.
Attach the 12” piece of soft tubing to the air pump and the 10
1/2” piece of rigid tubing. At the opposite end, attach the 1/2”
piece of soft tubing and the airline T. The airline T is added to increase
the airflow, and to make the flow of water more random. It is less likely
that you will have “dead spots”.
Attach the heater to the rim off the jar. Mine didn’t fit quite
right so I used a small piece of styrofoam in-between the jar and the heater
clamp to take up the space. Fill the jar with regular tap water at a temperature
of 80 degree F., and add 1 3/4 teaspoons of the uniodized salt. I was told
at a pet store to use Marine salt, but found it to be not necessary. You
can find the uniodized Morton salt at your grocery store for 39 cents instead
of spending $8 for a box of Marine.
Turn on the heater until the light just comes on. Place the airline
tubing with the T attached into the jar, and turn on the air pump. Let this
go for an hour and then check the temperature. You are aiming for a temperature
of 80F. Adjust the temperature if necessary until you have achieved this
after an hours wait.
You can then add the cysts. I normally add about a half a capful each
time, depending on the amount I harvest. Also turn on the small lamp, using
the Christmas tree bulb in it, pointing directly at the jar. I find the hatch
rate higher if the cysts are constantly illuminated. I use the Christmas
tree bulb because it is not too bright and does not generate very much
heat.
After about 24-30 hours you should be able to harvest. Attach the 7”
piece of rigid tubing to the 10” piece of soft tubing. You will use
this to siphon out the newly hatched brine shrimp. Turn off the air allowing
everything to settle for about 15 minutes. At the same time, change light
bulbs and aim the 40 watts towards the bottom off the jar. I place the lamp
directly against the jar to attract the brine shrimp to the light. They will
gather directly above the light source. Be careful though, as this will heat
up the jar and raise the water temperature.
I bend the end of the handle of the brine shrimp net slightly, so that
when I place the netting into the Betta cup, it rests level. This allows
my to have one more hand. You can then siphon the desired amount off shrimp
you want into the net, being careful not overflow the cup. Some people like
to rinse the salt from their brine shrimp, however I don’t bother
considering it is NOT marine salt, and a little salt in the water is okay.
Even though, what the fish are getting from this is almost nil.
After feeding, I pour back in the water from the Betta cup and refill
the jar to the top with water I let stand at room temperature. I do not add
any additional salt because all the initial salt is still there. Salt does
not evaporate. Turn off the light and let the bulb cool. Turn the air back
on. After the bulb has cooled replace the Christmas tree bulb and illuminate
the jar again. Add more cysts if you desire, and start all over again! You
can periodically add small amounts of cysts at different time intervals.
This will give you a constant supply of brine shrimp and allow you to harvest
whenever desired.
![]()