
PSP 8 (page 24)
Photoshop 7 (page 25)
Photo Impact 8 (PI8) (page 26)
Note: **Please do not copy tutorials in any form. Tutorial is written & owned by C. File. They are not to be emailed out on lists or posted on websites. A link is apprectiated. Thank you!***
To make a piece of Loose Leaf paper: in PSP 8
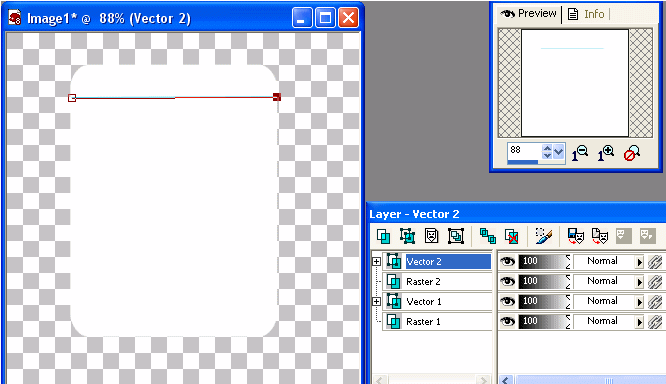
1. Start with a 400X400 New Transparent canvas.
2. Using the preset shape rounded rectangle, Color= FFFFF (white) draw a large rectangle vertically like so:
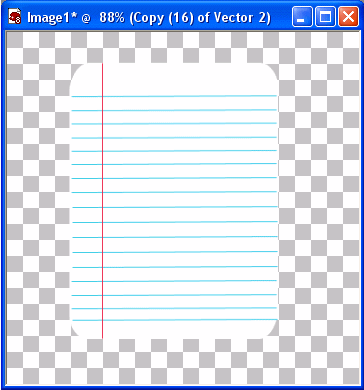
3. Using the pen tool, color = #2BC7E3 (setting:

make a straight line across the white rectangle horizontally
4. Copy this layer & move in intervals of spacing to represent the lines on a piece of looseleaf all the way down the white rectangle. Spacing about the size of a square width from the transparent background. (mine has 18 horizontal lines)

5. Add a vector layer. Still using pen tool, Change color to red ##EB1F45 to do the vertical line on the side of the paper.
6. Layers > Merge Visable so everything is now merged.
7. Change color to white. Using preset shape, make a round small circle to the left of the red line and overlapping a turquoise line.. we are now doing the loose leaf holes.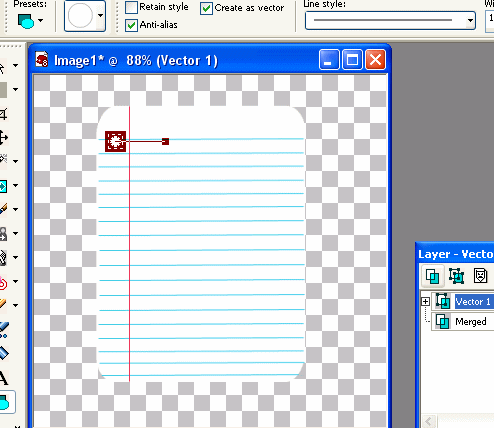
8. Convert layer to raster layer.
9. Using magic wand, click on white circle. That should add a floating selection to your layer pallette...

10. move the Floating selection between the raster1 & merged.
11. with Floating selection still reflected in your layer pallette, choose the merged layer in your layer pallette. click on the scissor which will cut the hole on the merged layer.
12. Still highlighted on the floating selection, using the mover tool, move the circle down to the bottom, and the same spacing for the top hole place the white circle for the bottom hole. again click on the merge layer of the layer pallette & click on the scissor on the tool bar.
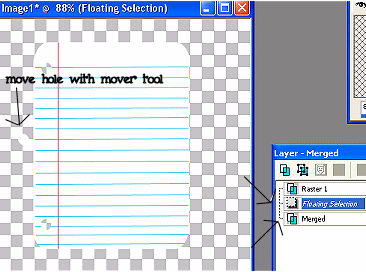
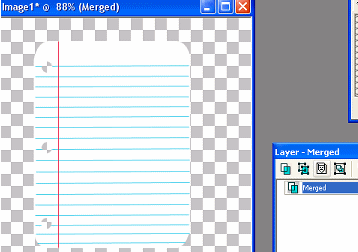
13. Now move the circle (floating selection highlighted) centering between the top & the bottom holes. Again once placed, click on the merge layer & then the scissor. now delete the raster layer & the floating selection. You should now have this:
14. Add a dropped shadow & save as a tube or .psd file.
You can also Crop it & save as a pattern in psp 8 (or even do a seamless tile by going to Effects>image effects>seamless tile & play with the tiling to get what you like.. I used 0 for vertical /horizontal & transparency) then save in psp as a pattern.
------------------------------------------------
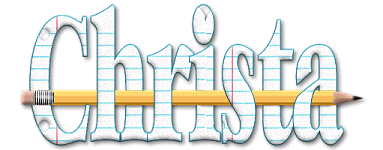
EZLoose Leaf with Pencil Tut
PSP8 (http://www.jasc.com)
Loose Leaf pattern (from above)
Yellow Pencil
Bambi Bold font (http://www.fontseek.com)
1. Start with a new 700 X 200 transparent canvas.
2. Open up LooseLeaf pattern.
3. Set forefround color to #0F6C83, background to LooseLeaf pattern
4. Using Bambi Bold Font, Creating as vector, Size 75 Stoke width 1.0 anti-alias checked as in setting below:

type name.
5. With the little boxes stretch name to be height of canvas.
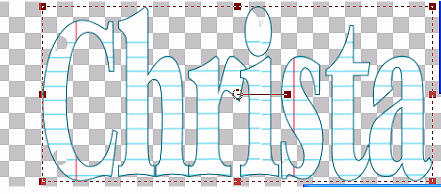
6. Go to Effects > 3D > Inner Bevel

7. Go to Layers >duplicate
8. Add Raster Layer
9. Add pencil tube so it is horizontal as reflected below:

10. Move Pencil so it is between the bottom name & the copy of name as so:

11. Using eraser set on size of about 13, & copy name (top layer) selected, start erasing the parts of the letters the pencil is intersecting alternating so it will look as if pencil is going through the letters.
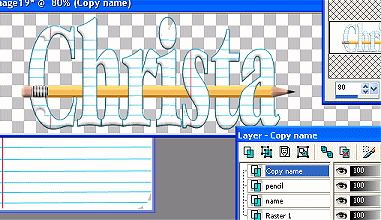
12. Duplicate the 3 layers in order twice so that you have 3 of each layer. Put them in order in your layer pallette (drag and move so the order is name, pencil, erased name, name2, pencil2, erased name2, name3, pencil3, erased name3)

13. on each of the 3 erased name layers, selecting one at a time starting at the bottom one, go to Adjust > Add remove Noise (see below) with uniform and monochrome selected.. the bottom one set at noise of 10, then go to the second named erase & set at 20. then the top erased name layer & set noise at 30.

14. Now select each of the pencil layers one at a time & go to Effects > 3D > Add drop shadow. Settings of 3 horizontal, 3 Vertical, Opacity of 51, blur of 7.25 color = black.
15. Now select each of the full name layers one at a time & go to Effects > 3D > Add drop shadow. Settings of 3 horizontal, 3 Vertical, Opacity of 51, blur of 7.25 color = black.
16. Now we will merge each of the 3 sets. In layer pallette, X the bottom 6 layers, so only one of the 3 sets is showing as shown:

17. With one of the "un X'd layers highlighted as above, go to Layers >merge Visable.
18. X the completed merged layer & un X the next set of 3 layers. Selecting a layer from the second set, Go to Layers > Merge Visable, Now X this new Merged layer, and unX the last 3 layers and select one from the bottom set & go to Layers >merge visable.

19. Un X all layers & save as a .psp file.
19a. Options: add additional tubes if you want on the layers
-------------------------------
20. Open up file in animation shop. If you wish to resize, go to Animation > Resize animation & set at 75%. If you have resized, remember you need to export each frame seperately to PSP to Adjust > Sharpen then x the image (first box answer no that pops up, and Yes to next box) and this will bring the frame back to AS.
21. Go to Animation > Animation Properties & click on opaque (color=white)
22. Leave at speed of 10, or if you want to change speed to a slower setting, Go to Edit > select all.. this will highlight all frames at once. Now go to Animation >Frame properties & set at 15.
23. Go to View >Animation. If it is the way you want it then
24. Save as a gif & you are done.
Other things to do with the Looseleaf .psd if you scrap book or school things is a simple tag by adding a child font & typing on the looseleaf, add tubes etc.
On the below tag (done in PS but same thing can be done in PSP & PI8 as well): I made the loose leaf paper added the drop shadow, and then used 5th grader Font in a slate gray to write on it & then after I did that attached the pencil we had previously made & then wrote on it the name & over the top used BaaBaaHmk font to curve the school days again in slate gray over the top.. then I merged everything, duplicated the layer, and glaussian blurred it, added noise & then added a white background.. I think it came out cute for those with little kids! Have fun!

*******Tutorial is written & owned by ChristaFile79. It cannot be copied & posted under ANY circumstances. A link to this tutorial is acceptable & appreciated. *******
