|
This
page is just a teaser so if you want more of it you have to click here
|

Updated
9-27-00
The eyes are the windows to the character soul!
I have had quite a
few people ask me - "Why don't Japanese people draw Japanese
people? I mean - Japanese people have smaller eyes - so why do
they draw them so big in anime?" Well - the answer to that is
actually REALLY SIMPLE. They realized a long while back, when
anime and manga were first beginning to develope, that the larger
the eyes and faces, the more expressive they could make the
people.
Emotions are best
shown using the face, and not just the actions. The eyes - their
shape, the size of the pupils - the forehead - the nose, and shape
of the mouth - They all play a huge role in the way you interpret
the emotional state of the character!
That is why - in
general - anime characters' eyes are abnormally large.
 Anime
eyes come in all shapes and sizes, often variying slightly
characters, based on their personality. However - in general -
most all eyes are drawn the same way. Anime
eyes come in all shapes and sizes, often variying slightly
characters, based on their personality. However - in general -
most all eyes are drawn the same way.
Anime
Eye Anotomy
Think of the eye as having three main parts.
- The
'top'
- The
'base'
- The
Pupil
The
top determines the shape of the eye, and plays one of the largest
roles. Sometimes the tops is thin, and other times it's very
thick. Often, it begins thin at the end of the eye nearest the
nose, and sort of fans out and becomes much thicker as you get to
the end. This is to give the appearance of eye lashes.
Sometimes a few individual eye lashes are drawn in at the end, and
sometimes they are not. It often depends on the character, and
your style of drawing.
The
base often begins as a horizontal line that goes along the bottom
of the pupil to show the 'base' of the eye. Sometimes it actually
connects on both ends with the top, and often, it does not.
Sometimes it ends as a horizontal line, but more often, it
continues on the outer edge of the eye, and curves up to either
meet with the lower end of the top, or stops just short of
meeting.
The size and shape of the pupil is often varied, depending on the
desired look of the character. Sometimes they are very small, and
do not actually touch the top or base of the eyes. Sometimes they
are very tall ovals and connect with both.
|

|
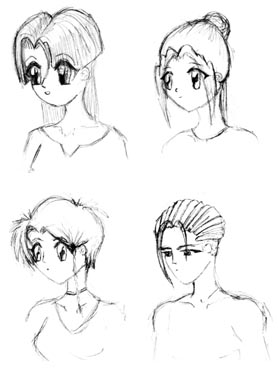
These are examples of 4 different types of eyes - each with slight
variations - and 4 character portraits to go with them. Match the
eyes with the corresponding character to the left. While the
differences in 3 of the eyes, are very small, when cobined with
the faces and hair, it helps to define the characters.
The last of the four eyes is used on a male character. However
this is not the only reason for it's drastic difference from the
other three. I based the shape of the eye on the characters
personality, and the idea that I wanted to portray with the face.

Expressions
To
express emotions on the face the eyes will change shape - and the
shape of the nose and mouth will vary as well. Here are exampels
of 4 different expressions.
Noses
As
simple as they are in anime, I still have many people ask me
questions on how to draw noses, so I'm posting a few examples
below to help you all out.
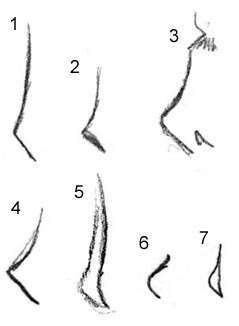 A
noses shape changes depending on the angle the face is at - a nose
will look different if the person is looking strait at you, versus
looking to the side, or at profile. A
noses shape changes depending on the angle the face is at - a nose
will look different if the person is looking strait at you, versus
looking to the side, or at profile.
Number 1 is a long slender nose (seen frequently on male
bishounen characters in shoujou manga) - it is slightly at a
3/4ths angle.
Number 2 is at more of an angle then 1, and is slightly
shorter too. It also comes out more.
Number 3 is rarely seen on the 'main character' - but
rather on big husky guys, or supporting male characters.
Number 4 is seen frequently - it sticks out quite a bit and
isn't too long. This is also a 3/4ths view of the nose.
Number 5 is sort of the front facing version of number one,
but more rounded. The side outline sort of represents the shadow -
but mostly it represents where the nose meets down with the rest
of the face. Numbers 6 and 7 are the same nose, only 6 is
at a 3/4ths angle and 7 is almost strait forward.
Mouths
Another
subject matter, that a number of people seem to have trouble with
is the mouth. One thing that people don't seem to register when
they first try to draw a mouth on a character is that you DO NOT
DRAW THE LIPS. If you ever pay attention to actual anime and manga
- you will never (or at least almost never) see any outlines lips.
On certain characters you may see a little extra color added to
show that she (or he in some cases!) is wearing lipstick - but the
lips themselves are not outlined.
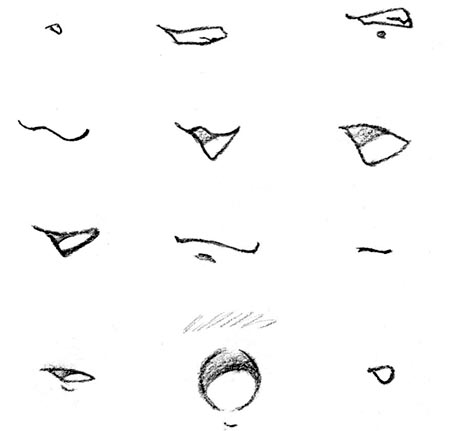
1 -The first mouth is your general, every-day closed mouth. Not too much
expression in it, but a small simple line can say a lot on the
right face, and with the right nose/eyes/eyebrows.
2 - A bit more definition to it - this is a small frown.
The line at the bottom shows that the lower lip is coming out a
bit - it is the shadow at the base of the lip and at the top of
the chin.
3 - A tiny, cute little smile. This can be adorable with
the right eyes.
4 - Nice wide-open, excited smile.
5 - Depending on the eyes and other facial expressions put
with it, this could be a smile, a large mouth going Ahhh! from
disapointment, or from shock! Experiment!
6 - A small annoyed lip curl
7 - The large, clenched angry teeth!
8 - The over-sized yelling/shocked mouth. This would fill
up the entire face from one side to the next. You see this a lot
when a character has just been shocked, or is in the process of
bitching at someone. It exagerates the emotion in the face, and
gives the words/situation for feeling.

Ears
Yes!
I do intend to cover the topic of ears! However not too throughly
^__^;;

It's
Fairly simple - just remember that on a strait forward face, and
on a 3/4ths angle face, the ear will get slimer in width - but the
height will not decrease too much.
|
|
Portrait
Every head starts
with a circle. Some people like to start with the features of the
face; the eyes, nose, mouth, and then draw in the shape around
them. I don’t suggest this at all, if making a picture of a
character.
Methods such as
those may be good for doodles and practice, but for a picture that
you intend to finalize, and especially for a picture of a
character you intend to draw more then once, it is important that
you draw the shape of the head first. This allows for you to keep
the character’s features consistent.
The circle itself
is the round part of the skull. The part on the circle where we
start to pull the face shape inwards is where the eyebrows will be
located. They are the last point where the bone points out the
most. On some characters you will bring out the cheek bones too,
but it is based on style, preference, and the intended appearance
of the character.
Notice on the
first image of the skull (the portrait view) the base of the jaw
curves inwards to a point where it then curves inwards at a much
grater rate. Compart this to the profile view. The lowest point is
the tip of the chin. The lowest part of the back jaw comes up to
the same point as that first incline ending on the portrait view.
(Now you know what it’s drawn that way!)
On this face, the
eyes are a medium size. The nose if pointed and fairly long. Even
when an anime nose is a small nose, it’s tip is still located
fairly low from the eyes. The bridge of the nose isn’t drawn
much here, but it is still there.
And remember to
leave enough space between the eyes, for another eye. If you can
fit a third eye there, you know they are spaced far enough apart.
|


|
|
|
|
3/4ths
View
Same face,
different view. Many people I have spoken with say that they have
the most trouble with the 3/4ths view of the anime face.
Unfortunetly this is the most widely used view of the face. Since
the face is usually seen at some angle, and not directly forward
or perfectly side-ways, it is nessecary to become familiar with
drawing a face at an angle.
From the main mass
of the skull (the circle) the head begins to indent where the eye
brows will be. The 3/4ths view is where the difference between
characters and styles are the most apparant. Some characters have
a highly defined jaw. This character does not. If a jaw was to be
used, instead of a direct curve coming down from the brow to the
jaw, an outward curve would begin below the base of the eye.
The point where
the jawline ends up the side of the head is where the base of the
ear is. Not all characters will have the whole jawline defined.
This is usually up to styalistic preference. I almost always draw
it, especially in 3/4ths view. Remember, though, that the top edge
of the ear is equal with the tops of the eyes. Avoid making the
ear too small.
When placing the
eyes in the 3/4ths view remember that the eye furthest from the
point of view (POV) will be the smallest. While it is
“smaller” you don’t resize the entire eye. You “squish”
the eye horizontally, so it isn’t as wide. This gives the
illusion that that eye is partially side-ways, which it would be
on this part of the head. Leave some space between the far edge of
the eye and the side of the head, and remember to leave enough
room between the eyes to avoid putting them too close together.
|


|
|
|
|
Profile
I think that a
direct profile is the most difficult view to draw a head at. The
profile is different in every character. The shape of the head and
face, and the shape and size of the nose varies frequently in
anime characters and each variation changes the way the profile
looks.
The blue guides to
the right point out a few key elements to the profile.
First, the point
at which the forehead begins to come down from the rest of the
head will meet up with the tip of the chin. On some characters the
curve for the eyes will come inside this line, on others it will
not. (On this head there is no large indent at the top of the
bridge of the nose, it is generally straight.)
This character has
a long nose. Notice at the base of the nose when it is coming out
to the top lip how it is curved. Don’t make this a sharp angle,
try to keep it smooth. The blue guides to the left of the mouth
show the basic shape and path of the lines. Notice ont he area
below the lower lip how it curves in and then out again for the
chin. Some character’s chins coming out more then this, and some
character’s chins come out less.
The eye in profile
is not very different from the eye in the other views. It is
frequently shorter horizontally, and the base of the eye should be
curved. Imagine that this line is following the top of the cheak.
So it is slanted downwards towards the front of the face slightly.
Also, when looking
forward the pupil’s front is flat. Some artists curve it
slightly. It’s a styalistic preference; you should do what you
think looks best in your mind’s eye.
|


|
|
|

In the Full Expansion
Chapter, I explain step-by-step on several diverse types of heads. I've
cut those out of the web version. Here is a compilation of several types
of heads for you to examine and compare.
This
may take a moment to load on slower connections

The three examples shown
here are certaintly not your only options by any measure. These are simply
a way of showing you how small changes in the shape can affect the kind of
character protrayed by the face. It’s easier to create the face for a
character when you have an idea in your mind about their personality. The
personality shines through in the face. This rule is especially true in
anime art. You can often just look at a character and you already have a
good idea of what their personality and traits are.

Small adjustments can be
made to a face, and it will become a completly different face. Having a
rounded out cheek in comparrison with a very flat, straight down face.
This, then in comparrison with a face with a much more rounded brow as
well as a rounded cheek. All coming from the same basic face, altered in
small ways.
The shape of the face
isn't the only thing that effects personality. The eyes and the mouth play
a very large role in the way the character is precieved.

Rule number one, No Lips.
Anime mouths are rarely, if ever drawn with the lips defined. And when
they are, it looks bad. Lips just don’t look good drawn on an anime
character. When they are added, it is in color only. Don’t outline
the lips.
When a mouth is open it is
made up of two parts. The top, and the bottom. Seems simple enough, but
it’s not always as easy as it sounds. The top lip can be drawn curved
upwards in the center or curved downwards. These mouths are almost all
designed for a 3/4ths angled face and the center curve of the mouth is
shown in that. If the face is tilted sideways, the two sides of the face
are not equal. The side furthest from the POV is shorter horizontally.
This applies to the mouth too.
The second and third
mouths are the general teeth clenched in anger kind of mouths. Notice how
in these the bottom lip curves up slightly in the center while in all the
other mouths the bottom lip always curves down. The upper curve of this
one line is what defines this feature. Also notice how the line defining
the teeth is not highly detailed, nor does it continue all the way across
the teeth. In cases such as these, less is better. Too much detail can
crowd the small mouth and make it look messy.

Above three sets of eyes
are seen. They are all the Same Eye, just with three differenet
expressions. Anime eyes change drastically depending on what emotion is
being expressed.
- Over
Joyed
- Pupils
are larger
- Entire
eye seems larger
- Eye
brows are upward curved, but not too high above the eye
- Sad
- Upper
Eye lid is lower
- Pupils
are fiarly large. The top is cut off by the upper eye-lid
- Eye
brows are low and slanted down, outwards.
- Angry
- Pupils
are small
- Lower
eye lid is higher up, cutting off the bottom of the pupil
- Upper
eye lid is lower, cutting off a large portion of the top of the
pupil
- Eye
brows are fuller and are drastically slanted down, inwards.
- Shocked/Surprised
- Eye
brows are very high up and are arked upwards.
- Top
eye lid is very high up.
- Pupil
is average size, but the whole pupil is visible.
- Lower
eye lid is slightly lower.
Extra
Notes and Tips

When the character blinks, the eyes will close down and the eye lashes
will be shown in the same location that the base of the eyes currently
are, when open. When you blink, the upper eye-lid comes down much more
then the lower lid comes up.

The eyes of a villian are commonly very small and frequently have a sharp
angle. When you draw the top line, draw the bottom line almost directly
below it.

No matter what style the eye is, when in profile the bottom eye-lid line
will be tilted to follow the curve of the cheek. And the front side of the
pupil will be semi-straight to straight, when looking forward.

Remember when you are drawing the eyes on a 3/4ths angled face that the
eye furthest from the Point of View is much smaller horizontally then the
other eye. This includes the pupil.
|


