The above banners are put on my page by Angelfire. I know nothing about these businesses
BUILDING THE KARA HUMMER

Click the picture above to see a movie
with the kara in action.
Before we get started, I want to say that the Kara Hummer, built
exactly to plan as designed is a fine boat that is inexpensive and easily built.
I made some modifications that I like and after using the boats for only two
seasons, I think I would probably build the boats basically the same way I did
build them, but my experience is limited. Be warned that if you build the boats
like I did, the cost will be far higher and it will take much longer than if
they are built exactly to plan. It took about 80 hours, not including the
steering for the electric boat, per boat, to build these boats. I know that two
men can build one boat, built exactly to plan, in a
weekend.
I've built two layout boats for duck
hunting. These are the Kara Hummers, 1 man boats designed by Rob Leonard who is
a wildlife biologist in Missouri. They are nice little boats. Mine are a bit
different, as they are sealed completely with epoxy. If I were to build them
with the 1/4 plywood the design calls for and then sealed them, they would be
very heavy. So what I did was build the frame with very lightweight spruce. I
substituted 1x6 for the 2x6 lumber called for in the plans on the 44 inch ribs,
and used a stitch and glue sealing technique to strengthen the frame. I used
very light 4mm Okoume, African mahogany, that weighs 12 lbs a sheet and 6oz
biaxial fibreglass cloth with kevlar at critical areas to strengthen the bottom
plywood. With the stitch and glue sealing technique (note: this isn't a stitch
and glue boat, I just borrowed the epoxy fillets from the stitch and glue
technique) the frame is much stronger than the mechanical fastener held frame in
the original design. After painting and carpet, fully outfitted the first boat
which had certain areas of the deck reinforced with 6.5 oz biaxial fibreglass
cloth covered with a tight weave 3.5 oz cloth weighed in at around 90 lbs. Boat
2 was built without the fibreglass reinforcement for the deck (the bottom was
fibreglassed in the same manner as the first) and I tried to use less
microballon putty for sealing. It came in at about 80 lbs fully
outfitted.
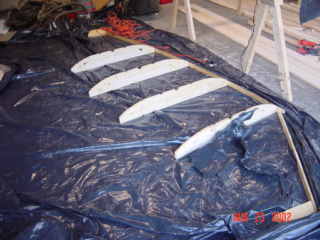
The Frame.
The ribs are cut from 1x6 spruce. The gunnles are 1x2x14' spruce.
Contrary to the plans, I angled the bottom gunnle cut 33 degrees to allow a
tight fit with the bottom plywood. I tried to get the gunnles to bend dry, after
bending them with weights at the stress points overnight. You see how well that
worked. I had to recut them, and get them wet to get them to bend. The frame was
allowed to dry for 2 weeks after this before the boat was sealed with epoxy. I
used a cargo strap to get them to bend. This worked well.
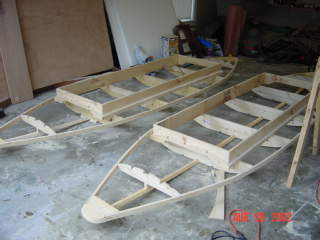
I
built two boat frames at once. I found that there wasn't a whole lot more work
to build two than to build one, because most of the work is measuring and
drawing everything out. Once you've cut one rib, you've got a template for the
others and the other 3 are as easy to cut as just one. Once the plywood starts
to go on, the real time consuming work begins.
Bottom
plywood is on. I coated the frame and the inner plywood with epoxy, using the
epoxy to glue the plywood to the frame.
I
wanted to seal the inside of the boat. To do that, you've got to be very
carefull. If any little cracks let water get in between the frame and the
plywood, that's were rot will start. I took a note from the stitch and glue
style boat builders and sealed the inside with epoxy fillets at all joints and
fibreglass strips. The fillets are made of an epoxy/fumed silica/phenolic
microballoon putty. This stuff handles better than bondo, and its more
waterproof and will bond fibreglass. Before the fillets cured, I pressed 2 inch
fibreglass strips into them and then wet them out with unthickended epoxy. If
you've built a Kara, you see how the keel is cut at an angle. I did this to make
it easier to cover it with fibreglass, and the fibreglass doesn't want to hold
over a sharp angle. After making a few hunts with the boat, I was really glad I
did this interior sealing. Those boats get very wet and water sits in them all
weekend. However, only time (years) will tell whether or not it was a good idea
to do the interior sealing. I know many boat builders will argue it was not a
good idea.

I
sealed the whole end up with putty and fibreglass also. This looked like a prime
place for water to sneak in and set up rot.
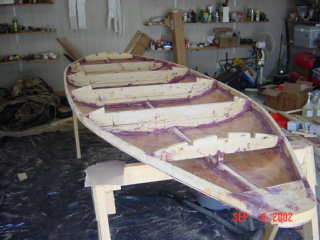
You
see that the cockpit wasn't installed until after the inside was sealed. It
would have been very difficult to do the inner sealing with it on. The cockpit
was epoxy glued together and its components sealed. The cockpit wasn't joined
with the dimensional lumber as specified in the plans, but with epoxy fillets
and fibreglass. After painting, this looked very slick. I used a couple of 1x1
stringers in addition to the main deck support and I'm glad I did. I don't think
that upper deck would have held under my weight otherwise with the 4mm Okoume I
used, even though its reinforced with 6 oz biaxial cloth and 3.5 oz woven cloth
on top of that on the first boat. I omitted this in boat 2 and it seems very
stable and is 10 lbs lighter. I weigh 225 lbs. You might also notice in the
picture to the left above that there are little semicircles cut in the bottom of
the ribs. This allows for drainage of water that gets inside the boat. I later
put a bilge pump in the back just to the rear of the cockpit floor.
Now
she's starting to take shape, but a lot of the work is still left.
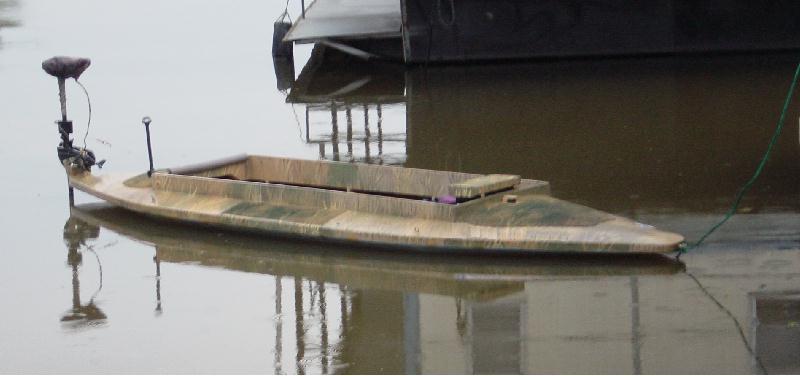
This
is something like the way the ducks will see her.

I laminated
1x6 lumber to form the transom. I screwed the back piece on with 5x 3"
galvanized wood screws to the rear nose piece. I used fibreglass and epoxy putty
to shape it and weld it to the hull. I don't think it could be separated from
the hull with blunt force, without destroying the hull itself. The boat we're
looking at here is powered with a 30# thrust trolling motor. Boat 2 got a bigger
stronger trasom as it is powered with a 5 hp Mudbuddy. The transom for the
Mudbuddy is taller, and has a wider fillet connecting it to the top deck of the
boat, and is covered with Kevlar, but is otherwise built the same way. After one
season, the transoms have held up well.

Here's what
the bottom looks like with the runners on. The entire bottom was reinforced with
6oz biaxial fibreglass cloth. At the bow running up to the 40 inch ribs is a
strip of 3 oz kevlar cloth. Over all is 3.5 oz tight weave fibreglass. I had a
lot of bubbles that had to be patched and reglassed. On boat 2, I vacuum bagged
the bottom after applying the fibreglass and this worked well. I had only one or
two spots that had to be sanded and filled. The runners are made of 3/4 x 3/4
yellow pine, and are sealed to the hull with epoxy fillets and fibreglass.
(Glen-l and others warn against using red oak in a boat. You can't get white
oak. Yellow pine is hard as nails and twice as strong, highly resinous and rot
resistant.) I would have omitted them, but Rob (the designer) says they're
needed to make the boat run straight when paddling or poleing. I'm glad I put
them on because not only are the boats easy to paddle and run straight, but I'm
able to tow them behind my bayboat one behind the other at 20mph, and they run
staight and true and tow very well.


I
worried about the way the cockpit deck was supported with blue board insulation
in the plans. Not that I'm worried about the strength, I know that's a very
sturdy way to support the deck. But the problem is that moisture is going to
collect around that foam, and eventually, you're going to get rot. I'll bet that
since this is at the bottom of the boat where all the water goes, that this is
the first place these boats will rot out. I have a better plan I think. I built
my deck on 8 1x1 spruce joists run between each rib. It accounted for about 4
hrs additional work. It probably weighs about 8 extra pounds. The joists are
supported on the edge of 1/2 inch strips of 4mm plywood that screwed, epoxy
glued, and fibreglassed onto the ribs. The top of the strips are placed exactly
1 inch below the edge of the rib, so the joists are flush with the edge. There
are 12 plywood strips, each 12 x 1/2 inches, two on each face of the 44 inch
ribs and two on the inner faces of the 40 inch ribs. There�s a space in the
middle of each rib between two strips, because there's not enough room to run
them over the keel. The joists were cut to wedge between the ribs snuggly, and
were sealed with two coats of epoxy before they were glued in place with epoxy
puty. The joists were then sanded perfectly even with the tops of the ribs, and
then then resealed. Then, the plywood for the cockpit deck was bonded to the
joists with epoxy. I used vacuum to do this. I had two vacuum cleaners attached
to the space under the joists, and taped up the space between the deck and the
bottom of the boat with duct tape, then turned on the vacuum. I don't know if
you noticed, but I cut small semicircles at the bottom of the ribs, one on
either side of the keel to allow water to drain form the bow to the stern. The
vacuum was transmitted through these to each compartment, and sucked the deck
plywood down solid and evenly onto the joists. The deck is now one solid piece.
It doesn't flex or creak when I walk on it. So far, this has been a very sturdy
floor and I'm able to drain the boat with the bilge pump very well while out in
the field. However, if I had it to do over again I might just run sealed 1x4
slats over the ribs for the floor and omit the joist. This would weigh about 5
or 10 pounds more I suspect, but the floor would drain better and it be easier
to build.
You see the two pipes sticking out of the top deck? Thats 1/2
PVC electical conduit for a cable steering system for a trolling motor. They're
sanded smooth with the deck later on.
I
added some green pigment to the final epoxy coat. I saw where another guy did
that who had built a kara. I don't know that it does anything but helps keep you
from missing too many spots. I got some indoor/outdoor carpet from Lowe's, light
and cheap with a "marine" backing. I glued that on the areas that can get foot
and or paw traffic, otherwise you'd be repainting those areas after each hunt.

Here are
the two boats tied up down at our duck lease in Terrebonne Parish. The boat
without the trolling motor later got a 5 hp Mudbuddy.


I made
a cable steering system for a 30# Minnkota Endura trolling motor that I was able
to pick up brand new off the internet for about $95.00. What I did was remove
the handle and attached switching mechanism off the trolling motor (easy. the
whole thing is modular) and move it into the cockpit connecting it to the
trolling motor via four wires. I made a little box to hold it and this box is
attached to a pie shaped wedge to which cables are attached which steer the
trolling motor via a pulley that clamps on the trolling motor shaft. You can see
initially I made a grooved pulley. This made a tremendous racket when steering
the motor due to the cables rubbing on it. I later made a simple cylinder pulley
that works perfectly. I'm very pleased with the way this arrangement has worked out. The electric boat has some limitations, but it's my favorite of the two boats.
The trolling motor pushes the boat at a top speed of 4.5 mph! Handling is excellent. I use an EverStart 110 amp hour (supposedly 160 amp hour reserve) deep cycle marine trolling battery, purchased from Wal-Mart. My range with this trolling motor and battery is about 2 miles (4 miles round trip) or 1 hour running time, running at top speed. That draws the battery down to 40%, which is about as far as it ought to go to maintain long life of the battery.
The
problem with the trolling motor is the thick vegetation we have in the duck ponds in the freshwater marsh in South Louisiana. It
has trouble getting through that. I have a fishing camp in the salt marsh and use now use the electric boat for some duck hunting there. There's no underwater vegeatation in these ponds, and this electric setup is just the thing for that area. It's a lot more comfortable, simpler, and quieter to operate that the Mudbuddy boat. Really just a pleasure to be out in it. You can get right up to all sorts of birds, aligators, turtles, otters, etc., before they see you. It's fun to run around in it even in the off season. More steering system details here.
With
the Mudbuddy, my top speed was 6.9 mph, and I was able to get into areas where
there was no water, just mud. The motor gets trough the thick vegetation with
minimal difficulty. No problem running over short mudflats, the length of the boat or a little more, and it will even run the boat through mats of water hyacinths. I mean really thick ones, too, as long as you can weave into some seams between the mats. Eventually with the water hyancinths, though, if they're really "chock-a-block" for more than a 10 yrds, they're impenetrable with any craft I know of, including the Mudbuddy powered Kara, except for maybe a auto engine powered mudboat.
The Mudbuddy cost about $1400, the trolling motor and battery came in at about $150. If you're running 2 miles or less and don't have thick underwater grass, go with the trolling motor, it's a just a no brainer all the way around.
Here's a view from the
cockpit while hunting on a beautiful day in early December:

Click the picture to see a movie of that scene.

Legal Disclaimer: This website
is intended for entertainment purposes only. The author is not a professional
shipwright or naval architect. Many of the methods used building these boats are
untested. It is not recommended that anyone follow the example on this website
to construct a boat or anything else for that matter. If you do use any of these
methods you, your family, friends, and anyone else you can think of could be
hurt, drowned, maimed, or otherwise killed due to the faulty
construction.
EMAIL
Copyright 2003, Edward Askew. All rights reserved.