
|
Papercraft Diorama (Mega Man vs. Big Snakey)
My recent Castlevania: The Adventure papercraft diorama came out well, so, I was eager to get started on another one. This time I selected a scene from the Snake Man stage in Capcom's 1992 Mega Man 3 Gameboy video game (original Japanese title: Rokku Man Wa-rudo 3, which translates to Rock Man World 3 in English--Rock Man is Mega Man's original name in Japan, if you didn't already know).
 And, for comparison purposes, this is what that room looks like in the original 1990 NES version. I like how the Gameboy remix changed the background to a jungle, as that setting is more appropriate for serpents.  Once again, I took separate screenshots of the background tiles and sprite layers, using an emulator, and then further separated and edited the individual graphical components utilizing various art programs (Microsoft Paint, IrfanView, and GIMP). I also doubled the resolution of everything (i.e., anything that was 16 pixels tall on the game screen, is 32 pixels tall in my diorama). This is the final PNG sheet, containing all the graphics that I needed, or felt I might need, to construct my papercraft diorama (feel free to save/print it and use it yourself if you like):  I'm not sure what went awry, as I made this sheet exactly the same way that I did the previous Castlevania: The Adventure one, because I wanted the two displays to be the same size, but the dimensions of this Mega Man 3 one turned out a bit smaller for some reason. Maybe Microsoft Paint, which is what I used to open the image file and print it, automatically resizes things to fit on a 9" x 11" piece of paper? Oh well, I can't maintain a consistent scale with the normal figures that I make, so, I guess that it should come as no surprise that I'm already following suit with papercraft dioramas as well. Observant readers may notice that I squeezed some more Castlevania: The Adventure foliage graphics in there too, so that I could glue them onto the top and side areas that I substituted newsprint for on that model. The crazy thing is that those elements did come out exactly the size that I wanted them to be (I took my measurements directly off of the Castlevania diorama and converted those values into pixels, that must have been what made the difference). Anyway, here's a look at the construction process for this piece:  Shoot, I forgot to bring snowshoes and water--this project is already doomed! As Big Snakey (don't groan, that's the robotic serpent's official name) is the most important, and complex, aspect of the diorama, that's what I elected to begin with (like many things in life, things go more smoothly if you tackle the hardest part first). The first thing I did was construct the discs that make up the length of the serpent's body. This was accomplished by wrapping a 7.0 cm x 20.0 cm strip of newsprint around a marker cap, glueing the scale-pattern game graphics around that, and sealing the ends with cardboard circles. They were pretty easy to make, but tedious, as I had to do so many.  Here's the ten finished discs (the final two neck segments, underneath the head, require a slightly different design, which is why I left them for later) and the pattern for the box-like elbow joint in the snake's anatomy. I made said box out of 3-ply newsprint, instead of cardboard, because I wanted the finished neck/head to be as light as possible, as it will have to support its own weight without any internal support.  This is the lower length of the snake fully assembled. It was a little bit tricky to get the eight undulating discs lined up and glued properly.  Here's the top portion of Big Snakey's head, without the eyes and other embellishments attached. I meant to take a picture of the pattern for this, but, I got so involved with what I was doing that I completely forgot about that until it was too late.  Big Snakey fully assembled, except for the lower jaw, which I hadn't made yet at this point (it was getting late, so, I decided that was enough work for one day).  Test shot on the jungle background. Things are looking good so far!  Here are the ladder and blocks/pipes, from up in the lefthand corner, in various states of completion. The blocks and cylinder are constructed exactly like the components of Big Snakey's body, just on a smaller scale. The ladder was the easiest thing to make, because all I had to do was glue four pieces of cardboard together, to achieve the proper thickness, and apply the game graphics.  Pictured are all the top left elements glued together into one continuous piece and the pattern for the small pipe segment that goes down in the right-hand bottom corner.  Here's the teensy Mega Man sprite figure. I actually glued two of him onto cardboard, cut out one, and then removed the head, underwear, and boots off the other copy and glued them on top of the first one to give him a little bit of depth.  Capcom USA rejected my proposal for a new, sexier background (Snake Man was totally for it, but since Keiji Inafune left the company, nobody at Capcom gives a damn what Snake Man thinks about anything).  Okay, here's the real test shot. I dare say things are nearly perfect at this stage of the proceedings.  I chose to break the background up into several different layers in order to convey depth to the jungle motif. Cutting all of those little holes between the vines and trunks was not fun at all--it took a very long time to do. I also briefly considered modeling 3-dimensional tree trunks and vines instead, but, ultimately decided to keep them as flat 2D planes.  The finished base/background--all I needed to do now was add Big Snakey, Mega Man, and the platforms/ladder up in the lefthand corner. Big Snakey I just glued into place, by its two bottom-most discs, but Mega Man and the platforms/ladder were trickier, as they're floating elements, so I mounted them on bendable wire. If you're wondering, I decided not to do any projectiles because that would involve even more wire/clutter, which I felt would detract from the overall look. If I had made the diorama shallower, and inside a box-shaped structure, I'd have been more inclined to do an exchange of bullets, as it's a lot easier to hide how floating objects are mounted if the display is completely enclosed on the sides and doesn't have much depth. Here's the finished product: 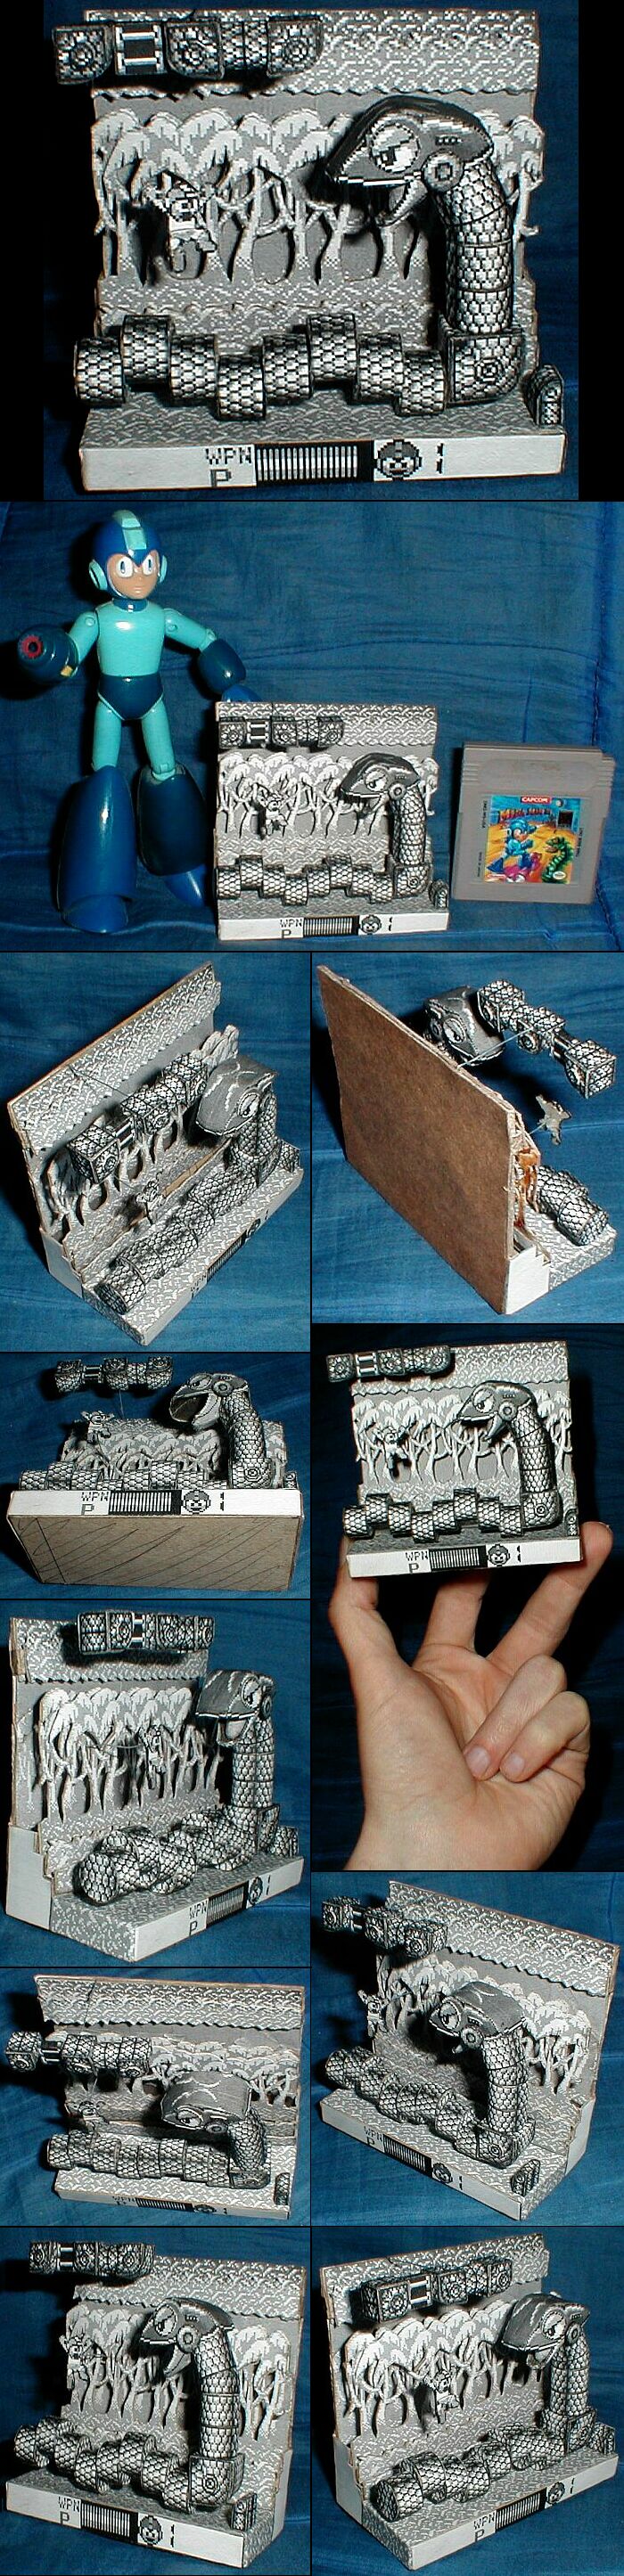
 Materials:
Dimensions:
Time:
« Return to my Capcom Video Game Fan Art Gallery Index
|

