![]()
We breathe through the harmonica.
Our breath gives life to the music,
Hidden,
Within it.
Without eyes or fingers
we search and probe its
Mysteries
With our mind and tongue,
Our determination,
Our heart.
This reference will also not teach you how to play the blues in 20 minutes. That's not possible either. How long does it take to learn the diatonic harp and to play the blues? Of course that depends on you, your musical background, your natural aptitude, and your goals. I've seen the number 2000 hours cited as how much time is required to be reasonably proficient at blues harp playing, and that seems to me to be as good a number as any. There are lots of ways to get your 2000 hours--at an hour a day every single day that's about 5½ years. At an hour every normal work day, that's about 9 years. If you practice about 6 hours a day for about a year, that's another way to get there. You want to play jazz? That'll take longer. There are more playing techniques required, and more music theory and musical knowledge is needed. A lot more. You want to play classical? See jazz. Also, the notes on the diatonic don't all have the same timbre, or musical color. A lot of practice can reduce the differences among the notes, but I have not heard anyone who has eliminated them. In classical music this is a severe handicap. In blues and jazz, it is much less a problem, and talented players can even take advantage of these timbral difference to add interest to the music. This reference focuses mostly on the blues, though you can take the techniques and theory anywhere you want. The blues is a good foundation for country, rock, and much pop music, so even if the blues is not your focus it is still good as a basis from which to build. You want to get there as soon as you can? Keep the harp in your mouth.
On the other hand, the harmonica does allow some things to be played quickly and easily! You don't have to work hard for a long time to get something to sound good! That's great news, because the more progress you hear in your playing, the less frustrating it is to learn the instrument. But don't worry, there are plenty of things about the harp to frustrate you! Most people don't know good harp playing from poor harp playing, which is good news when you're beginning, but frustrating when you get better! You have to keep in mind that the music is the thing; no one but another harp player cares how difficult it is to make the music, though music that sounds fast and difficult and complex can be dazzling. But no one but another player cares how hard it is to hit that 2 draw half step bent note, or the 1 overblow. The music is the thing.
Clearly, there's a lot more to the simple diatonic harmonica that meets the eye! This reference attempts to address the spectrum of information on the diatonic harmonica, from the simple and obvious to the complex and difficult. There are a lot of books out there that try to teach you how to play the harmonica in a step by step fashion. (See the Recommended Instruction Material.) This reference is not one of them, though I hope it makes a good reference and supplement for any course of instruction on the diatonic harp.
One of the most difficult aspects of playing music on the harmonica is that you can't see what you're doing, and no one can really show you! You don't have a keyboard to look at, or strings to press at a place you can see... it's all in your mind's eye and mind's ear. This reference includes many pictures, diagrams, and tables to try to help you get the harp into your mind. You play music with your technique, your mind, your ear, and your soul. You can play great music with good technique, a good ear, and a soul with something to say. You can play better music with great technique, a good ear, an expressive soul, and a knowledgeable mind. To improve your technique, practice your instrument. To improve your ear, listen. To improve you soul, learn. To improve your mind, study. To improve your music, improve your technique, your ear, your mind, and your soul.


The following table presents some basic definitions used when discussion
the harmonica and harmonica play. Many less basic terms are discussed
in the section about diatonic harmonica techniques below.
|
|
|
| Bend | A lowering of the naturally played pitch of a reed caused by playing techniques. Draw notes can be bent on holes 1-6 and blow notes can be bent on holes 7-10. |
| Blow | Notes played by exhaling. The blow notes are created by the upper reeds (numbers up) where the reeds open inside the harp. |
| Chamber | The area or cell in the comb into which the reeds vibrate. The player breathes through the outer holes of the chambers to play the harmonica. See figure above. |
| Chromatic | A tuning that uses all 12 notes used in Western music. Chromatic harmonicas have a slide activated by a button that alter the reed that is sounded to enable fully chromatic play. Often refers to the type of harmonica, as opposed to a diatonic harp. |
| Closing Bend | A pitch lowering bend where the reed initially closes into its slot. |
| Comb | The body of a harp upon which the reed plates are attached. The comb has the holes or chambers into which you play. Combs are made of wood, plastic, or metal. See picture above. |
| Covers | The outer covers of the harmonica that attach to the comb. |
| Cup | The seal formed between the hands and the harmonica or mic. |
| Diatonic | A tuning that uses only the 8 notes from a major or minor scale. This is the tuning for normal 10-hole "short" harmonicas, also called diatonic harps. Often used to refer to the harmonica itself, as opposed to a chromatic harmonica. |
| Discrete Comb | A diatonic harmonica comb with a separate chamber for each reed. |
| Draw | Notes played by inhaling. The draw notes are created by the lower reeds (numbers up) where the reeds open outside the harp. |
| Gap | The space between a reed and its slot in the reedplate. See picture above. |
| Embouchure | The method of applying the lips and tongue to the harmonica. |
| Harp | Harmonica. Seems to originate from the early term "French Harp". Also called "Short Harp" and "Mouth Harp", as well as "Mouth Organ", "Tin Sandwitch", and "Mississippi Saxaphone". |
| Opening Bend | A pitch raising bend where the reed initially opens away from its slot. |
| Overblow | An advanced type of bend that plays the opposite reed in an opening rather than closing fashion. Overblows raise the pitch of the natural note, whereas normal bends lower the pitch. Overblows are available on holes 1-6 and overdraws are available on holes 7-10. |
| Position | Relates to the starting place (e.g. hole number) and manner (e.g. draw or blow) in which the root note of the scale is played. The natural notes of the harmonica when played in different positions yield characteristic modes. |
| Reed | A thin rectangular metal strip (normally brass) attached to a mounting plate that is activated by the players breath to spring back and forth through its slot, which chops the airstream and produces the harmonica's sound. See picture above. |
| Reed plate | The mounting plate for the harmonica reeds. Normally brass. See picture above. |
| Slot | A rectangular hole in the reed plate just slightly larger than its reed. The reed vibrates through its slot to produce the harmonica sound. See picture above. |
| Tab | Short for tablature. A shortcut notation that indicates how to play a note on the harmonica. This is different from standard musical notation, which indicates what note to play including its relative duration. |
![]()
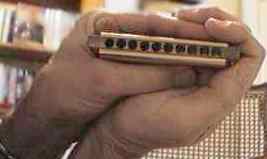
Place the harp between your thumb and index finger on your left hand with the numbers up, low notes on the left. (Left handed players may want to reverse things, but I'd recommend trying it this way if you can.) Your fingers should be toward the back of the harp so they don't interfere with your mouth/lips. Line up the rest of the fingers on your left hand with your index finger.
Okay, saying it another way, take your left hand and hold all your fingers straight and together. Drop your thumb underneath. Put the harmonica between your thumb and index finger, holes facing you (duh!).
Now, the object of your right hand is to get a good air-tight seal at the back of your harp by cupping and sealing with your left hand.
Open your right hand fingers up and together, thumb out and pointing toward your face. Now bend your hand back at the wrist, tucking your elbow in and keeping your arm vertical. Bring the palm of your left and right hands together.
Remember, you are trying to make a tight cup at the back of the harp. You open and close the cup while you play for "wah" effects, and--an advanced technique--for increased volume using hand resonance.
Hand sizes vary a lot, so I can't tell you exactly how to position everything. But I think it's safe to say the index finger on your right hand should be able to curl up over the end of the harp. You can play with the fingers of your right hand either open and straight out, or curled up around your left hand and the harp.

There are a zillion different diatonic harp models to choose from, some of which are shown above. So how do you decide which to get? There are two basic classes of diatonic harmonica: ones that basically work okay, and ones that don't. Here's the main thing--look for harp models that come in all keys, and not just one or two (typically C, or C and G).
Cost is not the determining factor, but expect to pay from $15 to $35 at a store, or from $10-$20 mail order, plus shipping and handling. This is just a rule-of-thumb range.. the point is, you usually won't get a good harp for $5.00, and you don't need to pay $50. Pro's play everything from Huang's that can be had for $6.00 mail order to custom Filisko models that cost about $200 and require a year wait. Click here for price comparisons. The most popular models used by pro's are:
The purpose of the comb is to hold the reed plates and direct the air over the reeds, The most important characteristics are stability geometric integrity--in other words, they need to be able to be manufactured accurately so that there are minimal air leaks between the comb and the reed plates. Plastic works fine for this. So does metal. Wood is more iffy in that there is much moisture involved in breathing through the harp, and wood can swell, crack or split. That aside, the wood comb Marine Band is the most popular harmonica out there, and often chosen for that classic Chicago Blues sound. The Marine Band has slots in its covers, which contributes to its characteristic sound. Probably many people attribute the sound to the wood rather than the design of the covers. Plastic body harps with Marine Band reed plates and covers also exhibit the same characteristic sound--but are only available by harmonica customizers. The Hohner Big River harp has slots in the covers similar to but smaller than those in the Marine Band.
One of the main factors that determine whether a harmonica's tone is characterized as warm or bright is the tuning used. Equal temperament tunings, such as used on Lee Oskar harps, are typically described as brighter sounding than more justified tunings such as used on most Hohner harps.
I recommend starting with a plastic body harp. Wood combs can swell and be rough on the lips, and tend to be less air tight and more difficult to play than plastic or metal comb harps. Here are my top 3 recommendations, in no particular order:
Also remember, all harps can be (are!) less-than-perfect out of the box, and all will sometimes break reeds (where they go flat), especially for beginners learning bends, or more advanced players learning overblows. Many people find that Lee Oskars last longer than just about any other model, and I've personally never had one go bad. Many people prefer the sound of Hohner harmonicas, however, so you'll have to figure it out for yourself! In my opinion, the better the player the less difference there is in the sound of the model of the harp. I don't know anyone who can listen to a CD and accurately tell you what model harp is being played based on its sound.
1) Pucker - The lips are pursed and pushed out, and the harp is positioned deep back into the mouth (but not are far back as for tongue blocking or U-blocking. See below). The air stream is directed through the pucker to one hole. (Note: This is as described in many beginning harp books, ala John Gindick's. In my opinion, the pucker does not direct the air stream through the hole so much as the deep position of the harp in the mouth brings the lips into contact with the side holes not to be played.)
2) Lip Block - A variant of pucker. Tilt the harp up at the back about 30-45 degrees, open your mouth pretty wide, enough to cover 3 holes, with your upper lip about 1/2 to 2/3 of the way over the top cover. Let the harp nestle into your lower lip. What happens is that quite naturally, without really trying and without forcing it, the lower lip blocks the 2 side holes and lets the center hole sound cleanly. The open mouth improves resonance, which helps in getting bends correctly, and improves tone. The harp needs to be well in your mouth... Don't be shy! You can't just touch it with puckered lips and make it work right.
Note: I believe that for experienced players the pucker and lip block evolve so as to become nearly indistinguishable. In my opinion, it is easier to reach this "pucker/block" embouchure starting with the lip block than with the "pucker" mental image.
3) Tongue Block - The mouth is opened to cover 3 or more holes, and the tongue blocks the holes that are not intended to sound. Must be used for octave and split interval play . Facilitates various effects such as "slaps" and "flutters". The tongue normally blocks the holes on the left and leaves a single note on the right unblocked to sound. The tongue can also block holes on the right leaving a single note on the left to play.
4) U-block - A variant of the Tongue Block where the tongue is (normally) rolled into a "U" shape, though the tightness of the curve varies a lot from player to player. The tip of the tongue is placed just beneath the hole to be played or even down onto the lower cover. The mouth is open to cover about 3 holes, and the tongue curves up, or is pushed up to block the left and right holes.
All bends and overblows/draws are available using any of these embouchures. There is no clear evidence of which I am aware that any embouchure allows faster or cleaner play than any other. The consensus best approach is to learn them all and use the ones you like.
Note: The tongue block is the only embouchure that offers split intervals and certain "slap" effects. (U-block techniques easily extend to become essentially tongue block techniques for blocking multiple holes.) In my opinion, for most people if only one embouchure were to be used the tongue block would offer the most versatility. However, as mentioned above, there is no need to stick to only one embouchure, and it's best to learn as many as possible.
Also note: It is possible to "pucker/block" out of either corner of the mouth, and it is possible to lip block on either side of a single hole to be played. These modifications to the "standard" embouchures can add speed and accuracy since less harp/head movement is required to jump to a non-contiguous note. For the pucker/block, the harp is "twisted" from side to side to bring either corner of the mouth into play. For the tongue block, the tongue is moved left or right to cover/expose the proper notes. For U-blocking, the tongue can be moved from side to side to select individual notes with little or no movement of the harp relative to the mouth.
There are several important considerations for good tab notation conventions:
| Symbol | Description | Meaning |
Here is an example of some tab.
Listen to my version in Real Audio.
verse:
Look at me,
~4 3 2'...
I'm as helpless as a kitten up a tree,
1 2> 2" 5>.. 5> 6> 5> 4.. 3
2 2>...
And I feel like I'm clinging to a cloud;
1> 1 2> 2 3
4 4 4 4' 4..
I can't un-der-stand, I get misty just holding your hand. (repeat for
2nd)
4> 3 4> 4 2
3" 3 4> 2> 2> 2' 2
3" 2
Bridge:
You can say that you're leading me on
2 3" 3
4 5> 5
5 5 5...
But it's just what I want you to do.
5> 5 ~6 6> 4
5> 5> 6> 5>
Don't you notice how hopelessly I'm lost,
6> 6 7
8 8> 9>' 9>' 9>' 8> 9>'...
That's why I'm foll-ow-ing you. (DS for 3rd verse)
9>' 9>' 8> 10>" 9>' 8> 8 (fill
for turnaround)
Just wanted to add a couple comments about Jerry Portnoy's rendition. I heard him do it at SPAH, and--despite not being that fond of the song before hand--I was blown away by how great a job that Jerry did. He was so attentive to the details.. rhythmic, pitch--especially on the embarrassingly exposed intermediate bends (3 draw whole step (3") and 2 draw half step (2') bend), and tone (see note with pitch). It's a piece where "the slow" is definitely in evidence, less is more. His tone on the bends was just killer.. very horn like I thought. It's great practice for those intermediate bends because 1)the melody is so well known, you're familiar with what the note must sound like, and 2)the bends are right out there on important sustained notes.. you've got to get them clean and strong and pure. There is also some good work on the top end. The 9 blow bend (9>') is the key note of the melody on the bridge.. you have it hit it without ever getting the unbent 9 blow.. same with the 10 blow whole step bend (10>").. but you go from 9>' to and from 8>, so you've got to keep hitting the 9>' plain, without bending into or out of it.
The discontinuous line of hole numbers is shown to emphasize the point that the note relationships invert at hole 7. That is, on holes 1-6 the blow notes are lower than the draw notes--but on holes 7-10 the draw notes are lower than the blow notes.
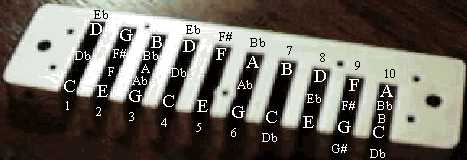
C Diatonic Note Layout
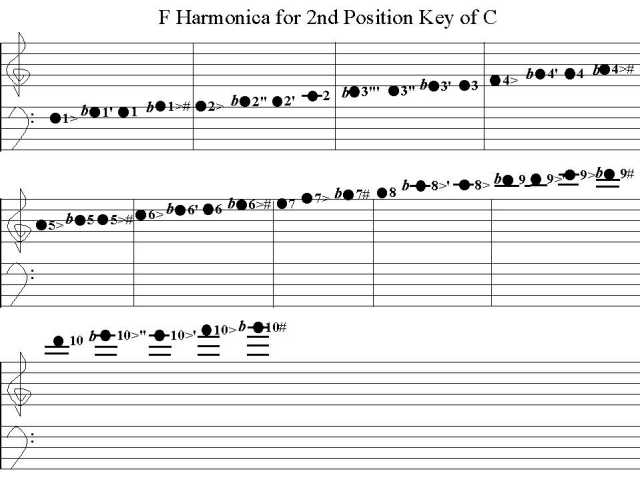
Most players who advance beyond the beginner level play in 2nd position 80%-95% of the time. (Playing in 2nd position means the tonic note is the 2 draw, which is a 5th higher than the key of the harmonica.) So, to think in the generic key of C when playing in 2nd position, you use the key of F harmonica. Here is the note layout of a key of F harmonica.
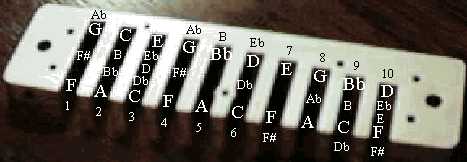
F Diatonic Note Layout
Another nice thing to see explicitly, instead of digging it out of other
charts, is how to play the same note at different places. The range of
a 10 hole diatonic is 3 octaves, so I've divided the table into Low, Mid,
and Hi to correspond to these octaves.
|
|
F Harp Note Location | ||||||||||||||||||||||||||||||||||||||||||||||||||||||||||||||||||||||||||||||||||||||||||||||||||||||||
|
|
These next tables show the holes, blow and draw, and the associated
notes on C and F harps.
|
|
F Harp Notes by Hole | ||||||||||||||||||||||||||||||||||||||||||||||||||||||||||||||||||
|
|
This table should give you an idea about "where you are" in your ability, and what techniques you still need to master.
I've included sample Real Audio clips to demonstrate most of these techniques, where it makes sense. Some areas, such as embouchure, should not effect the resulting sound to an appreciable degree. The samples are most all played on a key of A harp.
Diatonic Harmonica Techniques
|
|
|
|
| Wow, you can make noise *sucking* too! | Playing should be done by breathing through the harmonica, not by thinking about blowing or sucking. The breathing should come from the diaphragm. Breath control is as important in harmonica playing as in singing. The air should be slowly inhaled and exhaled. Practice playing a note and holding it for as long as you can, being careful not to get dizzy. |
|
| Simple 1st position play (i.e. "straight harp") | Many traditional "camp fire" songs are easy for the beginner, like "Oh Susanna", "Red River Valley", "Clementine", etc. |
|
| Chugging Rhythms | The harmonica lets you play chords as well as single notes, and the chords are easier to get than single notes. The chords can be used as backing rhythms to compliment melodic play. |
|
| Clean single notes | Because of the close proximity of the holes on diatonic harmonicas, some technique and practice is required in order to get clean single notes. The way of putting the mouth on the harp is called embouchure, and several different embouchures can be used to get single notes. The main embouchures are the pucker or lip block, the tongue block, and the U-block or slotted tongue. |
|
| The 2 draw | The hole-2 draw is often problematic for beginners, and sometimes the 1 draw as well. Many beginners think there's something wrong with the harp, because this note won't play. The usual reason is a "pre-bend" condition where the mouth/vocal tract shape causes a flatted note or keeps the note from sounding. The beginner should concentrate on a mouth shape for making an "eeeee" sound, and might want to let a little air in through the nose at first to help play the note. If you can draw holes 1-2-3 and hear the 2 draw note, you know the harp is okay. |
|
| Hand techniques | Cupping the harp with the hands, and opening/closing the hands and fingers is a common and traditional way to achieve very characteristic harmonica specific sounds. The key is getting a very air-tight cup with the hands, which mutes the sound. Opening and closing this cup creates the characteristic "wah-wah" sound of the harmonica. |
|
| Multiple key harmonicas | Diatonic harmonicas come in all different keys (i.e. C, D, E, ... Ab, Bb, F#, etc.). The normal range of harps from low to high (such as when harps are offered in a set) is G at the low end to F# on the high end, but doubled keys add high G and low harps from D (or even low C). The sample has chords for A, C, and D harps, 3 of the most common keys. |
|
| Note articulations (e.g. Ta, Da, Ka, Ha) | The tongue can be used to start or attack notes differently, which changes the color of the notes and adds variety to the sound of the harp. These articulations can be associated with various spoken syllables, like saying "ta" or "ka" or "da" or "ha" or "ga", etc. Articulation can also be done by slightly lifting the upper lip off the harp and replacing it in a sort of "biting" or "kissing" the harp fashion. |
|
| Shakes | A shake is a rapid alternation between adjacent holes. Shakes are similar to trills, but the notes are more than 1/2 step apart. Shakes are commonly done by shaking the head from side to side (probably where the term comes from), but can also be done by moving the harp from side to side, twisting the harp, or some combination thereof. |
|
| 2nd position (i.e. "cross harp") | 2nd position is the most commonly used approach to playing blues, rock, and country music. The scale for 2nd position is a 5th higher than the natural key of the harp, for example, for a key of C harp playing it in 2nd position means playing in the key of G. 2nd position starts on the 2 draw and uses mostly draw notes, especially on the low end of the harp, rather than mostly blow notes as in 1st position (the key of the harp). The draw notes provide more possibilities for bends and expressive vibrato than the blow notes. |
|
| Draw Bends as ornaments | When beginners first achieve draw bends, which are available on holes 1-6, they are primarily quick changes from the natural note, like a quick flattening of a note continuously bending a little down and then back up to the primary note. In other words, the bent notes are not used as notes in their own right. The note bends, but the player has little control over the depth and duration or the note. The sample has a thin weak sounding draw bend, and is an example of what NOT to do. |
|
| Blow Bends as ornaments | Blow bends are available on holes 7-10. The sample has a thin weak sounding blow bend, and is an example of what NOT to do. |
|
| Diaphragm Vibrato | Diaphragm vibrato is distinct from throat vibrato, and as its name implies it emphasizes the diaphragm instead of the throat, though each is used to a certain degree. It is usually characterized by a volume oscillation (vibrato) as opposed to a pitch oscillation. However, when using vibrato on a held bend, the diaphram is used to gently add the vibrato, and the pitch will vary due to the pressure changes. Diaphragm vibrato is basically achieved by repeating "ha ha ha ha" as when making a laughing sound. The sample vibrato is somewhat exaggerated so you can easily hear it. |
|
| Draw Note Alteration
- Full bends - Intermediate Bends |
Draw note alterations are so-called bends that alter the natural pitch of a note to a different usable on-pitch note. The word "bend" implies a continuous pitch change, but bends on the harmonica do not have to be changes from other notes--in other words, a bend as an altered note can be played separately from other notes, and the natural note need not be played at all. Holes 2 and 3 have bend ranges more than a single half step (semi-tone). Bends tend to alter most easily to the extreme range, and notes between the natural note and the most altered note are called intermediate bends, and are more difficult to achieve, control, and maintain on pitch than normal bends. The sample has a number of draw bend notes mixed in with normal notes. |
|
| Blow Note Alteration | Hole 10 has a 2 half-step bending range. |
|
| Rhythm and melody together (i.e. vamping) | Using a tongue blocking technique, rhythm chords and melody can be played at the same time. Normally a chord containing the melody note is played, and then notes of the chord are blocked from being played by using the tongue. Similar effects can be achieved with a lip block by opening and closing the embouchure or rolling the harp up at the back to go from a chord to a single note. This technique is often used on the bottom 3 holes where lip blocking is more difficult. |
|
| Glissando | The glissando is a strictly increasing or decreasing sequence of notes played in succession so fast that the individual notes are not given separate specific time values. It's easy on the harmonica! Just blow or draw and slide the harp around--you're doing glissandos. The key is to make the notes clean, even and smooth, in rhythm, and leading to a clean melodic note. Even response can be greatly affected by the reed gaps. You need to set the gaps so that a consistent playing pressure produces notes of the same loudness up and down the length of the harmonica. | |
| Amplified play | Traditional blues style harp is played amplified through a microphone. The mic and the amp work together to produce the sound, and what you should get depends on what you like to hear. Traditional mic's are bullet shaped vintage or vintage reissued models like the Shure Green Bullet, Astatic JT30, Hohner Blues Blaster, etc. The Shaker mics are smaller, lighter and easier to cup. Preferred amplifiers are normally tube amps, and vintage Fender amps are highly valued as harp amps. Popular amps include the Fender Bassman, the Bassman ReIssue (RI), the Fender Champ, Fender Princeton, etc. Many players prefer amps with reverb, or use separate reverb "tanks". Digital or analog delay pedals are a common effect in amplified play. |
|
| Slurs and double stops | A slur is where a bit of an adjacent note is played along with the primary note. A double stop is where two notes are played at the same time with essentially equal strength. Double stops can be played using bent notes and combinations of bent and un-bent natural notes, especially on holes 1-4. A slur has a primary note and a softer secondary note. Slurs can add a "bite' to a note, especially when amplified. The sample has first a slur, then a double stop for the same notes. Notice how much smoother the slur sounds. |
|
| Split Intervals
- 4-hole octaves - 5-hole octaves |
Split intervals are notes that are played that have intervening notes blocked out, normally by the tongue. The most common split interval is an octave, for example holes 1 and 4 blow or draw at the same time, with the tongue blocking out holes 2 and 3. Hole 4 and 8 draw also form an octave, with holes 5, 6, and 7 blocked out. The sample plays single notes an octave apart, then together, for both blow and draw octaves. |
|
| Octave Shakes | An octave split interval is played and rapidly alternated with an adjacent octave, as in a 2-hole shake with single notes, by shaking the head and/or harp. | |
| Resonance
- Vocal tract - Hands/cup |
Resonance is a reinforcing of sound waves that amplifies a note. Achieving good tone on a harmonica requires tuning the vocal tract to the note being played. This requires opening the vocal tract and playing "from the diaphragm". Hand resonance can add to the player's vocal tract resonance and further amplify a note. Very minute changes to the hand cup can produce or eliminate this resonance. The samples were played with the same force of breath. The differences in volume are due to the added resonance. Notice how the tone goes from thin and weak to full and strong. |
Play |
| Throat vibrato (also called tremolo) | Throat vibrato, sometimes called tremolo, is a slight wavering of a note's pitch similar to the effect singers use. Throat vibrato, as distinct from diaphragm vibrato, is mainly felt in the throat as a pinching of the airstream. In reality both throat and diaphragm vibrato use elements of both the throat and the diaphragm, but the emphasis is different as the names imply. |
|
| Tongue Slap | A tongue slap is where a chord is played for a brief time, then all but one or two notes are suddenly blocked out with the tongue. The air that had been flowing through normally 4 holes is suddenly diverted to 1 or 2 holes, and the sudden blocking of 2 or 3 holes causes a kind of slapping sound. The sample is exaggerated to highlight the effect. |
|
| Flutter tongue/tongue lift effects (i.e. rapid vamping) | A flutter tongue or rapid vampingtechnique is where (normally) a split interval is played and the tongue is rapidly repeatedly removed and replaced off and back onto the blocked notes. It causes a rapid switching between a chord and an interval like an octave, or even a single note. The sample first plays an octave slap, then the rapid alteration between a chord and the octave, for both blow and draw. |
|
| Tongue Rolls | A tongue roll is where a note is played and the tongue is vibrated or rolled as in a Spanish-style rolled-R. This is more of an effect than a playing technique. |
|
| Whoops | A "whoop" is using your voice to whoop or holler while playing the harp. This is an effect rather than a playing technique. You can also do barks, clicks, and other mouth or voice effects in conjunction with playing the harp. |
|
| Growl | A growl is an effect technique used in conjunction with deep draw bends. The soft palette at the back of the mouth is relaxed and allowed to vibrate; it's kind of like snoring while playing. This vibration along with the bent note causes the growl sound. |
|
| Back-Pressure Chords | By using a very air tight hand cup it is possible to play the harmonica backwards, by having air enter through the back of the harp in addition to through the front. In effect, your cup is so tight that when you blow a note the air pressure builds up in your hand cup and flows back into the harp. Similarly, a draw note causes enough of a vaccuum to suck air into the harp through other non-played holes. You block holes you don't want to sound with your thumb or finger and use the back-pressure activated notes along with the played note to create new chords. | n/a |
| 3rd position (i.e. "draw harp") | As 2nd position is playing in a key a 5th above the natural key of the harp, 3rd position is playing in a key another 5th higher than the natural key of the harp, e.g. for a key of C harp, 2nd position is the key of G, and 3rd position is D. 3rd position play starts on the hole 1 or 4 draw. The natural mode of 3rd position is a minor key so 3rd position is often used to play with minor key songs. A complete blues scale is available on the first two octaves in 3rd position, so this is a common position for blues next to only 2nd position in frequency of use. The sample is the blues scale in 3rd position. |
|
| Special Tunings | Special tunings are modifications to the standard diatonic layout of notes, which is the Richter tuning. Common special tunings include the natural minor, which provides a minor key for normal 1st and 2nd position playing, the Lee Oskar Melody Maker, which raises the b7ths (i.e. hole 5 draw) to Maj7th and raises hole 3 blow a whole step, Steve Baker Specials which adds a duplicate of the low 3 holes as the 1st 3 holes an octave lower, country tuning, etc. etc. These special tunings make playing certain styles easier than using normal Richter tunings. The sample has chords from a Melody Maker tuning, a Natural Minor tuning, and a rare tuning called Tempting. |
|
| Train Songs | Train songs use train-like rhythms on chords on the low 3 holes, and work best on lower key harps (like G and lower). A train whistle is simulated by drawing holes 3 and 4 at the same time. One articulation that mimics a train is "Tah hooka tooka hooka" where only the "hooka" is played exhaling, and many variations on that theme, like "Tooka hooka tah hooka". Other fast tongue articulations can be used to augment the breathing pattern, such as "diddly hooka diddly hooka tah hooka diddly hooka". |
|
| Multiple Embouchures | The 3 primary embouchures are the puker/lip block, the tongue block, and the (relatively seldom used) U-block. The lip block and tongue block can be used for different effects, so it is good to learn and use both and be able to switch back and forth easily depending of the effect you want. Many players believe the best blues tone can only be achieved by using the tongue block. Many effects and techniques require use of the tongue block embouchure. |
|
| Playing out of both corners (of the mouth); TB left and right | Tongue blocking is typically done with the tongue blocking holes on the left with the single note being played by the right corner of the mouth. It is useful to also be able to block on the right and play out of the left corner, for fast accurate note jumps and playing hole 1-3. |
|
| Bends from all embouchures and corners | Many players bend from one embouchure, like a pucker/lip block, and not from another, like the tongue block. It is best to be able to bend from all the different embouchures and both sides of the mouth. |
|
| Tongue Switch Shimmer | The tongue switch shimmer is an effect where the tongue is rapidly switched from side to side to allow opposite corner holes to sound. |
|
| Draw Bend Vibrato | Getting a smooth vibrato on draw bends requires a delicate control and balance between the throat and the diaphragm. Without this delicate control the vibrato becomes very chunky. |
|
| Blow Bend Vibrato | Blow bend vibrato also requires a more delicate control than vibrato on straight "unbent" notes. |
|
| Speed | Speed playing requires note and rhythmic accuracy and control of rapid changes to breath direction. |
|
| Positions 4-12 | Learning positions 4-12 requires additional familiarity with the diatonic note layout. The natural scales associated with position play correspond to various modes. Best use of these positions requires the ability to play chromatically by using either valves or overblows. |
|
| No speed needed | Sometimes speed can be used as a crutch to hide defects in playing. Attention to details and nuance of note formation, timing, and phrasing can require more expertise than merely playing fast. Details and mistakes are more exposed during slow play than during fast passages. Speed is best when the precision and nuances required for beautiful slow play are incorporated in the fast passages as well. |
|
| Valved Bends | Valved bends use only a single reed for the bend, rather than both reeds as in a normal diatonic bend. Valved bends have a greater potential range than normal bends, but require a different attack and bending approach. |
|
| Overbends (i.e. overblows and overdraws) | Overblows and overdraws activate the opposite-than-normal reed as an opening reed as opposed to the normal closing reed activation. Overblows activate the outer "draw" reeds to a note about 1/2 step above the natural draw note, while overdraws activate the inner "blow" reeds to a note about 1/2 step above the natural blow note. Overblows require relatively narrow or tight reed gaps. Achieving overbends requires much more finesse than ordinary bends, with much stricter requirements on mouth/throat shape and pressure. |
|
| Bending overbends and overbend vibrato | It is possible to bend the pitch of overblows and overdraws, and add effects such as vibrato to the overbends. Overbends themselves require much greater facility with the harp than normal bends, and further bends and effects require still greater control and expertise. |
|
| Chromatic play | By using overbends and/or valved (isolated reed) bends in addition to normal bends and the natural notes it is possible to play every note on a diatonic harp, that is, to play a diatonic chromatically. This adds enormous capability to the diatonic and especially position play. |
|
| Chromatic play in all keys | Since a single diatonic harmonica has all chromatic notes available, it is possible to play every key diatonic in every key. This of course requires a great deal of practice and study. |
|
| Jazz | The ability to play the diatonic chromatically brings jazz into the realm of the diatonic. Jazz is a difficult genre on any instrument, and especially so on an instrument such as the diatonic that requires advanced techniques to make available all the chromatic notes. |
|
| Counterpoint | Counterpoint is more than one melody at the same time. By sophisticated use of single notes, playing out of both sides of the mouth, and split intervals, simultaneous melodies can be played on the diatonic harp. Diatonics have the advantage over chromatics in this regard because wider splits are possible due to the smaller hole size of diatonics as compared to chromatics. Special tuned harps are often used for counterpoint play. |
|
The reeds vibrate, but interestingly it is not the reed vibration that causes the harmonica sound. You can verify this for yourself by removing the covers and plucking a reed. It makes a tiny ping sound, nothing like what you hear when you play the harmonica. The sound of the harmonica is created by the action of the reed vibrating through its slot and chopping the airstream. This is similar to the way a siren works. There is very little clearance between the edges of the reeds and the sides of the slots in the reed plates, so when the reed is actually within the slot during its vibrations the airstream is essentially shut off. When the reed emerges from its slot on either side of the reed plate the area through which the airstream can pass opens up, so the airstream starts up again. It is this vibration of the airstream that makes the harmonica sound. The reeds are not like guitar strings, which vibrate to make the sound which is amplified by the acoustics of the guitar body. They are just springs that cause vibrations in the airstream.
The tiny harmonica does not have any resonant body like a guitar or violin, or a soundboard like a piano. Nothing in the harp appreciably amplifies its sound or resonates. The resonance comes from the player, which is largely why the harmonica is such a personal instrument. Many people will tell you that the material out of which the body of the harmonica is made determines how it will sound. While there may be very small differences in tone due to materials, any such difference is essentially negligible.
The top picture above shows the harmonica parts in their proper orientation. Notice how from this angle you can only see the slots in the reedplates on the other side of the plate from where the reeds are attached. Both plates have their reeds facing down. You can see that when the harp is assembled, the upper reeds are inside the comb and the lower reeds are outside the comb.
Normal blow notes are caused by the upper reeds crossing their slots when the airstream enters through the holes in the comb, flows over the inner reeds, and exits through the slots. The reeds move into their slots, stopping the airstream, and then out the other side of the reedplate, which lets the air flow again. As the reed deflects it gains energy like stretching a spring or a rubber band. When the air pressure is released after the reed passes through its slot the energy in the reed causes it to spring back toward its starting position, once again crossing its slot and cutting off the airstream. This process repeats while the airstream is maintained. Normal draw notes work similarly but are caused by the lower reeds crossing their slots when the airstream flows over the outer reeds, enters through the slots, and exits through the holes in the comb. This action of the reeds where they first move into their slots is traditionally called a closing note.
During normal bends, both the draw reed and the blow reed can participate in making the note. As you start with a draw note and bend it down to its limit, initially the draw reed makes the note as above, then both reeds vibrate through their slots to make the note, and finally, at the deepest part of the bend, only the blow reed is making the note. You can verify this by removing the covers and using your fingers to stop the vibration of the upper and lower reeds at various times during a bend. The reverse happens during blow bends: the blow reed starts, both reeds participate, and finally only the draw reed makes the sound.
The range of bending available for a pair of reeds is determined by the pitches of the natural notes of the reeds (i.e. the unbent notes). The pitch can be bend down from the high note to just lower than 1 semitone (one half step, e.g. B to C) above the low note.
The opposing reed, i.e. the blow reed during a draw bend, starts by moving away from its slot. This deflection adds energy to the spring that is the reed. When resonance factors are just right the opposing reed can gain enough energy that when it springs back it goes all the way through its slot. The action of the reeds where they first move away from their slots is traditionally called an opening note. The physics of exactly how all this interplay between the reeds, airstream, and slots works is largely unexplored, unintuitive, and not well understood.
The point to understand is that during a normal bend, one reed is operating in a closing note fashion while the opposing reed is operating in an opening note fashion. The closing reed's pitch gets lower while the opening reed's pitch gets higher than their corresponding natural notes.
During overbends, i.e. overblows and overdraws, the resonances and airflow characteristics are such that the closing reeds don't participate in making the sound, and only the opening note is played. (It is possible to play in such a way that the closing and opening reeds both play and produce different pitches. This is usually caused by poor overblow technique, but can be used to achieve two-note double stops that can't be achieved any other way.) The action of stopping the closing reed from sounding is often called choking the reed, which forces the closing reed into its slot with very little energy so that it neither crosses its slot nor has enough energy to spring all the way back to its normal position. With the slot blocked the airstream cannot flow that way, and with the little energy in the spring the reed remains in position to block the slot, so the closing reed vibration never takes place. Overbends are opening notes, so their pitch is higher than the natural note of the reed--just the opposite of normal bends.
How does the harmonica work? You inhale through it or exhale through it and it makes notes. You change the shape of your mouth, move your tongue around, open and close your throat, breathe with different pressures and attacks, and the notes it makes changes. You do it enough and you figure out what makes what happen.
Bending lowers the pitch of the natural note of the highest reed in the hole. However, since both reeds participate in producing the bent note, the natural note of the lower pitch reed in the hole actually raises while the higher pitch reed lowers in pitch. For example, for a draw bend the pitch of the draw reed gets lower while the pitch of the blow reed gets higher.
The note in a hole can be bent down to about a semitone higher than the lower pitched reed in the cell.
This is the best I've been able to determine on the physics of how bends work on a diatonic harp.
If one *only* uses mouth adjustments to the resonance chamber, the range of resonant frequencies is smaller than if adjustments to other parts of the airway are included. When the other airways in the vocal tract, e.g. the throat and below, are tuned to the same resonant frequency as the mouth, this will accentuate the frequency energy advantage and the bending range and tone of the note will improve. This is why it is best to play "from the diaphragm", using as much of the vocal tract as possible.
One of the few scientific papers on the physics of harmonicas is at:
http://www.bs.monash.edu.au/staff/johno/acust2.html
I was talking with Jim Antaki, one of the paper's authors, during the Howard Levy "Harp Summit" week in North Carolina November 1998, about his research and findings about the physical behavior of the harmonica. There are some surprising results.
One of the interesting points is that it appears that turbulences like those that cause a power line to vibrate in the wind are required for reed activation and sustained vibration. Here's a quote from the paper:
"In order to cause self-sustaining oscillations, air must flow past the reed in a manner which reinforces this vibration. St. Hilaire et al. have shown that such pressure instabilities could result when air flow is sufficient to cause boundary layer separation at the edge of the reed surface. When this occurs, the aerodynamic drag force on the reed increases as the gap decreases, and the reed moves against the air flow. Conversely, the drag force decreases when the gap increases, and the reed moves with the flow."
The reed moves against the air flow. This is a striking counter-intuitive finding.
"When playing a low blow note...the nominal, or 'average,' position
of the blow reed moved away from the comb." This seems intuitive
because during a blow the pressure in the chamber increases. BUT...
"The draw reed, although nearly idle during blowing, appeared to displace
slightly upward, into its respective reed slot and into the comb."
So the
increased pressure provided by the blow does not push the draw reed
farther away from the comb. Aeordynamic effects draw it inward.
And further: "[on] low draw notes...the blow reed appeared to vibrate, albeit slightly... away from the comb." So, also, during a draw the blow reed moves against the airflow, and moves outward. It continues:
"Intuition would likewise dictate that the relative phase between the two reeds would result in their contrary motion: outward with blowing and positive pressure in the hole and inward with drawing and negative pressure in the hole. However, this was observed to be the case only for the high blow notes." What's this?! The notes don't act the same! Continuing "When any of the ten holes was drawn, the reeds were observed to oscillate in parallel with one another."
The reeds oscillate in parallel!? They open together and close together during draws. Very strange.
"Parallel motion of reeds can be interpreted as both reeds acting simultaneously to close, or open, their respective reed slots."
Another interesting finding is that the waveform of a blow note differs significantly from that of a draw note! "In most cases, the blow reed appeared to follow a sinusoidal trajectory, whereas the draw reed displayed a notable amount of superimposed third harmonic..." The diagrams show a little pause of the draw reed right as it crosses its slot. This is not evident for the blow reed.
Also, looking at the wave forms for both draw and blow reeds during a draw bend: ..."the bent note results in an almost composite of the two. The wave shapes and relative position of both the blow and draw reed displacements were observed to resemble those occurring for their respective straight notes. (This is worthy of recognition since the blow reed is no longer operating as a closing reed, but operates as an opening reed.)"
Here's more: "However, for both draw bends and blow bends, counterintuitive parallel motion of the reeds was demonstrated. Most intriguingly, this did not occur in holes 9 and 10."
And more strange with overblows: "The relative phase of the reeds for the overblows studied (holes 3 to 6) was observed to depend upon the location of the displacement transducer [the reed position measurement device used]. When placed near the roots of the two reeds of hole 5 and 6, the phase relation evidenced parallel motion; whereas, when placed at the tips, the motion was is opposition." The reeds are flapping the the breeze.... [my characterization]
"The common rule that bent notes are limited to within a semitone of the opposite note of the hole was substantiated in these studies."
On a lighter note "...a simple experiment was conducted in which a player [Howard Levy], lying supine, played specific fashioned notes and then held the configuration of the vocal tract while the oral cavity was filled with water and the required volume was recorded... It is probable that actual playing volumes were larger than measured, since when water was instilled, constriction of the glossopharynx and larynx occurred in order to suppress the swallow reflex and prevent aspiration."
Or, in Howard's words, "they were trying to drown me!"
The classic way to get throat vibrato is to imitate a rapid fire machine gun (eh eh eh eh eh), like when you were a kid. Then do it inhaling instead of exhaling. It's the same throat motion that gets the throat vibrato. Work on it until it's smooth, like the vibrato of a singer.
A good way to get the feel is to put vibrato on the 3 draw 1/2 step (or even less) bend. Your throat is involved getting the bend initially, so there's some feel there before you go for the vibrato. Breathing from your diaphragm will help control the vibrato. There's always an interaction between the throat and diaphragm when doing a vibrato, since each is involved in controlling the airstream. For throat vibrato, obviously the emphasis is on the throat--but you'll probably notice some involvement of the diaphragm as well.
Try it amplified, but play softly. Practice very soft draw bends. At some point you'll notice what feels like a direct connection between your throat and the note. Every little nuance of throat motion is reflected in the sound. Work on playing the 3 draw 1/2 step bend softly. Then put some vibrato on the note by pulsing the airstream with your throat. The pitch will change up and down because you've got a hold of the bend with your throat. Keep at it, it's worth it.
How do you play an overblow or overdraw (sometimes lumped together and called an overbend)? Good question. Hard answer.
First, you have to have your reed gaps set close to the reed plates. It also helps to have harps with good compression, that is good "air tightness". If your harp is set up improperly, you simply won't be able to get an overbend, and if its not set up just right it will be much more difficult to get the overbend.
Overbends are advanced techniques that require a lot of control of your mouth, throat, and tongue, as well as your playing pressure. An overblow is NOT a result of extra hard blowing or anything of the sort. It is a technique of finesse, where your tongue and throat have to be set in exactly the right position and your activation pressure has to be just right. Don't even think about trying for overblows unless you can easily do and control all the normal draw and blow bends.
In an overblow, your tongue is set in essentially the same position as for a blow bend on hole 9. The tongue and the throat constrict at the place where you make the hard "K" sound. The air pressure comes from deep within, from your diaphragm. Very tight control over the airstream and embouchure is required to start an overblow and to keep the overblow sounding after you get it. A slight waver in your control and the overblow will be lost. You can't really sneak up on an overblow--you've got to snap it into place right from the beginning. Try imitating the sound of a jet engine. Form an O shape with your mouth and hump your tongue up at the back to constrict the back of the mouth at the soft pallette, and push the air through the constriction with your diaphragm. Don't blow too hard! It's not necessary to force it. You have to finesse it. Try doing a draw bend in the hole first, then go right to the overblow. You don't have to change your mouth position much from the draw bend to the overblow.
Once you get an overblow, practice holding it as long as possible. Relax everything you can without losing the overblow note. You'll find that you can get an overblow with much less effort than you think if you have your tongue and mouth in exactly the right position and shape.
Despite the tight tolerances required to get overblows, with enough practice you can actually bend the pitch of an overbend, and use vibrato on overbends. This requires a very well set up harmonica, and very good control that only comes from a lot of practice.
An overdraw feels like a strong draw bend with the jaw not dropped and the tongue set more in a blow bend position. Here again, the pressure used to get and sustain an overdraw is very critical with very little variation tolerated. Start it with a well articulated attack with the tongue, as if making a T sound, and play with a tight pull draw bend. Experiment with different pressures, because you have to get it just right to pop the overdraw note out there. Remember, you're pulling the note up in pitch, not down. You need to adjust your resonance to match the higher note.
Still having problems? Not surprising. It is helpful to get the sound in your ear, and get the feel of what hitting an overbend is like. One way to do that is to remove the covers and practice overblows while blocking the corresponding blow reed. (Remember, it's the draw reed that sounds during an overblow, as an opening bend.) You can use a finger to block the reed, or you can even use a bit of tape to do the job. It is much easier to get an overblow with the blow reed blocked, and you can practice this way to learn the sound you're going for. It's easier to get the note when you know what it is supposed to sound like--probably due to a subconscious tuning of the vocal tract to the resonant frequency of the note. It's kind of like whistling--you automatically make the adjustments in your mouth to get the note you're hearing in your mind's ear. Once you are used to getting overblows with the blow reed blocked you can transfer the feel of the technique and the sound of the note to normal play--with the covers on!
Another way to go is to practice on a Discrete Comb, which isolates the draw reed in its own chamber and accomplishes the same thing as blocking the blow reed with your finger or some tape, making overblows much easier to get. Even if you don't use the Discrete Comb as your standard instrument, it is quite useful as a practice device.
Overbends take a lot of practice.. probably more than almost any other diatonic playing technique. Then, once you can do the overbends it takes a lot more practice to use these extra notes to play the diatonic harp chromatically. Overbends open up all the positions to all modes of play, and bring jazz to the domain of the short harp.
The holes in which overbends add new notes not available through normal play or normal bends are:
Again, make sure you adjust your reed gaps as close to the reed plate as you can get them without causing the reed to choke. Adjust the gaps close for both reeds in the hole. In other words, to set hole 6 for overblows, gap both the draw reed and the blow reed close to their reed plate. An improperly gapped harp is extremely difficult if not impossible to overbend.
Breathing is basic to harp playing, and rhythmic breathing should be part of every practice session. Start by using rhythmic breathing patterns to play draw and blow chords on holes 1-3. Practice as fast as you can, but not faster than you can. If you find yourself stumbling over the pattern, slow down and work it into your muscle memory. Be sure to relax, open up your throat, and use your diaphragm to control your breathing, not your lungs, mouth, or tongue. This will improve your resonance and the depth and richness of your tone.
Fast improvisation can be achieved by using repeated breathing patterns to select the notes you play, rather than selecting notes some other way then doing whatever you need with your breath to get those notes. Of course this style should not replace other improvisation, or dominate, necessarily, but can add to other styles and put another tool in your bag of tricks. Seems to me that John Popper uses this approach routinely.
The other point with respect to breathing patterns is that analyzing difficult passages to identify the underlying breathing pattern can greatly simplify the learning and playing of the passage.
There are superimposed rhythmic patterns at work when we play:
Some of the mystery of odd rhythms is removed if you think of them as combinations of blocks of 2 and 3 beats. 5/4 time, for example, can be counted (One Two)(One Two Three), or (One Two Three)(One Two). The 7's have two blocks of 2 beats and one block of 3 beats, for example (One Two)(One Two)(One Two Three), or (One Two)(One Two Three)(One Two), or (One Two Three)(One Two)(One Two).
Another way to look at the odd rhythms is as patterns of short and long counts. The two beat blocks are short, and the three beat blocks are long. Then for the 7's you have short short long, or short long short, or long short short. Experienced players tend to think of odd rhythms in these terms. The key to having good rhythm is to put the rhythm in your body. Your mind may think 12 12 123 12 12 123, but its easier to feel short short long short short long. Also, it's easier to use triplets when you're not thinking One Two, and to use two notes when you're not counting One Two Three.
Here's an example for the 7's with the pattern 12 12 123. Try playing triplets during the 2 beat blocks, and 2 notes during the 3 beat block. That is, play (123)3(123)3(1-2), first while counting 12 12 123, then try it while feeling short short long. It's much easier to do it by feeling the rhythm than by counting it.
One way to put the rhythm in your body is to dance or walk in rhythm. Walk around and stomp your foot on the 1, like stomp step stomp step stomp step step, then starting with your other foot first, stomp step stomp step stomp step step.
A good way to practice playing the 7's is at the same time you practice scales. Major and minor scales have 7 different notes, which lines up nicely with the 7 beats of this rhythm. When you practice scales, don't just play the notes in sequence from bottom to top, top to bottom. Mix up the order. Play each note only once, but play different interval patterns. Synchronizing these scale melodies with odd rhythms can be great practice for improvisation.
Positions are numbered according to the circle of fifths. First position is where you start in the circle, and each step clockwise is one position higher. For example, on a key of C harp playing 1st position puts you in the key of C. To figure out which key is 2nd position, go one step clockwise from C in the circle of fifths (i.e. add one sharp to the key) and you get G. 3rd position is another step clockwise (i.e. 2 sharps added to the 1st position key) which is D, and so on. Rather than memorizing a table of positions for each harp key it is much preferable to learn the circle of fifths, which is far more useful.
Since there are 12 distinct notes in a chromatic scale and in the circle of fifths, there are 12 different positions on the harp. When numbering the positions based on going clockwise around the circle of fifths we are essentially talking about "sharp" positions, since each clockwise step gives us a scale with one more sharp than the previous scale. It is pretty unnatural to think about a key having 12 sharps however! For this reason, some players talk about "flat" positions as well as regular positions. The flat positions are named and numbered according to a progression counterclockwise around the circle of fifths. So first flat on a key of C harp is the key of F. In terms of the "where/how" of playing, 1st flat is identical to 12th position. Similarly, 2nd flat is identical to 11th position, etc.
There is a natural mode associated with each position. By this I mean that by using just the natural non-bent unaltered blow and draw notes on the harmonica, when you start at a different where/how note you are playing a different mode. Here are the natural modes associated with some common positions.
Position Designation of Tonic Note
| Blow | 1 | 5 | 2 | 1 | 5 | 2 | 1 | 5 | 2 | 1 | Blow |
| ''' | 9 | 10 | 7 | 11 | ' | ||||||
| '' | 12 | 4 | 8 | '' | |||||||
| ' | 8 | 7 | 11 | 8 | 9 | ||||||
| Draw | 3 | 2 | 6 | 3 | 12 | 4 | 6 | 3 | 12 | 4 | Draw |
The most commonly used positions are first (1st), second (2nd) and third
(3rd). This table shows these positions for each harmonica key, which is
the same as 1st position.
|
Position |
Position |
Position |
|
| A | E | B | 1 |
| Bb | F | C | 2 |
| B | F# | C#/Db | 3 |
| C | G | D | 1 |
| Db | Ab | Eb | 2 |
| D | A | E | 3 |
| Eb | Bb | F | 1 |
| E | B | F# | 2 |
| F | C | G | 3 |
| F# | C#/Db | Ab | 1 |
| G | D | A | 2 |
| Ab | Db | Bb | 3 |
The "sets" (with matching colors) show different 4-harp sets that will cover all 12 keys if you play in all 3 positions. In other words, with an A, C, Eb, and F# harmonica you can play all 12 keys by playing positions 1, 2, and 3.
1st position, also called "straight" harp, is the natural key of the harmonica. In other words, if you have a key of C major tuned harmonica, first position utilizes the scale tones of the C major scale, which starts on the C note.
The position designations follow the circle of 5ths clockwise.
2nd position, commonly called "cross" harp, starts on the 2 draw and uses a scale a 5th higher than the natural key of the harmonica. 2nd position is the most commonly used harmonica position for Blues, Country, and Rock music because it makes use of draw notes much more than 1st position, which is important because the draw notes for holes 1-4, and 6 can be bent, allowing all the notes for the blues scale to be played, as well as being able to be played with more variety and nuance. For a key of C harmonica, the 5th scale tone is G (C=1, D=2, E=3, F=4, G=5), so playing 2nd position on a C harp is playing in the key of G (technically the G "mixolidian" mode).
3rd position, sometimes called "double-crossed", is the scale starting another 5th up from 2nd position, e.g. for a C harmonica, D. (G, 2nd position key, =1, A=2, B=3, C=4, D=5.)
The above picture shows where the notes on a C harmonica fall on a piano type keyboard. It can help as a visualization aid for those of us who picture notes as they are laid out on a piano. For keyboard players, it can help translate from piano/synth licks to harmonica licks. The positions are shown in circles above and below the keyboard graphic. Notice that as you proceed in whole steps, the position numbers increase by 2. Positions are sometimes specified based on the C harp, for example "Ab on a C harp" instead of 9th position, or even "1/2 step above cross harp".
However, when playing in 2nd position, the C harp is played in the key of G, which is not the simplest key in which to visualize music.
The picture below shows where the notes on an F harmonica
fall on a keyboard. An F harp played in 2nd position is the key
of C--the natural choice for thinking about musical relationships. For
me, this is the best way to visualize the generic note layout for 2nd position
on a diatonic harmonica.

In this case, the selected key is C, the scale is "Blues" and the position is 2nd. Notice how the notes in the C Blues scale are highlighted so you can tell where and how to play them on your harp. This combination of key, scale, and position requires an F harp. OB means "overblow" and OD means "overdraw". The small subscript numbers represent the scale degree of the note. For example, the 1 with the C shows the root note (tonic) of the C scale, the 3b with Eb indicates the flat 3rd, the 5 with G indicates the fifth scale degree (dominant), etc.


Chords are named according to the root note of the chord. Sometimes the order of the notes gets rearranged so the lowest note is not the root note. These rearranged chords are called inversions of the natural chord. Sometimes it's a bit tricky to determine the root note for chord inversions, though often you can tell by looking at the intervals, which are the distances between notes.
First let's look at simple 3-note chords, which are called triads.
Here is the C major scale, with the first 4 notes
repeated:
Scale Degree: 1 2 3 4
5 6 7 8 9 10 11
C D E F G A B C D
E F
Triads are formed by starting somewhere in the scale and then picking
every other note, skipping the notes in between.
For example, start at scale degree 1 and pick the note--a C. Then
skip 2, the D, and pick 3, the E. Then skip 4=F and pick 5=G.
We have 1+3+5, which is C E G. Since the chord was formed by starting
with the C we know it is some type of a C chord. Here are all the
3-note chords in the C scale formed by using this process:
|
|
|
|
| 1+3+5 | C E G | C |
| 2+4+6 | D F A | Dm |
| 3+5+7 | E G B | Em |
| 4+6+8 | F A C | F |
| 5+7+9 | G B D | G |
| 6+8+10 | A C E | Am |
| 7+9+11 | B D F | Bdim |
How do you know if it's a major or minor or diminished chord? You have to look at the number of half-steps between the notes. There are 2 intervals in each triad, the distance between the first and second note in the chord, and between the second and third note in the chord.
Considering a piano keyboard, starting on C count the number of keys (both black and white keys) you need to get to E (each successive key on a piano is one half-step away). Here they are from C: 1=C#/Db, 2=D, 3=D#/Eb, 4=E. That's 4 half steps to get there. The interval is determined by counting note names, not half steps. The C to E interval is 1=C, 2=D, 3=E, so it's a third. So the C-E interval is a third consisting of 4 half steps. A third with 4 half steps is called a major 3rd. A chord that starts with an interval (i.e. from the root note to the 3rd) that is a major 3rd is called a Major chord.
Now determine the interval from D to F. The note names are D, E, F, so once again we have a 3rd. This interval is always a third because of the way we formed the chords. But now count the half-steps starting on D to get to F. D to D#/Eb is 1 half-step, D#/Eb to E is 2 half-steps, and E to F is 3 half-steps. So there are only 3 half-steps to get from D to F. An interval of a third with 3 half-steps is called a minor 3rd. A chord that starts with an interval that is a minor third is called a minor chord.
When we do the same procedure on the 2nd interval in the triads we find that for C major, E to G is a minor 3rd, and for D minor, F to A is a major 3rd. So major chords consist of a major 3rd interval followed by a minor 3rd interval, while minor chords reverse the order and have a minor 3rd followed by a major 3rd.
The B D F chord as a minor 3rd (B to D) followed by another minor 3rd (D to F). A minor chord with the second interval shortened from 4 half-steps (a major 3rd) to 3 half-steps (a minor 3rd) is called a diminished chord.
Another kind of chord consists of 2 major 3rd intervals. An example is the chord C E G#. When a major chord has it's second interval extended by a half-step to be a 4 half-step major 3rd instead of the usual minor 3rd it is called an augmented chord. Augmented chords do not occur naturally in the scale, and are used very much less frequently than major, minor, and diminished chords.
A diminished 7 chord follows the same procedure, so for Bdim7 we have B D F Ab. Another diminished chord is sometimes called "half-diminished" when the 7th is a major 3rd above the top note of the triad instead of a minor third. In this example we have B D F A. This chord is also called Bm7b5, which means Bm7 flat fifth. The Bm7 is B D F# A, so when we flat the fifth, the F#, we get the same notes as the half-diminished chord. This chord is frequently found in jazz.
Another form of 7th chord is the Major 7, which adds a major 3rd interval to the top note in the base triad. Normally this is done with Major chords to produce a sweet sounding chord. The example for C is CMaj7, which has notes C E G B.
Other extended chords are made by adding other notes from the scale. A 6th chord adds an interval a 6th above the root note of the chord. For a C chord the 6th is an A and the chord is C E G A. For a Dm chord the 6th is a B and the chord is D F A B.
Other common extended chords used frequently in jazz are 9th and 13th chords which are built by adding the 7th and also adding the 9th or 13th above the 7th. These chords are colorful and dissonant and along with diminished and m7b5 chords are characteristic of the cool jazz sound.
Holes: 1 2 3 4 5
6 7 8 9 10
Blow notes: C E G
C E G C E G C
Draw notes: D G B D F
A B D F A
So, for blow holes 1, 2, and 3 you have C, E, and G, which is a C Major chord (major 3rd interval on "bottom", i.e. C & E, and minor 3rd interval on "top", i.e. E & G). Notice that holes 4, 5, and 6 are also C, E, G, which is another C Major chord, as are holes 7, 8, and 9. In 1st position the C Major chord is the tonic or root or I chord of the C scale. In 2nd position the C Major chord is the sub-dominant or IV chord of the G scale, which is part of the I, IV, V blues progression.
For draw holes 1, 2, and 3 you get D, G, and B. This is a G Major chord, 2nd inversion (which just means the root note is in the middle--that is, a G Major chord is G, B, D, but if you play the D as the lowest note you get D, G, B--but it is still a G Major chord). Notice that the 4 draw is the same as the 1 draw, a D note. Doubling a note does not change the chord, so drawing holes 1-4 also produces a G Major chord. For 1st position the G Major chord is the dominant or V chord of the C scale. For 2nd position the G Major chord is the root or I chord.
Drawing on holes 2, 3, 4, and 5 have notes G, B, D, F, which is a G7 chord. The dominant 7th note adds color to the major chord and is used very often in blues, rock, and country music. Once again you can double the D by adding the 1 draw and you still have the G7 chord.
Drawing on holes 4, 5, and 6, or 8, 9, and 10 produces the notes D, F, A, which is a D minor chord (notationally Dm).
The four note chords in draw 3-6 and 7-10 are B, D, F, A, which is a Bm7b5 chord. Note that this chord is the same as the D minor chord with the 6th added (called Dm6), but in a different inversion--that is, instead of the 6th note (the B) being the high note in the chord it is the low note.
Here are the arpeggios for the basic I, IV, V chords in 2nd position (notes for the key of C).
|
|
|
|
|
|
|
|
|
|
|
C E G |
|
|
Middle |
|
|
9> 10>' n/a |
|
|
F A C |
|
1> 2> 3> | Middle | 4> 5> 6> |
|
|
|
|
G B D |
|
|
Middle |
|
|
|
Here are the arpeggios for the dominant I, IV, V chords in 2nd position (notes for the key of C).
|
|
|
|
|
|
|
|
|
|
|
C E G Bb |
|
|
Middle |
|
|
9> 10>' n/a n/a |
|
|
F A C Eb |
|
1> 2> 3> 3' | Middle | 4> 5> 6> 6># |
|
|
|
|
G B D F |
|
|
Middle |
|
|
|
Here is a diagram showing where the arpeggios lie in your harp. Start at a filled circle and follow the arrows. By the way, you can practice these arpeggios on any key harp--you don't have to use an F harp--it's just easier to think in the key of C.
One of the interesting things about these diagrams is that you can easily
see how the arpeggios relate to each other and connect. Seeing and
visualizing these relationships is very important for improvising
and knowing how to jam over chords.
Here are the arpeggios for the minor ii, iii, and vi chords in 2nd position (notes for the key of C).
|
|
|
|
|
|
|
|
|
|
|
D F A |
|
|
Middle |
|
|
10 10> n/a |
|
|
E G B |
|
n/a 1 2' | Middle | 3 4 5># |
|
|
|
|
A C E |
|
|
Middle |
|
|
|
Here are the arpeggios for the dominant minor ii, iii, and vi chords in 2nd position (notes for the key of C).
|
|
|
|
|
|
|
|
|
|
|
D F A C |
|
|
Middle |
|
|
10 10> n/a n/a |
|
|
E G B D |
|
n/a 1 2' 3" | Middle | 3 4 5># 6 |
|
|
|
|
A C E G |
|
|
Middle |
|
|
|
The major scale arpeggios can be played in 3rd position with the use
of the hole 5 overblow to get the major 3rd instead of the naturally occurring
minor 3rd. It is this natural minor 3rd in hole 5 that makes 3rd
position a natural choice for playing with minor chords and minor scales.

The following diagram shows the arpeggios for the minor i, iv, v chords
in 3rd position. Here, the iv chord minor 3rd requires the hole 6
overblow.

Listen to enough blues that you can hear the chord changes and anticipate them by feel, without thinking about it. Develop your ear enough to be able to single out and listen to the individual instruments. Playing blues is like communicating in a language.. you need to be able to listen as well as speak, and what you say is better if it fits in the context of the conversation. Stay in the rhythmic "groove" established mainly by the bass and the drums.
The blues consists of numerous phrases (also called "licks" or "riffs") that follow a question-answer, tension-release form. The initial phrase asks the musical question and establishes some tension. The subsequent phrase releases the tension by answering the question. So, even though the phrases are distinct and separate, they are still related. Listen to the questions asked by the other instruments and how they are answered. Build your improvisational solos in the context of this conversation. Even though you're playing a solo, you're first and foremost part of a team of musicians creating the music. Listen to the music. Add to it only to make it better.
The basic 12 bar form is:

For the key of C that's:
C, Eb, F, Gb, G, Bb, C.
For 2nd position in the low octave that's:
2, 3', 4>, 4', 4, 5, 6> (2 draw, 3 draw
bend, 4 blow, 4 draw bend, 4 draw, 5 draw, 6 blow).
For the high octave in 2nd position the tab is:
6>, 6>#, 7>, 7#, 8, 9, 9>
Here is a diagram that shows where the notes are in your harp. It doesn't matter whether you use an F harp or not--it's just easiest to think in the key of C.

Here are all the notes in the blues scale in 2nd position:
1>, 1', 1, 2", 2 and 3>, 3', 4>,
4', 4, 5, 6>, 6>#, 7>, 7#, 8, 9, 9>, 10">, 10>, 10#
Play mostly notes from the blues scale (at first, while learning. Later you'll figure out that you can use any note, it's just a matter of how and where). Make sure you play notes from the blues scale on the beat. Try to lean on the notes in the current chord in the I, IV, V chord progression (in C, I=C, IV=F, V=G), especially the I, on the beat.
The first 6 holes are the most used for blues. Holes 2, 3, and
4 are especially important. Work on all the available bends in these
holes. Virtually always play hole 3 draw bent, at least a little.
It is one of the key "blue notes", which are the flat 3rd,
flat 5th, and flat 7th. The blue notes in 2nd position are
located at:
1' (flat 5), 2" (flat 7),
3'
(flat 3), 4' (flat 5), 5 (flat
7), 6># (flat 3), 7# (flat 5), 9 (flat
7), 10>" (flat 3), 10# (flat 5)
Blues is also often played in 3rd position as well as 2nd. Here
is the blues scale for 3rd position showing the key of C.
1 2" 2 3"' 3" 4> 4, 4 5 6> 6' 6 7> 8, 8 9 9> 9>#
10 10>
Blues can also be played in 1st position. The high end of the
harp is expecially good for blues in 1st position because all the notes
in the blues scale are available with only normal bends. The middle
octave requires 3 overblows, on the 4, 5, and 6 holes, but the low octave
only requires the hole 1 overblow for the flat 3rd.
1> 1># 2" 2' 2 3' 4>, 4> 4># 5 5># 6> 6># 7>, 7> 8>'
9 9>' 9> 10>" 10>

Another good position for blues that is used much less often is 5th
position. The 6 overblow is needed to complete the blues scale in
the middle octave, but that note is the flat 5th, which is the least important
note of the blues scale. Leaving it out gives you the pentatonic
scale, which is still good for playing blues.
2> 2 3" 3' 3 4 5>, 5> 6> 6 6># 7 8 8>

Put the rhythm in your body and don't let it die. Prefer to miss a note rather than mess up the beat. Tap your foot. Tap BOTH feet. Rock from side to side. Put the rhythm in your body!
Use triplets. (A triplet divides a rhythmic unit into 3 equal parts, instead of just 2 or 4 etc. For example, "triplet eighths" have 3 notes in the space of 1 beat instead of the usual 2 eighth notes in 1 beat.)
Leave some space. The rest is a valid musical expression. The silence sets up the sounds; frames them as if they're a valuable painting. Spaces, like notes, can add musical tension and interest to your phrasing and expression. Very often in blues it is best to subscribe to the philosophy that less is more.
Get the blues in your mind and ear, find something to say, and be able to say it.. clearly and eloquently.
|
|
|||||||||||||||
|
|
|
|
|
||||||||||||
|
|
|
|
|
|
|
|
|
|
|
|
|
|
|
|
|
|
|
|
|
|
|
|
|
|
|
|
|
|
|
|
|
|
|
|
|
||||||||||||||
|
|
|
|
|
||||||||||||
|
|
|
|
|
|
|
|
|
|
|
|
|
|
|
|
|
|
|
|
|
|
|
|
|
|
|
|
|
|
|
|
|
|
|
|
|
|
|
||||||||||||
|
|
|
|
|
||||||||||||
|
|
|
|
|
|
|
|
|
|
|
|
|
|
|
|
|
|
|
|
|
|
|
|
|
|
|
|
|
|
|
|
_4 | - |
The dots (.) after the numbers mean to hold the note a little longer. I put them in to remind you to play with a swing rhythm.

The first thing to notice is that there are no bent notes in there! The most basic blues riff doesn't even stay in the blues scale. That makes it a great 12 bars for beginners to practice. You can make it a little bluesier by bending all the 3 draws down 1/2 to the flat 3rd. Another thing you can do is to replace the 7 blows in bar 6 with the 6 overblow, which is the same note as the 3 draw bend, but over the IV chord it is the flat 7, which is really needed to match up with the 5 draw flat 7 over the I chord, bar 2.
A variant of Blues Riff 101 moves the lick over the IV chord in bars
5 and 6 down an octave and makes use of two of the hole 3 draw bends.
Here's how that goes:
Blues Riff 101A - bar 5: | 1>.1> 2>. 2> 3>.3> 3". 3" | 3'. 3'
3". 3" 3>.3> 2>. 2> |
Of course the 2 draw can be used instead of the 3 blow since they're
the same note.
Blues Riff 101B - bar 5: | 1>.1> 2>. 2> 2. 2 3". 3" | 3'.
3' 3". 3" 2. 2 2>.2> |
The idea is to repeat that rhythmic pattern over different notes in different places in the improvisation.
The result is a sense of "variation on a theme" familiarity (where the theme is the rhythmic statement rather than (necessarily) a melodic one).
Rhythmic patterns can come from:
The goal is to get a sense of completeness, cohesiveness (it all fits together), and integration with the whole.
This attention to rhythmic patterns is also useful as a "rut-busting" exercise.
One variant of the "theme and variations" tip is...trick 'em.
Set something up by repeating a phrase or rhythmic pattern until the listener comes to ~expect~ something--a concluding note or phrase, a particular beat or groove, a certain effect, like vibrato (absent or present), etc.--then take it away and give them something else. This adds interest, and builds a sense of excitement at the unexpected--"what's coming next that I don't expect?" Of course this, like most things, can be over done. You have to create a balance between playing the expected and the unexpected so the music is neither too predictable nor too "off the wall".
When the IV chord comes around, I'll switch keys, sort of, and emphasize notes in the (e.g. blues) scale of the IV chord with further emphasis on the IV7 chord notes. Same for the V chord. So, to me, one of the first "theory" things to learn (or learn to hear) is the notes in the I, IV, and V chords--then augmenting them with the rest of the notes in the (e.g. blues) scales for those chords.
By way of example, consider the key of C. The I, IV, and V chords are C, F, and G--with the 7th we're talking C7, F7, and G7, which have these notes:
From listening, we know that the 7 note and the flat 3rd are "notes of tension"--we want to hear them resolve. So, depending on where you are in the chord progression you resolve differently from the same note (Eb, or the 2nd position 3' [that's pronounced 3 draw bend])--either to IV (F7) chord (or scale) notes, or I (C7) chord (or scale) notes. But, lookie here. The C note is shared between these two chords. So you can resolve Eb to C over either the I=C7 chord or the IV=F7 chord. For 2nd position, that's 3' to 2 [pronounced 3 draw bend to 2 draw (there's a greater than sign '>' for blows)]. Ever use that?! Of course! It fits in so many places. This is why!! In blues, we're mostly on the I and IV chords, with occasional ventures into the V.

Music is played via improvisation, composition, or a combination of the two, with varying degrees of interpretation and expression. The "ways to play" can be mixed and combined in a large number of combinations. Ways to play include:
Playing strictly by improvisation (with no composed elements) eliminates reading, and certain elements of playing from memory, since strict improvisation is a purely dynamic endeavor.
The elements of interpretation and expression are final transformations of the musical elements being played that ultimately make music from sounds and silences. Playing by ear includes, by its very nature, elements of expression, but not elements of interpretation since interpretation implies variations on that which has a defined form. Composed musical elements can be interpreted, improvised ones cannot. Compositions can be interpreted well or poorly or not at all (which could be considered a (poor) type of interpretation).
Composition (distinct from playing something that has been composed) and improvisation are closely related. An instance of improvisation, captured and recorded, becomes a composition. Composition is a process of capturing improvised segments and developing them into a structurally related whole.
Improvisation commonly makes (re)use of composed elements. In fact, since musical styles include such "composed" traditional things as the 12-tone scale, micro-tonal scales, 4-4 time, and swing rhythm, virtually all improvisation makes use of some composed elements. Much (most) improvisation is melodic in nature and takes place within a composed harmony (e.g. chord progression or key) and scale type (e.g. major, minor, blues).
Both improvisation and composition are normally constrained by elements of style. These constraints do not necessarily limit creativity, but rather can require greater creativity to express within the limitations of form, structure, or tradition. Consider a poet who writes in a form as opposed to blank verse. The form is constraining, requiring greater creativity to express the same thoughts and emotions as when no form is present.
The rings of numbers show the diatonic harp position relative to the music key. For example, on a C harp if you're playing in first position (shown as 1) you're playing the key of C. If you're playing in 2nd position (shown as 2) you're playing in G, 3rd position D, 4th, A, etc. If the position rings confuse you, you can safely ignore them!
Here's how to figure harp key, music key, and position using the diagram. Given any two of position, music key, and harp key you can quickly find the third.
If we think about the key of G major scale instead of C major, the notes are 1=G, 2=A, 3=B, 4=C, 5=D, 6=E, 7=F#, 8=G. Up a fifth from G is the note numbered 5 in the G scale, which is D; up a forth is the note numbered 4, or C.
This is really simple--there's nothing mysterious about it. These tems like a fifth, forth, third, seventh, etc. just talking about where the note falls in the scale if you number starting at the root note in the scale.
Now if we number the notes going down the C scale we have C=1, B=2, A=3, G=4, F=5, E=6, D=7, C=8. If we pick the note down a forth from C we get the note numbered 4, in this case G. Notice that up a fifth yields a G, and down a forth also yields a G. This is a general principle: up a fifth is the same as down a forth. Well, what about vice-versa? Up a forth in C major is an F, and down a fifth is also an F. Yep, it's another general principle: up a forth is the same as down a fifth.
We've seen that up a fifth in C is G, and in G is D. What if we keep going? The major scale for the key of D is D=1, E=2, F#=3, G=4, A=5, B=6, C#=7, D=8, so up a fifth is the note numbered 5, which is A. For the key of A we get E, for E we get B, for B we get F#, which is the same note at Gb. Traditionally we go to flat names at this point, up a fifth from Gb is Db, then Ab, Eb, Bb, F, and C. We're back at C, and we've covered all 12 notes in the scale. This is great! We don't get back too early--before all the notes have been used, all the notes are used, and there are no duplicates.
This is where the idea of the circle of fifths comes from.. the mathematical relationship that allows us to go up in fifths and get each note exactly once before we get back to the beginning. Of course, we can also go up in forths and have the same relationship, since up a forth is the same as down a fifth--the notes just come out in reversed order. This circle of key names is symmetrical, and really only a circle of fifths if you go clockwise. It's a circle of 4ths if you go counterclockwise. But by convention and tradition, the circle of key names is called the circle of fifths.
An interesting thing about the circle of fifths is that as you step clockwise, the number of sharps in the key signature increases by one. Since the circle is symmetrical, as you step counterclockwise the number of flats in the key signature increases by one.
And, for diatonic harmonica players the circle of fifths is great for figuring out positions, harp keys, and the key of the music.
Given the key of the harp, each step clockwise on the circle of fifths is the key of the music for the next higher position.
Given the key of the music, each step counterclockwise on the circle of fifths is the key of the harp to use for the next higher position.
To figure the music key and position for any diatonic harmonica key, just number the harp key as 1, and consecutively number the other keys stepping clockwise around the circle. You don't need a big table. Just the Circle of 5ths.
We often play I, IV, V chord progressions in blues, country, rock, pop, and classical music. If you pick a key/root chord from the circle, the chord one step clockwise is the 5th, the chord one step counterclockwise is the 4th. So, it's easy to figure out I IV V by looking at the circle.
Most western music uses chord progressions from the Circle of 5ths,
and mostly the chords are in the range from tonic + 1 (i.e. the 5th) to
tonic - 4 steps. And, most often songs resolve by stepping directly clockwise
back to the tonic.
Examples help. Lets pick the key of C as the root, or tonic. Looking
at the circle, the chords from C - 4 to C + 1 are Eb, Bb, F, C, G. You
want to find a good sounding chord progression? Well, try some of these,
which just follow the about 2 rules: stay in that range, and step clockwise
back to the tonic.
Examples: C, F, C, G, F, C
Well, that's cheating. It's "just" a blues progression. It is the most basic progression that follows the rule!
Okay, lets extend it: C, F, C, G, Bb F C or how about C Eb Bb F C G C etc.
For improvisation, thorough familiarity with the Circle of Fifths is almost indespensible.
By the way, I never have to dig through a box to find the harp key I want. I keep my harps arranged according to the circle of fifths. I think this is a really good idea--extremely useful when jamming to music and trying to find the right key and position. Changing position is just a matter of picking the harp to the right or left.. you don't have to think about it. If the harp you try isn't right in any position you're comfortable with, it's easy to skip 2 or 3 to the right or left and get a harp where none of the keys in your comfortable positions overlap. This way, I usually find the right key within 3 or 4 tries at most. And, with your harps arranged this way the circle of fifths becomes well ingrained, second nature, and it's much easier to pick a particular key harp than when I had them arranged in "sequential" order (C, D, E..).
Think about the triads built on the notes of the major scale, for example the key of C. The first 3 triads are C E G, D F A, and E G B, which are the C major, D minor, and E minor chords. Look at the circle of fifths for minor keys and find the relative major keys for Dm and Em, the ii and iii chords in the key of C. The relative major for the ii chord is the IV chord, and for the iii chord is the V chord. The I IV V progression is just the first three chords of the scale with the relative major chords substituted for the minor chords!
Familiarity with the circle of fifths and chord substitutions will greatly enhance your understanding of music and your ability to improvise and write music.
Note that IMO the primary tone color you get from the MM is the Maj7 chord and note, rather than the dominant 7.
Here's a Melody Maker layout:
Hole: 1 2 3 4 5 6 7
8 9 10
Blow:[Eb G C Eb G]
Bb[Eb G] Bb Eb
Draw: F [Bb D F A]
C [D F A] C
And a Natural Minor layout:
Hole: 1 2 3 4 5 6 7
8 9 10
Blow: C [Eb G C Eb G]
C [Eb G] C
Draw: D G [Bb D F A]
Bb[D F A]
The brackets '[]' and coloring show where the notes are the same. Since the MM only modifies the first what-would-be draw C to a Bb, the other 2 C's on the draw don't align with the Bb's on the NM. On the blow side there's the same Bb/C mismatch, but much the rest is the same after NM hole 1.
So, the Maj7 chord on the MM--the Bb D F A in holes 2-5 draw--is right there on the NM in holes 3-6 on the draw. The Natural Minor actually has the Maj7 chord again! More than the MM... And, the Major6 and minor chords on holes 1-6 of the MM are there on the NM as well. The major chord on the high end of the MM is a minor chord on the NM...
Anyway.. the point is, there's a lot of overlap between the two tunings. Much of the flavor of the MM can be found on the NM. AND, every chromatic note except one--the Gb (flat 6th)--is in the middle Bb scale (so-called by Lee Oskar 3rd position) of the NM tuning. (The Db, E, Ab, and B require normal draw bends.)

Valves are flaps attached to the reed plate over the slot opposite the reed at the rivet. They are made out of a thin plastic strip, or pair of strips these days--though they used to be made of other materials such as leather. Valves are most often found on chromatic harmonicas, on which they are usually called windsavers. They do indeed function as valves, blocking the airstream during a draw from entering through the blow reeds (and vice versa for draw reeds) while allowing the airstream during a blow to exit via the blow-reed slot (again vice versa for draw reeds). And since they block the airstream from the opposite reed, less air is required overall to play a reed--thus they save wind, which is important on most chromatics because their mouthpieces and slide assemblies typically leak substantial amounts of air. Windsavers on chromatic are normally present for every reed, sometimes with the exception of the very highest notes.
Such is not the case on diatonics, which are generally much more air tight than their chromatic cousins. The valves on diatonics are not used as windsavers. They are used to facilitate valved bends.
A valved-bend is simply a bend on a reed whose paired-reed (i.e. in the same chamber) is valved. On the diatonic, not all reeds are valved. The valves are used to obtain bends not normally available on the diatonic harp. Normal bends are draw bends on holes 1 through 6, and blow bends on holes 7 through 10. A valved diatonic allows all the regular bends, plus blow bends on holds 1 through 6, and draw bends on holes 7 through 10. So, when valving a diatonic harp, the flaps are placed as follows:
Valved bends are a little different than normal diatonic bends. During a normal bend, both reeds in the chamber participate to produce the characteristic gutsy sound. These dual-reed bends tend to "snap" into place at the lowest note available. Valved bends are more delicate and require more control to execute cleanly and clearly. Only one reed participates in the generation of the sound, since the other reed is blocked by the valve. It is especially important not to attack the bend hard when you initiate it, otherwise it will choke off and not sound. It is also very important to bend "from your diaphragm" for valved bends. A pinching of the lips will not produce a good valved bend. Valved bends can be done on the chromatic, as well as a valved diatonic.
The only commercially available valved diatonic at this time is the
valved Suzuki ProMaster. But, with a little practice valving your own harp
will only take 5 or 10 minutes.
![]()
Valves interfere with overbends. For example, if a draw reed has been valved, an overblow is not possible in that chamber because the airflow cannot reach the draw reed during a blow. The bottom line is that you can't play valved bends and overbends in the same chamber.
I like valved bends, but I hate to give up the capability to do my favorite overblows. I set out to determine if there is a way to set up a Richter Tuned Diatonic (RTD) that has full chromatic capabilities using valves but without interfering with the most useful overbends.
The result is that valving the draw reeds in holes 1, 2, 3, and the blow reed in hole 8 is the optimal way to valve a harp which still allows full chromatic play without losing any useful overblows. A fully valved diatonic valves draw reeds 1-6, and blow reeds 7-10.
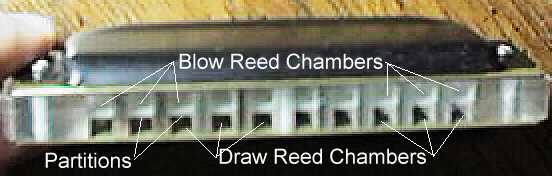
The Discrete Comb is the invention of Winslow Yerxa. It is essentially a thick comb (about 50% thicker than a normal comb) with a partition in each chamber to isolate the blow and draw reeds into discrete cells. Discrete combs are available for the Hohner MS (Modular Series) harps and for Lee Oskars. Prices are $25 for MS compatible combs and $35 for Lee Oskar compatible combs, plus $5 shipping and handling. To order one, write cheques (must be drawn on a U.S. Bank) to Harmonica Information Press and mail to:
Discrete CombBy the way, standard disclaimers apply here.. I have no financial or other interest in HIP or the Discrete Comb. It's a great invention, full of possibilities, and I just want to help inform everyone of its existance and capabilities.
203 14th Avenue
San Francisco CA 94118-1007
By covering both the upper and lower cells with the embouchure at the same time, a harp built on the discrete comb responds like a normal diatonic harp with the normal 2-reed bends. But, by tilting the harp a little up or down you can select a discrete chamber containing either a blow or a draw reed. By isolating reeds in this fashion, any reed can be played as a closing reed or an opening reed.
What this means is that
Normally, valves are used to isolate the blow reeds to allow single reed closing bends--and valves prevent overblows. The discrete comb allows both overblows and single reed closing bends.
The downside of the discrete comb is its thickness. The thicker comb is less comfortable to play, for me anyway, than a normal harp. The added thickness means you have to be more accurate with your embouchure to get clean single notes, since a more wide open lip/mouth position tends to let in more of the adjacent holes. However, these drawbacks are most likely due to limited playing experience with the discrete comb. The more you play on a discrete comb the more comfortable you are likely to get with its size and playing characteristics. You'll have to determine for yourself if the numerous benefits are worth the drawbacks.
A reed gap is the gap between the reed and the slot in the reed plate (see the picture above). The gap height greatly influences how the reed plays. A wider gap requires and allows more pressure to make the reed sound. If you attack notes hard a relatively wide gap can help keep the reed from "choking" and refusing to sound. A narrower gap allows less air to activate the reed. If you play softly, a relatively small gap can help the reed activate with a soft attack. If the gap is too small, like with the reed tip inside the slot, the reed will refuse to play.
The reed gaps need to be wider for longer reeds. In other words, the low notes should have slightly more gap between the reed and the reed plate than the high notes. In order for the harmonica to play smoothly and uniformly, the gaps must be consistent for every reed, with the slight adjustments applied for different length reeds. The nominal adjustment is for the gap to be about the same as the thickness of the reed.
For overblows, the reeds should be gapped relatively close to the reed plate. This can be crucial for obtaining overblows! An improperly gapped reed will just refuse to overblow.
Every bit of the reed should be above the reed plate, and the distance between the reed and the slot in the reed plate (the gap) should continually increase from the base of the reed (nearest the rivet) to the tip. If any of the reed dips into the slot, or if the reed arches up and then back down at the tip, the reed will not respond properly.
Harmonica reeds are essentially just brass springs that vibrate through slots in the reed plates to chop the airstream, which produces the sound. To adjust the reed gaps, just use your fingernails or a small tool to gently press the reed down, to close the gap, or up to increase the gap. After an adjustment is made, flick the tip of the reed a few times to get the reed to settle to its rest position--if you don't you can get fooled by the reed position. It can look one way, but revert back to where it was after you play a little--remember, it's a spring. Flicking the reed tip a few times is a good way to get the reed to settle so you can correctly determine its gap. It's best to bend the reed in very small increments, and not make over-adjustments. Slight over-adjustments are inevitable, but repeated bending one way, then the other, will weaken the reed and could even cause it to break.
Gapping is easy, safe, and a basic requirement for making a harp play well. Factory reeds are set to some average beginner gap, and are usually too wide--and most often inconsistent across the harp. I strongly recommend re-gapping your harps according to your personal playing style and needs.
Before attempting to remove metal from a reed you need to support the reed so you don't push it through the slot. A thin shim like a .003 spark plug gapper works well, as does a razor blade.
Be careful not to push the reed sideways in its slot, or the reed won't vibrate freely. Also, be careful about filing the reed edges, which can cause burrs that catch on the slot-edges as the reed vibrates through the slot. If you get a burr you can shave or file it off.
You need to use a chromatic tuner to check the pitch of the note. You may notice small pitch differences between a note played with the cover off and when the cover is in place.
Preamp tubes can also be used as the drivers for the output devices (the power tubes, typically). In this application, a 12AX7 will give more distorted power than a 12AU7 , which will sound sweeter and cleaner. A 12AT7 is even cleaner and brighter, giving more definition to the sound. (In some cases it is possible to change the sound by changing the type of preamp and/or driver tubes -- as with any mod, it's best to consult a qualified service center first.)
The power tubes are the larger ones inside your amp, and do the job of converting the signal from your instrument into the power needed to drive your speakers. There are several types of power tubes available, each offering different performance characteristics. For example, EL-34 power tubes tend to distort quickly and easily and give a creamier sound with a looser low end. These tubes are mainly manufactured in Europe and the ones responsible for the "English" or "British" tube amp sound. 6550 's are a more durably built tube, manufactured in the USA, and they stay cleaner even up to full power. When they do distort, it's with a more solid sound and a tighter low end: the "heavy metal" type of distortion, with lots of power. 6L6 tubes have a very good dynamic range and give the traditional "American Rock" sounds, while 6V6 tubes produce a creamy sound with nicer distortion. Most tube amps are designed around a specific type of tube, but many can be modified to accept a different type of power tube, to provide different sounds and performance. There are sets of tubes available that have been extensively tested and matched together for optimum performance and tube life. (Check your service center about your particular amplifier before changing tube types.)
When looking for tubes, the best ones to get are New Old Stock, or NOS tubes. These are tubes that are old stock, made when tubes was it! But they're new in that they've never been used before. You can order NOS tubes from http://www.angela.com/.
For information on Rod Piazza Custom Mics and the
Rod Piazza "Harp King" amplifier write to:
P.O. Box 21004
Riverside, CA 92516-1004
|
|
|
|
|
|
| Complete Classic Chicago Blues Harp | David Barrett | Mel Bay | 0-7866-0531-6 | with CD |
| Building Harmonica Technique | David Barrett | Mel Bay | 0-7866-0002-0 | with cassette |
| The Harp Handbook | Steve Baker | Hermann Demmler | 3-9802891-0-9 | with CD |
| Jazz Harp | Richard Hunter | Oak Publications | 0-8256-0229-7 | Advanced. with floppy record |
| Blues Harmonica Masterclass | Jerry Portnoy | n/a | n/a | 3 CD course with booklet |
|
|
|
The Blues - Volume 3 Blues Legends (Laserlight) Blues with a Feeling: Chess Collectibles, Vol. 3 [BOX SET] The Blues World Of Little Walter Confessin' The Blues Down Home Harp The Essential Little Walter Hate To See You Go His Best : The Chess 50th Anniversary Collection Quarter To Twelve Best Of Little Walter Best Of Little Walter, Volume Two
![]()
E-mail me at: myquill@hotmail.com
© Michael B. Will. All Rights Reserved.