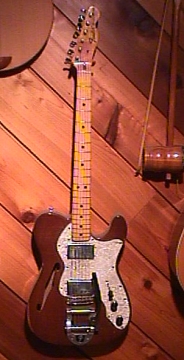
CLASSIC SERIES 72 TELECASTER THINLINE
http://www.fender.com//electricguitars/teles/classic/72telethin_specs.html
72 Telecaster® Thinline Specifications
Model Number 013-7402
Body Ash
Neck Maple
Fingerboard Maple (7.25" Radius/184 mm)
Scale Length 25.5" (648 mm)
No. of Frets 21
Width @ Nut 1.650" (42 mm)
Machine Heads Fender/Schaller "F" Style Machines
Pickups 2 Reissue Fender "Wide Range"Humbuckers, (Neck & Bridge)
Pickup Switching 3 Position Blade
Controls Master Volume, Master Tone
Pickguard White Pearloid
Bridge 70s Strat Non Trem
Unique Features Non-Veneered Semi-Hollow Body w/"F" Hole, "Bullet"
Truss Rod Adjustment
Strings Fender Super 250Ls (.009 to .042)
Accessories Deluxe Fender Gig Bag
TELECASTER SETUP GUIDES
Suggested by Fender
(Applies to most Fender electrics)
Necessary Tools
- Set of automotive feeler gauges (.002 - .025)
- 6" ruler (with 1/32" and 1/64" increments)
- Light machine oil ( 3-in-1, toy locomotive, or gun oil)
- Phillips screwdriver
- Electronic tuner
- Wire cutters
- Peg winder
- Polish and clothe
Strings
In order for strings to stay in tune well, they should be changed
on a regular basis. Strings that have lost their integrity (worn
where the string is pressed against the fret) or have become oxidized,
rusty, and dirty will not return to pitch properly. To check if your strings
need changing, run a finger underneath the string and feel for dirt,
rust or flat spots. If you find any of
these, you should change your strings.
Make sure to stretch your strings properly. After you have
installed a new set and have them tuned to pitch, hold the strings at the
first fret and hook your fingers under each string (one at a time)
and tug lightly, moving your hand from the bridge to the
neck. Re-tune and repeat several times.
Tuning Keys
First start by loading all the strings through the bridge and
then loading them onto the keys as follows:
Locking tuning keys - Imagine the headcap of the neck is
the face of a clock, with the top being at 12 o'clock and the nut
at 6 o'clock. Line the six tuning machines so that the 1st string keyhole
is set at 1 o'clock, the 2nd at 2 o'clock, the 3rd and 4th at 3 o'clock,
the 5th at 4o'clock, and the 6th at 5 o'clock. Pull the strings through
taut, and tighten the thumb wheel locking the string in. Now tune to pitch.
Standard keys - In order to reduce string slippage at the
tuning key, we recommend that you use a tie technique. This is accomplished
by pulling the string through the keyhole, and pulling the string
clockwise underneath itself and bringing it back over the top of itself;
creating a knot. You will need to leave a bit of slack for the 1st string,
so you have at least 2 to 3 winds around the post. As you progress down
the line to the 6th string you will reduce the amount of slack and the
amount of winds
around the keys.
Vintage keys - For these keys you will want to pre-cut
the strings to achieve the proper length and the desired amount of winds.
Pull the 6th string to the 4th key and cut it (make sure when you are pulling
the strings that you are pulling the string taut). Pull the 5th string
to the 3rd key and cut it. Pull the 4th string between the 2nd and 1st
keys and cut it. Pull the 3rd string just about to the top of the headcap
and cut it. Pull the 2nd string about a 1/2" past the headcap and cut it.
Finally pull the 1st string 1 1/2" past the top of the headcap and cut
it. Insert into the center hole in the tuning key, bend and crimp to a
90° angle, and wind neatly in a downward pattern (carefully as to prevent
overlapping of the strings).
If your tuning keys have a screw on the end of the button, check
the tightness of the screw. This controls the tension of the gears inside
the tuning keys. DO NOT over-tighten these screws. They should be tightened
to "finger-tight". This is very important especially on locking tuners.
Bridge
Telecasters can be found with two distinctive types of bridges.
The most well known bridge is the vintage style three-section bridge. The
other is the modern-day six-section bridge like the American Standard
Telecaster bridge. Check your tuning.
Intonation (Roughing it out)
You can pre-set the basic intonation of your guitar, by taking
your tape measure and measuring from the inside of the nut to the center
of the 12th fret (the wire, not the fingerboard). Double that measurement
to find the scale length of your guitar. For a vintage three section bridge
a series of compensations will need to be made to compensate for the lack
of individual string intonation adjustment. Adjust the 1st bridge saddle
to this scale length, measuring from the inside of the nut to the center
of the bridge saddle. Now, adjust the distance of the 2nd saddle back from
the 1st saddle, using the combination of the gauges of the 2nd and 3rd
strings as a measurement (Example: If the 2nd string is .011" and the third
is .013" you would move the 2nd saddle back .024" from the 1st saddle).
Move the 3rd back from the 2nd saddle, using the gauge of the 5th and 6th
strings as a
measurement.
For the six-section bridge you will make adjustments for each individual
string. Adjust the 1st string bridge saddle to the scale length, measuring
from the inside of the nut to the center of the bridge saddle. Now, adjust
the distance of the 2nd string saddle back from the 1st saddle, using the
gauge of the 2nd string as a measurement (Example: If the 2nd string is
.011" you would move the 2nd string back .011" from the 1st saddle). Move
the 3rd back from the 2nd saddle, using the gauge of the 3rd string as
a measurement. The 4th string saddle should be set parallel with the 2nd
string saddle. Proceed with the 5th and 6th in the same method used for
strings 2, and 3.
Lubrication and String Breakage
Lubricating all of the contact points of a string's travel may
be one of the most important elements in ensuring tuning stability, and
in reducing string breakage. First, let us explain some of the most common
causes for string breakage. The first and foremost contributor to this
happening is moisture collection at the point of contact on the bridge
saddle. This can be attributed to the moisture and acidity that transfers
from your hands or can be a direct effect of humidity in the air. Another
factor is
metal-to-metal friction and fatigue. The differences in the metal
components, over a period of time, react to each other and help breakdown
the integrity of the strings. The stronger metal will always attack a softer
metal (this is why a stainless-steel string will wear a groove or burr
in a vintage-style saddle). Finally, you will also find that different
string brands will break at different points of tension, due to the metal
make-up and string manufacturing techniques. Since we manufacture our own
strings, we are able to design and make our strings perform well for all
playing techniques. Now, one of the best ways to reduce string breakage
is to lubricate the string/saddle contact point with a light machine oil
(we prefer 3-in-1 oil, because it contains anti-rust and anti-corrosive
properties) every time you change your strings. The oil acts as an insulator
against the moisture, and reduces the friction and metal fatigue.
Another point that should be lubricated is the string tree(s).
For this point, a small amount of Chapstick®, applied with a toothpick,
works wonders.
Truss-Rod
There are two different styles of truss rods found on Fender guitars
and basses; the "Standard" truss rod and the "Bi-flex" truss-rod. Most
Fender guitars and basses are equipped with a "Standard" truss rod (there
are two types of "Standard" truss rod; one which adjusts at the heel of
the neck and one which adjusts at the headstock, but both operate on the
same principle). The "Standard" truss rod can counteract concave curvature,
for example: in a neck that has too much relief, by generating a force
in the neck opposite to that caused by excessive string tension.
Fender also uses a unique "Bi-Flex" truss rod system on some instruments.
Unlike the "Standard" truss rods, which can only correct a neck that is
too concave (under-bowed), the "Bi-Flex" truss rod can compensate for either
concave (under-bowed), or convex (over-bowed) curvature, by generating
a force in either direction as needed for the correction.
Check your tuning. Install a capo at the 1st fret, depress the
6th string at the last fret.
With a feeler gauge, check the gap between the bottom of the string
and the top of the 8th fret -- see the specification chart below for the
proper gap.
Adjustment at headstock (Allen wrench): If neck is too concave, (the
guitar in playing position, looking up the neck towards the keys) turn
truss-rod nut counter clock-wise. Too convex-- clockwise.
Adjustment at neck joint (Phillips screwdriver): If neck is too concave,
turn truss-rod nut clock-wise. Too convex--Counter clockwise.
Check your tuning, then check the gap again with the feeler gauge. In
either case, if you meet excessive resistance or need for adjustment, or
you're not comfortable with this adjustment, please contact the Custom
Shop.
Neck Radius
7.25"
9.5" to 12"
15" to 17" |
Relief
.012"
.010"
.008" |
Action
Players with a light touch can get away with lower action, others
need higher action to avoid rattles. Check tuning. Using 6" ruler, measure
distance between bottom of strings and top of the 17th fret. Adjust bridge
saddles to the height according to the chart, then re-tune. Experiment
with the height until the desired sound and feel is achieved.
| Neck Radius
7.25"
9.5" to 12"
15" to 17" |
String Height
Bass Side
5/64"
4/64"
4/64" |
Treble Side
4/64"
4/64"
3/64" |
Shimming/Micro-Tilt™ Adjustment
Shimming is a procedure used to adjust the pitch of the neck in
relation to the body. A shim is placed in the neck pocket, underneath the
butt-end of the neck. On many of the American series of guitars, a Micro-Tilt
adjustment is offered. It replaces the need for a shim by using a hex screw
against a plate installed in the butt-end of the neck. The need to adjust
the pitch (raising the butt-end of the neck in the pocket, thereby pitching
the neck back) of the neck occurs in situations where the string height
is high and the action adjustment is as low as the adjustment will allow.
To properly shim a neck the neck needs to be removed from the neck pocket
of the body. A shim approximately 1/4" wide x 1 3/4" long x .010" thick
will raise the action approximately 1/32". For those guitars with the Micro-Tilt
adjustment, loosen the two neck screws on both sides of the adjustment
access hole on the neckplate by at least 4 full turns. Tighten the hex
screw with an 1/8" hex wrench approximately 1/4 turn to raise the action
approximately 1/32". Retighten the neck screws when the adjustment
is complete. The pitch of the neck on your guitar has been preset at the
factory and in most cases will not need to be adjusted. Note: If you feel
you need this adjustment to be made and you're not comfortable with the
procedure, take your guitar to your authorized Fender Service Center.
Pickups
Set too high, pickups can cause a myriad of inexplicable phenomena.
Depress all of the strings at the last fret. Using 6" ruler, measure the
distance from the bottom of the 1st and 6th strings to top of the pole
piece. Rule of thumb-the distance should be greatest at the 6th string
- neck pickup position, and closest at the 1st string - bridge pickup position.
Follow the measurement guidelines from the chart as starting points. The
distance will vary according to the amount of magnetic pull of the pickup.
Texas Specials
Vintage style
Noiseless Series
Standard Single-Coil
Humbuckers
Lace Sensors |
Bass Side
8/64"
6/64"
8/64"
5/64"
4/64"
As close as desired |
Treble Side
6/64"
5/64"
6/64"
4/64"
4/64"
(allowing for string vibration) |
Intonation (Fine Tuning)
Adjustments should be made after all of the above have been accomplished.
Set the pickup selector in the middle, volume and tone controls to
the max. Check tuning. Check each string at the 12th fret harmonic
to fretted note (make sure you are depressing the string evenly to the
fret). If sharp, lengthen string by adjusting the saddle back. If
flat, shorten string by moving the saddle forward. Remember guitars are
tempered instruments, retune, play and make further adjustments as needed.
(Note: In the event you have a three section style bridge, compensate between
the strings to minimize the percentage any one string that may be sharp
or flat. Listen for an aurally pleasing intonation).
Additional Hints
There are a couple of additional things that you can do to optimize
your tuning stability that have more to do with playing and tuning habits.
Each time that you go to play your guitar, before you do your final tuning,
play for a few minutes to allow the strings to warm-up. Metal expands when
warm and contracts when cool. After you have played a few riffs, bent a
few notes, you can then do your final tuning. Remember that with most tuning
keys it's desirable to tune up to pitch. However, with locking tuners go
past the note, and tune down to pitch. Finally, wipe strings, neck, and
bridge with a lint free clothe after playing. When transporting or storing
your guitar, even for short periods, avoid leaving it anyplace you wouldn't
feel comfortable yourself.
TELECASTER REFERENCES ON
THE WEB
Official Fender Musical Instruments
Site
Official Danny Gatton Site
Bill
Hillman's Telecaster Journals
Telecaster Shootout
Fender Discussion Page
Telecaster
Nitty-Gritty pictures
Fuzzy's Telecaster Page
Lindy Fralin Telecaster
Pickups
Guitar Solos &
Picker Bios
Guitar Chord Finder
Guitar Player Mag Online
Hot Country Rock Guitar Licks &
B-Benders
Stringbender
Brad's Page of
Steel
Bigsby
Website
|