|
|
|
|
|
|
|
|
|
|
|
|
|
|
|
|
|
|
|
|
|
|
|
|
|
|
|
|
|
|
|
|
|
|
|
|
|
|
|
|
|
|
|
|
|
|
|
|
|
|
|
|
|
|
|
|
|
|
|
|
|
|
|
|
|
|
|
|
Final Installations
|
|
|
|
|
|
|
|
|
|
|
|
|
I am assuming that you have reached this step after achieving the proper wear
pattern and backlash previously. As a result, the pinion bearing should
already
be installed onto the pinion gear with shim between the head and the bearing
and the carrier shims already selected.
|
|
|
|
|
|
|
|
|
|
|
|
|
- Slip the crush sleeve over the pinion gear.
|
|
|
|
|
|
|
|
|
|
|
|
|
|
|
|
|
|
|
|
|
|
|
|
|
|
|
|
|
|
|
|
|
|
|
|
|
|
|
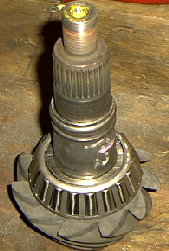
The crush sleeve placed on the pinion gear. Notice the splines on the
top of the gear.
|
|
|
|
|
|
|
|
|
|
- Slide the pinion gear through the housing from the rear. Install the pinion yoke over the end of
the pinion gear.
|
|
|
|
|
|
|
|
|
|
|
|
|
|
|
|
|
|
|
|
|
|
|
|
|
|
|
|
|
|
|
|
|
|
|
|
Sliding the yoke over the splined end of the pinion gear.
|
|
|
|
|
|
|
|
|
|
During your initial installation of the pinion gear you should have "practiced" setting the bearing preload
so this should be easy the second time
around.
|
|
|
|
|
|
|
|
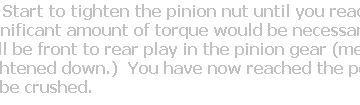
- Install the pinion nut on the end of the pinion gear and slowly tighten it down until it is hand tight. At
this point there should still be front to rear
play in the pinion bearing.
|
|
|
|
|
|
|
|
|

|
|

|
|
|
|
|
|
|
|
|
|
|
|
|
|
|
|
|
|
|
|
|
|
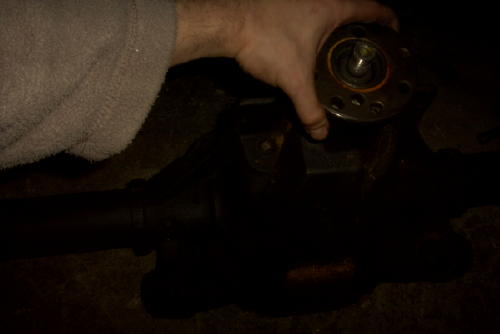
Tightening down the pinion nut. Notice that in order to keep
the pinion and yoke from spinning with the turns of the pinion
nut.
|
|
|
|
|
|
|
|
|
|
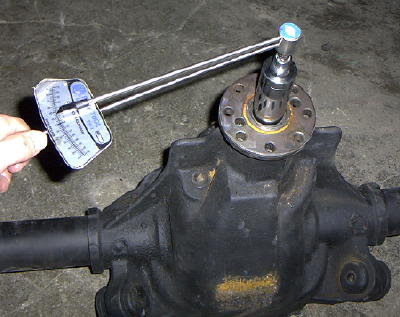
- Slowly turn the pinion nut which should be fairly hard to tighten because to tighten is to compress
the crush sleeve. The torque necessary should be
well over 100 ft./lbs. Turn the pinion nut about
1/8 of a turn, then use your torque wrench to check the bearing preload as was done previously.
Continue to
alternate between a 1/8 turn and a check of the bearing preload until a reading of 10
- 14 in./lbs. (if reusing old pinion bearings) or 18 - 28 in./lbs. (if using new
pinion bearings) is reached.
|
|
|
|
|
|
|
|
|
|
|
|
Do this very slowly and very carefully because if you reach a preload over the spec. you should not loosen
the pinion nut to reduce the preload. Once you go
over the spec. you must use a new crush sleeve (which
will be a pain in the ass if you don't have another handy.) You must sneak up on the bearing preload
specification.
|
|
|
|
|
|
|
|
|
|
|
|
|
|
|
|
|
|
|
|
|
|
|
|
|
|
|
|
|
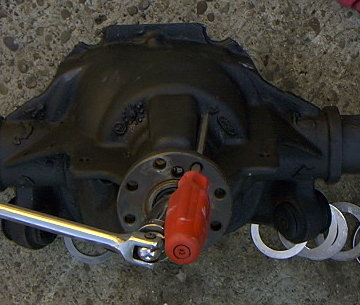
Using the 1/4" torque wrench to read bearing preload. It
is not very noticeable from the picture but the in./lb. torque
wrench is 1/4" drive and the
pinion nut commands using
a socket which is 1 1/16". This socket is 1/2" drive. I needed
two adaptors: one to go from 1/4" to 3/8" and the second
to go from 3/8" to
1/2".
|
|
|
|
|
|
|
|
- Next install the carrier into the housing. Start by applying a small amount of gear lube to the carrier
bearings. The best order to proceed from my
perspective is to first place the carrier into the housing
with carrier races on the ends but without carrier shims. Then, on each side, slide the thinnest shims
in
place (as these cannot be tapped into place because they are too thin.) Finally, install the largest
shims on each side tapping them into place when
necessary.
|
|
|
|
|
|
|
|
- Install the bearing caps and bolts on the same sides they were removed from during disassembly.
Torque the bolts down to 85 ft./lbs.
|
|
|
|
|
|
|
|
|
|
|
|
|
|
|
|
|
|
|
|
|
|
|
|
|
|
|
- Slide the axles into the axle tubes and through the splined side gears of the differential. Using a magnet
or needle nosed pliers install the C-clips
on the end of the axles. Then, push the axles outward to their
final resting place.
|
|
|
|
|
|
|
|
|
|
|
|
|
|
|
|

|
|
|
|
|
|
|
|
|
|
|
|
|
|
|
|
|
|
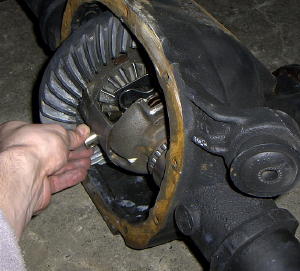
Look directly into the middle of the differential and
you will see the S-spring. The axle has been pushed
into the housing and on the end you can see that
the
C-clip has been slid onto it.
|
|
|
|
|
|
|
|
|
|
|
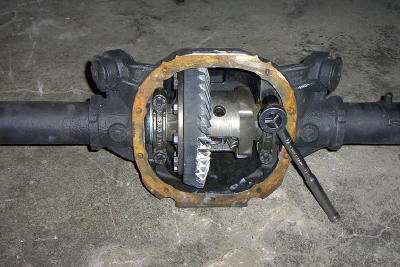
- Slide the pinion shaft bolt through the pinion gears. Install the pinion shaft retaining bolt and torque
to 333333333.
|
|
|
|
|
|
|
|
|
|
|
|
|
|
|
|
|
|
|
|
|
|
|
|
|
|
|
|
|
|
|
|
|
|
|
|
|
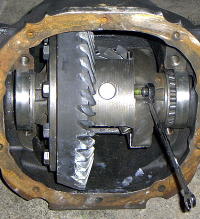
Push the pinion shaft retaining bolt through the pinion
gears. In the picture there is gear marking compound
on the ring and pinion: AT THIS POINT YOU
SHOULD HAVE
ALREADY CLEANED OFF THE GEAR MARKING COMPOUND.
(this picture was taken out of sequence.)
|
|
|
|
|
|
|
|
|
|
|
|
|
|
|
|
|
|
|
|
|
|
|
|
|
|
|
|
|
|
|
|
|
|
|
|
|
Install the pinion shaft retaining bolt.
|
|
|
|
|
|
|
- The final step is to install the cover. Your choice is to either use a gasket or RTV gasket maker. My gasket
came with the Ratech kit but looked to be
little more than a piece of a brown paper bag that was cut to
fit. I decided to use both the gasket and RTV.
|
|
|
|
|
- Using a 3/8" drive extension and ratchet remove the gear oil fill plug. Fill the rear with friction modifier
and three quarts of gear oil. Reinstall
the fill plug.
|
|
|
|
|
|
|
|
|
|
|
|
|
|
|
|
|
|
|
|
|
|
|
|

|
|
|
|
|
|
|
|
|
|
|
|
|
|
|
|
|
|
|
|
Back to Contents
|
|
|
|
|
|
|
|
|
|
|
|
|
|
|
|
|
|
|
|
|
|
|
|
|
Next
|

