
 |
 |
|
||||||||||||||||||||||||||||||||||||||
|
 |
|
||||||||||||||||||||||||||||||||||||||
 |
||||||||||||||||||||||||||||||||||||||||
 |
||||||||||||||||||||||||||||||||||||||||
 |
|
|||||||||||||||||||||||||||||||||||||||
 |
||||||||||||||||||||||||||||||||||||||||
|
||||||||||||||||||||||||||||||||||||||||
|
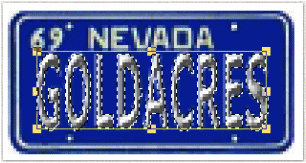
1. Open your blank plate. If you make your own it should be 100 x 50 pixels and should have a rounded beveled edge like a real license plate would. 2. Select the Text tool and set up as follows.
3. Depending on the length of your name you may need to lower the size of your font so that it will fit in the plate. One problem you will notice is that the letters aren't really tall enough. The next step will fix that.
4. Save as UFO and name it final. 5. Press Control +d or right click and choose Duplicate. Close the one you saved. |
||||||||||||||||||||||||||||||||||||||||
|
 |
|
||||||||||||||||||||||||||||||||||||||
|
||||||||||||||||||||||||||||||||||||||||
|
Plate images shown are Zoomed to 400% |
||||||||||||||||||||||||||||||||||||||||
 |
||||||||||||||||||||||||||||||||||||||||
|
||||||||||||||||||||||||||||||||||||||||
 |
||||||||||||||||||||||||||||||||||||||||
|
||||||||||||||||||||||||||||||||||||||||
|
6. Erasing the letters to make the frames. To make it easier to see what you are doing select the ZOOM tool and click on the image as many times as necessary using the left mouse button.
|
|
|||||||||||||||||||||||||||||||||||||||
 |
||||||||||||||||||||||||||||||||||||||||
 |
||||||||||||||||||||||||||||||||||||||||
|
 |
|||||||||||||||||||||||||||||||||||||||
|
7. Assembling the Annimation.
|
|
|||||||||||||||||||||||||||||||||||||||
 |
||||||||||||||||||||||||||||||||||||||||
 |
||||||||||||||||||||||||||||||||||||||||
8. Setting up the toolbars. Unless you have used the Animation program before you will need to turn on the Frame Manager.
|
|
|||||||||||||||||||||||||||||||||||||||
|
||||||||||||||||||||||||||||||||||||||||
|
 |
|||||||||||||||||||||||||||||||||||||||
|
||||||||||||||||||||||||||||||||||||||||
 |
|
|||||||||||||||||||||||||||||||||||||||
9. Click on the Preview tab or the right facing arrow under the Frames to run the animation. Most likely it will not be in the correct order and will run much to fast. But this gives you a chance to see what needs to be moved. Stop the animation by clicking on the Edit tab or the stop button under the frames.
Timing the animation.
10. Saving & Optimizing.
Be sure you don't just click the Icon. By default it will save in UGA format and your animation won't be viewable in that one except in Gif Animator. |
|
|||||||||||||||||||||||||||||||||||||||
|
||||||||||||||||||||||||||||||||||||||||
|
 |
|||||||||||||||||||||||||||||||||||||||
|
||||||||||||||||||||||||||||||||||||||||
|
 |
|||||||||||||||||||||||||||||||||||||||
|
||||||||||||||||||||||||||||||||||||||||
|
 |
|||||||||||||||||||||||||||||||||||||||
|
 |
|||||||||||||||||||||||||||||||||||||||
|
 |
|||||||||||||||||||||||||||||||||||||||
|
||||||||||||||||||||||||||||||||||||||||
