

Evening Star
https://www.angelfire.com/stars4/eveningstar/
https://www.angelfire.com/stars4/eveningstar/
dpixel261@yahoo.com
This tutorial I believe is an advanced tut but it really isn't that difficult.This tutorial requires:
Lets Begin:
Create a new image 300 x 300 pixels, transparent background. Open the angelwing.psp. Change your foreground to gradient, find the Ultraviolet gradient or a gradient similar. Change your settings as follows:

Then change your background to white. Flood fill your image with white. Then flood fill with the gradient.
Then go to effects, plugins, VM Natural, sparkle. Add. You can change the size and amount of sparkle, this is up to you.
Then go to Gregs Factory Output, pool shadow. Reduce only the intensity to 62. Apply.
Add a new astor layer. You are welcome to keep this tube but please do not add it to another tutorial. Save it under files as a tube and name it esangelwing.tub
Add a new layer to the image your creating, select your tubes tool, find esangelwing, but first resize it to 75%. You can sharpen it if you wish.Then move it to the left, center.
Duplicate this layer. Then mirror it.Now position both wings until they overlap slightly at the lower inner tips.
Your background should still be white. Change your foreground to null. Take your preset shapes, change shape to ellipse, vector and antialias checked. Make sure you are on the top layer wing. Draw an ellipse starting at 138,133 ending at 187, 207. Move it down, centering it over the bottom tips of the wings. Convert to rastor. Select all, select float.
Go to effects, Eye Candy 4000, gradient glow, setting Flourescent Tubing. Your settings should be:
| Glow Width | 22.58 |
| Soft Corners | 25 |
| Opacity | 50 |
| Second Tab Color: | |
| First Color | #FF0155" |
| Second Color | #FFC5DE |
| Third Color | white |
| Forth Color | white |
| Fifth Color | #FFC5DE |
| Opacity | 80 |
Go to effects, Eye Candy 4000, Corona, Magnetic Flux. Use the same settings, except change the color purple to white and set the glow width to 64.13. Duplicate this layer, then go to the original, not the copy. Go to effects, geometric effects, curly q's. The columns and rows should be set at 7, size to 90%, strength to 23, clockwise. apply. Then go to effects, blur guassian blur, radius 2.00.
Click on each of the wngs and apply the same corona, except change the glow width to 30.96.
Make certain your on the top layer. Change your background layer to #FDC3D6. Foreground should still be null. Draw an oval, small. No bigger than 3/4's the size of the center glow. Node edit. Change the nodes as follows

I resized it a bit more. Then add your favorite bevel. I then lowered the layers opacity to 57 and centered the heart.
Change your background to null, and change your foreground to color #FBD069. Get your preset shapes tool, chnage the line width to 4, line solid and draw a small halo which is an oblong oval.
 Convert to rastor. Angle it slightly. Convert to rastor.
Select all, select float, effects, texture effects,Sculpture, gold setting, but make changes as follows:

Then go to effects, plugins, gregs factory output and apply the shadow as is. Open the esstar.tub and apply at size 47. Move the halo up and to the left. Add one more star to the heart. You can add words if you want or add your favorite frame.
Hope you enjoyed this tutorial.
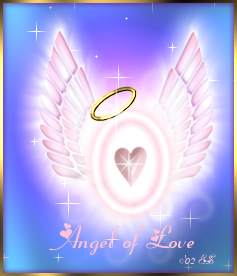
Graphics by Evening Star ©'02
All Rights Reserved.
