
![]()
"Creating
the Probable Impossibility."
NRN
DESIGN - VFX

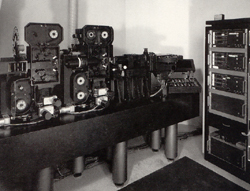
Optical Printers.
The Anderson- Named after Howard Anderson, who built the printer for use on the Ten Commandements
The L.S. - Named after John Ellis, the camera operator who built the printer by hand.
The Work Horse - Built in
1982 when budgets were tight, with the rationalization this printer would
save time and money and pay
back its development.
The Quad - Designed by Richard
Edland for The Empire Strikes Back, built as a double printer with four
projectors prior to The Return of the Jedi until
the Work Horse was put to use. The lenses are custom designed by ILM
to produce an image so sharp and clear that the only limitation to the
detail
was the film grain. This and the Work Horse feature computerized control
systems. (shown below)


How Optical Printers work.
#1 - A projector shines the front strip of film over the strip before it. (#2)
#2 - This strip of film has the image we are trying to composite into the scene. (TIES, Live Action Footage, etc).
#3 - This lens focuses the elements from strip #1 and #2 to be composited to the final film strip (#4)
#4 - This strip of film already has its own image on it, such as the image of a Matte Painting, motion backgrounds, etc.
#5 - The camera that photographs
all the films composited together in the lens's eye. To this camera, the
images appear to blend together with
crystal clarity, save for the grain of the film which produces the
final illusion of all the elements existing in the same place.
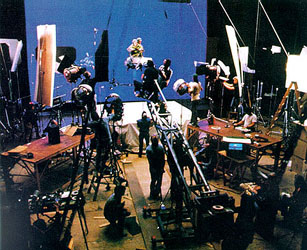
Preparing for Film.
The Blue Screen Process -
Special screens are used to substitute a scene shot with live action or
miniatures which will then later be replaced
by matte paintings or other environmental effects. Blue was used mainly
for metals and grays, while currently green is more sought after because
it
does not conflict with skintone. The blue is "keyed out" which means
it is turned transparent so other objects can be composited in its place.


Let's take a look at a basic blue screen set
up in which I'll use the example of Chewbacca "magically" joining the
Battle of Geonosis in Attack of the Clones.
The original footage of Chewbacca in the falcon set, where only blue
panels depict the exterior of the vessel.
Here the blue has been "keyed out". The gray represents the transparency
in the image.
Here is the background plate we want to composite into the scene.

Here is the final composite with a slight blurr applied the background
and light adjustments of Chewbacca joining the impossible battle!
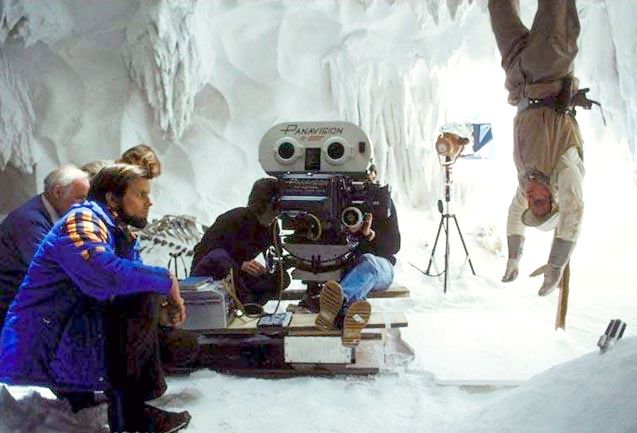
Basic Set Construction -
The bare minimum to film a scene which usually consists of no more then
live actors, a few foreground elements, and blue/green
screens scattered throughout, whose positions are tracked and numbered
for later composited elements such as CGI or other visual effects.
In this case, the blue screen is where Leia, Luke, and the droids stand
gazing to a swirling galaxy which is later composited once the blue screen
is keyed out.
There is nothing beyond the basic setup of the window on the actual
stage, what the camera cannot see, does not matter in the capture of the
shot.

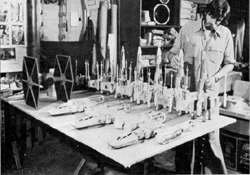
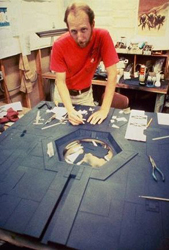
Miniatures- Used to simulate
larger scale objects, built on smaller scales where a full sized prop cannot
be attained or cannot function the
way the director wishes it to. Miniatures may also be submerged or
rigged with pyrotechnics for explosion sequences and fitted with internal
lights to simulate lighting effects.

Props and Live Action - A
prop is anything that is not nailed down on a set, which can range from
weapons, equipment, boxes, clothing,
to single elements like door frames and or wall panels. Live action
is live actors filmed against the blue/green screen or miniature effects.
Keying out the Blue Screen.
Removing Blue Screen - This
is also known as "keying out" the blue or green elements from shot footage.
Currently this is done digitally with compositing
programs such as After Effects, Combustion, Commotion,
and Premiere, or with plug ins like DV Matte or Ultimatte.
However, we will say for the sake of
demonstration that these methods are not avaible to key out and composite
footage of Luke and Leia flying at great speeds through the Forest of Endor
in Return of the Jedi.
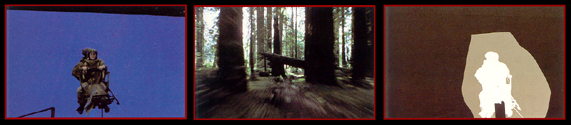

Let us label the above images as Figures #1, #2, #3, #4, and #5.
Figure #1 - Carrie Fisher
and Mark Hammil are filmed against the blue screen, with fans blowing on
them to simulate
flying at great speeds. (1000 miles per hour)
Figure #2 - A backwards walk
with a glidecam through the woods shoots only 1 frame every few seconds.
When played back on screen at
24 FPS, the pace speeds up by 5000%.
Figure #3 - Remember those
hand cut mattes in the rotoscoping section? Same thing applies here, which
we will call the Cover Matte which consists
of a Garbage Matte (grey) traveling over the footage, staying stable
over most of the screen while the Traveling Matte (white) follows the
movement of the two actors on the bike. The black area actually covers
most of the blue screen as its own Matte.
Figure #4 - From the Cover
Matte, a final Holdout Matte is created, being the silhouette of the actors
and the bike. The area that the silhouette
covers will keep that section of the film unexposed when Endor (figure
#2) is rephotographed next to it. The space can then be filled in with
the
image of Luke and Leia that the Cover Matte will let us create.
Figure #5 - The composited
frame with Endor replacing the blue screen completely. Currently as stated
before, we can just drop in our footage, run
a plug in or do a few actions and avoid the TEDIOUS nature of the matte
creation process above, then plunk our background plates into place, render,
and enjoy the work! Thank your lucky stars we now live in a age where
the frustration of keying has been limited.
Now view the exciting, high speed footage of the Speeder Bike chase
from Return of the Jedi by clicking here.
Creating Optical Magic.
Background to Foreground
- When compositing a scene, the elements must be shot from the background
to the foreground so that every element
such as ship exhaust and other methods are placed with the proper illusion
of depth and perspective. This however can change if such elements do not
directly overlap eachother, such as smaller ships composited in the
extreme background.
Photographic Mattes - As shown in the Speeder Bike demonstration, a main element is seperared from its background or vice versa.
Pin Registration - In order
for every composite to be absolutely flawless in the layered exposure process,
special pins keep the composited perfectly
aligned so that nothing is shifted out of place, which can be either
seperate mechanical devices, or inside the camera's themselves.
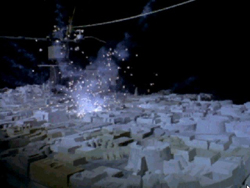
There can be an unlimited amount of exposures in a single shot, this
is known as Multiple Exposures or "Layering" the shot. A perfect
example is the
flock of TIE fighters swarming like a hornets nest at the Rebel Forces
in Return of the Jedi.

In order of composite..
1. Background/Space plate.
2. Middleground/Endor Plate
3. Foreground/Mon
Calamari Cruiser
4. Death Star II
5. Rotoscoped Superlaser
Beam
6. Reflected light on Mon
Calamari Cruiser.
7. X-Wing
8. A-Wing
9. Rebel Transport
10. Secondary Rebel Transport
11. Distant Fighters
12. Very Distant Fighters
You can view the final footage of a extensive, 125+ exposure composite
sequence of a swarm of TIES here.
![]()
![]()
