
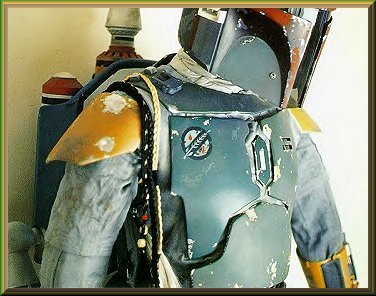
Boba Fett Chest Armor
This page contains some Chest Armor tips.
Follow the links to see more detailed armor instructions.
 Fett from Magic of Myth |
 Fett from the SW chronicles |
Some tips specific to chest piece weathering
* The first thing to remember is, Do Not paint the underside of the armor!
Just lightly sand the underside so that all glue and Velcro will have something to hold on to.
If you paint the underside, whatever you use to attach th armor, such as glue or Velcro, will only stick to the layer of paint, not the plastic.
* Some sugest using different shades of women's eyeshadow to dirty up your emblems and jumpsuit. Be sure to stick with earth tones.
* Be sure to make your "battlescars" large enough so they will show up from a distance.You will want them large enough to be seen in any pictures or on camera.
* Remember that most of the scars have another color outlining them. You can see yellow surrounding the silver.
For additional tips to paint and weather the armor, use any of the techniques discribed on the
paint and weather page.
Attaching the armor to the vest
Three diffrent methods of attaching the armor.
Alternative #1
Bolt attachment method
You will need:
Styrene sheets
(or similar material) from a plastic supply house,
or hobby shop.
You will need enough material to make
slightly smaller sizes, of each piece of armor to be attached.
Flat head machine screws
(long enough to pass through your new sheet of plastic,
the vest and a hex nut)
Heavy duty epoxy,
a pencil and some sandpaper.
The first step, is to trace each piece of armor, onto the styrene/plastic sheet(s).
Cut out, trim and sand the edges of this new piece until
it will fit inside the outer armor with about a 1/8" space,
all the way around.
Next,drill a small hole into this new piece,
at each location you feel the armor should be connected.
(This will likely be the corners)
These holes only need to be slightly larger then the
screws-bolts that you decide to use.
Each hole will represent a bolt, so drill as many or as
little you are comfortable with.
Now, center the new "inner" piece of armor onto the
backside of your "outer" armor piece and mark with a pencil,
the center of each drilled hole.
Use some sandpaper and rough up each of these areas.
Now, you will need to place the inner armor piece into the oven,
for a few minutes.
Only long enough to make it slightly soft and flexable.
Remove this piece carefully with oven mits and
place it back onto the outer armor piece.
Press it down until it takes the shape of the outer armor.
As soon as it has the shape of the outer armor,
place it under some cold water to cool it down fast.
This will help the material to retain the shape of the
outer armor.
Next, fit the two pieces together and again, mark the center of each hole.
These marks are locations you will attach the bolts
Use 2-part heavy duty epoxy (found at most hardware stores
to attach the bolts. Apply some of the mixed epoxy to the
heads of the screws and place them onto the marked areas.
When the epoxy dries, test fit the inner armor piece.
Now, you are ready to fit the armor to the vest.
Line up the outer armor piece with your vest and make
a small hole in the vest, where each bolt touches.
Next, attach a grommet to the vest
in each spot
the bolt will pass through. This grommet should only be large enough for the bolt to just fit through.
Instead of a grommet, you may choose to make a button hole.
Use a sewing machine, to make a button-hole stitch around the hole, to prevent it from fraying.
Now, hold the outhe armor to the vest and pass the screws trough the vest holes.
Place the the inner armor piece inside the vest and slide it onto the bolts, pressing the two pieces of armor together.
Finally, put the nuts on and tighten them down (by hand only)
To wash your vest, remove the nuts and take the plates off.

This is an excellent example of bolt attachments
Alternative #2
Using Velcro for the armor attachment
Use 2" wide industrial sticky back velcro to attach it. Use the sticky back part on bare plastic only,
this will ensure that the adhesive is secure to the armor, and not on a layer of paint.
Place the adhesive Velcro on the backside of the armor ,then use any strong adhesive to attach the corresponding pieces of velcro on the vest. Some suggest the velcro will cause the armor stand out too far, others insist that it is not that noticeable.
One advantage of Velcro over the glue method (discribed below) is, the vest can be easily washed if needed.
Here is a great example of Velcro attachments

Alternative #3
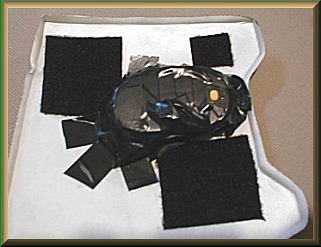
When it is time to attach the armor to the vest, Finally, whatever attachment technique you decide on, Armor extras Here is a great solution for the lights, The many versions of the light have a row of little LED's, with 4 patterns to choose from They should last 8 to 10 hours on two AAA batteries. Be sure to look for a 'Personal Safety Light'. You can place two pieces of window tint where the holes were cut. then carefully place the light in its location. Just take the plastic red cover off and fasten them with duct tape or glue to your armor behind the layer of window tint. It works just by taping it back there and sealing extra light leaks from behind - then using some creative Velcroing.
If you chose instead to glue your chest armor directly to your padded vest,
be certain that you do not paint the area of the back, where the glue will be applied. If this area is not free of paint, the glue will not have a stable base to adhere onto. You will only need to lightly sand this area before applying the glue.
A good glue recomendation is, a large tube of Liquid Nails. It will cost about as much as a two small packs of Crazy glue. You wll end up buying several tubes of glue compared to one or two tubes of Liquid Nails and both products seem to hold the armor well.
it is recomended that you wear the vest during the process.
If you attach the armor to the vest without wearing it, you may find it does not fit corectly.
Put the vest on and have someone else apply the Velcro/ glue along with armor pieces.
Having your body shape in the vest, while attaching the armor, will allow the pieces to properly fit your body.
You may find that the armor tends to flare away from the sides of the vest
Here are some suggestions to correct the problem.
If the armor flares outward from the vest on the sides, try cutting strips of industrial Velcro, at least a quarter of an inch wide and just under the length of the armor.
Keep both pieces of velcro attached together, apply strong adhesive to the already sticky back of the velcro.
Then, attach the Velcro between the armor and vest.
Another sugestion
is the use of contact cement, on both the vest and the armor.
Or, plain superglue to hold down the edges.
To make your costume really stand out, try some of these options
Armor Lights
Try replacing the standard black bars on the chestplate with LED's.
There should be 4-5 in each row, flashing in a slow, random and easy pace.
They should look best, hidden behind window tint.
Place a LED bank of 5 LEDs, going across horizontally, on the chest piece.
To do this ,try a 'Personal Safety Light' for a bicycle! They can be found in the Bicycle/Sports section at places like Target, Sears & K-Mart.
1 all lit
2. Blinking
3. scanning back and forth
4. Random
Do not be confused by cheaper versions that simply flash on and off.
One good suggestion is to use the Multi-Pattern LED bank at Sears. This light has a red plastic cover
on it and is a long oval shape.
This red cover must be removed.
Perhaps the greatest thing about it is that there ARE no loose wires to speak of! They are totally self contained - batteries and all.
You can use other LED's for blinking colored light in the triangles of the helmet, as described on the Helmet page. Installing these various lights will create excellent "functioning" suit type F/X !
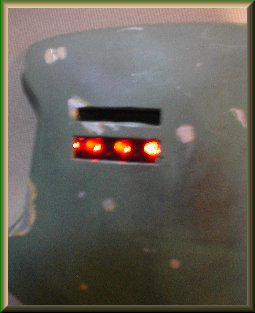 |
 Chest display using the safety light |
Another idea for lights,
If you are unable to find the safety lights, another option is auto shops, such as
'Pep Boys' or 'Track Auto'.
Look for the 'fake' alarm warning lights. They offer the same multi pattern LEDs but are a bit more expensive. You could also
try 'Radio Shack'. They should have everything you need.
 Boba Fett Main Page |

Return Home |
