

As in all aspects of costume replication, you will need to have reference photos.
Here is a small collection of boot reference pics
Remember, there is a vast amount of reference material out there, with only some minor searching.
There are two choices to achieve a nice pair of Fett boots.
One is to find and work with a cobbler/Boot maker to create a pair of boots from your gathered reference material.
The second is to create your own.
When starting to research the boots,
they apear to be one of the more difficult pieces, of the Fett costume.
Although, after some investigation, you will quickly find the boots are not so hard to create.
First you will need to choose a 'base boot.'
An existing pair of boots that you can create the new boots from.
The Soles
You should start with the soles because it is one of the main factors to consider, when determining your base boot.
The soles of the shoes are an "off white" color. Reference photos show the boots with various degrees of dirt and grime.
The soles appear to be the darkest in the Pre-production photos. These photos also show the weathering, on the sole, has worn off around the edges allowing the original lighter color to show.
Cepe rubber is an off white color and is possibly the material that the soles were made from.
Suggestions for base boots.
Due to the proper looking sole, the Towncraft Wallaby is one of many good suggestions.
These can be found at JC Penney

Also listed as Towncraft� Moc-Toe Demi Boot
These boots will however need some minor preparation, before convertion.
To prep these boots,
you will First, need to remove the laces.
Next, cut the stitches and remove the piece of leather that covers the top of the foot.
Also, remove the top strip of leather, that wraps around the ankle.
Next, cut the "U" shape out of each side of the boot to allow for the large pieces of elastic.
Although the material, used for the boots, does have a suede like appearence, most agree that it is canvas or a similar material.
Many reference photos show the boots with the material worn away,
and the texture of the material visible.
You may decide to find the proper coloer material or color an existing material with gray craft acrylic enamel,
made for fabric and leather.
It is suggested that the material you choose be sewn or bonded over a slightly stronger material, allowing the boot to hold its shape.
Now, you will need to cut the patterns, from your chosen material.After you have your spats made to fit the boot properly,
it is time to glue them to the boot surface.
Use an adheasive that will bond well with your
boot surface & material. One decent choice is
"Shoe Goo"
You can find it at most hardware stores and in the sports or shoe section of larger stores.
Before you glue the spats on, rough up the area of the shoe, where the spats will be placed, with 40-60 grit sand paper.
This will give a slightly rough surface for the adhesive to stick.
Start gluing the fabric at the toe first and work your way toward the back. Be sure that the fabric conforms to the baseline of the boot.
* To allow you to easily slip your foot in and out of the boot,
you may chose to leave one side of the elastic piece
(on the left or right side of the boot) unlglued,
and use a velcro closure instead.
The black piping
Take a look at close shots of the boots.
It appears that the side flanges, of the black shoe piping, are sewn in-between and under the edges of each cloth section.
You may choose to locate and sew the proper piping strips or
rubber strips, strips of leather, or plastic wire covering may be used to create the piping.
Boot Cuff
The boot cuff is a separate piece and did not attach to the boot.
The cuff wraps around the ankle and attaches, above the heal, with Velcro.
As suggested by the BYOBF site:
...You may want to sew one end of the cuff to the boot to assure it doesn't come off while walking....
Toe Plate
The toe plate may be made from any thin strip of aluminum
you may also use brass or plastic, painted silver.
After this piece is trimed and bent to shape, it will attach to the toe with either screws or epoxy.
If you choose to use screws, an identical piece may be attached over the first one, to hide the screws.
Two holes (for inserting the toe spikes) will need to be drilled into the toe plate,
in their proper location.
Toe Spikes
The foremost suggestion is machined metal
Another suggestion is to use two pieces of acrylic rod, wooden dowels or thick plastic coat hangers.
A few simple cuts and you will have wood/plastic rods that can be sanded to any desired point.
Some other options are Bullet style arrow tips, or even molded from Sculpey clay.
The finished spikes are then glued into the predrilled holes.
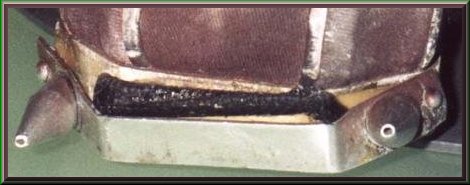 This pic from the 'Art of SW' shows the boot tip after it has fallen free of the boot edge. |
|
|
Because the small holes in the original spikes resemble |
|
Weathering the boots
Finally, dirty the boots with anything from,
mists of black and earth tone paints, eye shadow, pastels, or even...dirt.
|
|

Return Home |


